Selecting the Environment Options
| < Day Day Up > |
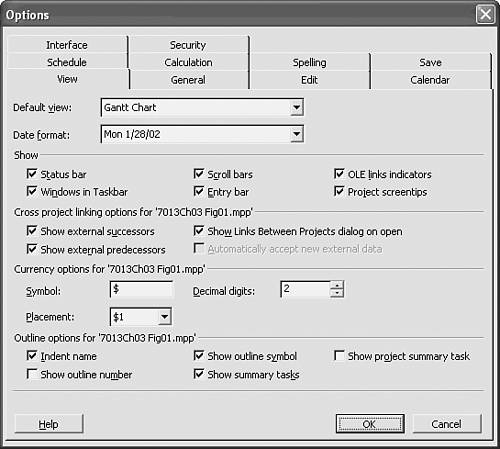
| Microsoft Project makes many assumptions regarding projects. You can review these default settings, which control the behavior of the application, in the Options dialog box. The options are divided into two types: global and file-specific options. To display the Options dialog box (see Figure 3.8), choose Tools, Options. The options in this dialog box are conveniently organized into categories on a number of tabs. Figure 3.8. The View tab is the default tab in the Options dialog box. Most of the settings in the Options dialog box affect the way you view all projects, and are referred to as global options. Changes you make to global options affect projects that have already been created, the current project you are working on, and any future projects you create. For example, changing the date format (which might include hours and minutes instead of just rounding to the day) affects all projects, including those that you originally created with a different date format. The new format remains in effect for all projects until you change the setting again. Some of the options in the Options dialog box are specific to the file you are currently working with. These options include the filename in the section title. For example, the dialog box in Figure 3.8 shows three sections that contain file-specific options: Cross Project Linking Options for 'New Product,' Currency Options for 'New Product,' and Outline Options for 'New Product.' Changes made to these settings affect only the current project you are working onin this case New Product.mpp . Any options that are not part of a section or for which the section title does not include the filename in the title (such as the Show section in Figure 3.8) are global options. The Cross Project Linking Options For section of the View tab controls links between projects. For example, the setting in this section in Figure 3.8 is set for the active file onlythe default is to display all external links. In addition, when you attempt to open a file that contains links to other projects, a dialog box alerts you that the file has external links.
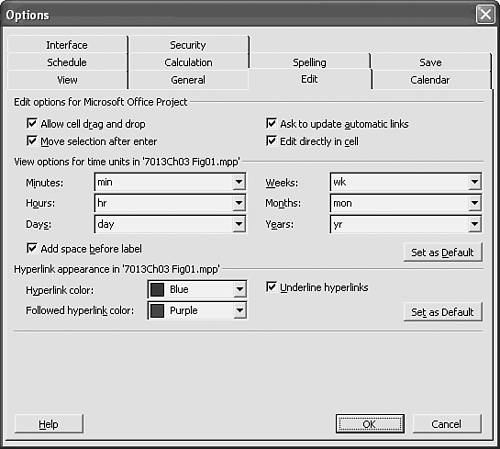
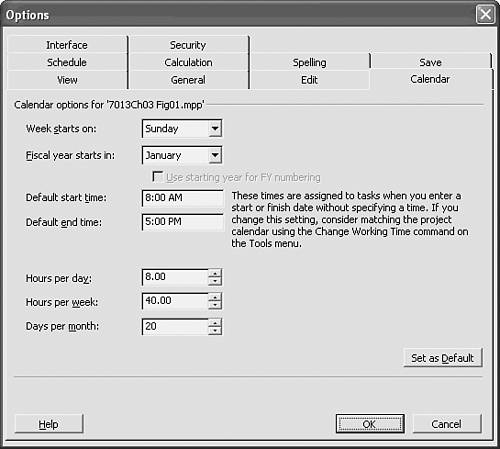
NOTE If the Office Assistant is active, the external link message appears in an Office Assistant pop-up. In some cases, file-specific options can be changed for the current file and new files if the section containing the file-specific settings has a Set as Default button (see Figure 3.9). If you click the Set as Default button, Project updates the Global template to reflect the option settings. The Global template controls the settings for all new project files. The current document, as well as all new project documents, incorporates these options, but previously created documents do not change. Figure 3.9. The Edit tab of the Options dialog box has two sections that include Set as Default buttons . The following sections focus on a few choices in the Options dialog box that are critical in defining any new project and a few options of general interest. NOTE All changes you make in the Options dialog box are saved in the Windows Registry. Reviewing Critical OptionsThere are several important settings on the Calendar tab that you should confirm are appropriate for your organization. These options determine how the calendar is used on printed reports , how your fiscal year is designated, and, most importantly, how your use of the terms day, week , and month are interpreted by Microsoft Project 2003. Figure 3.10 shows the settings on the Calendar tab. Figure 3.10. The Calendar tab of the Options dialog box enables you to customize project plan settings to your organization's working hours. Defining Days, Weeks, and MonthsThe three most critical settings are those that define the meaning of the basic task duration unitsdays, weeks, and months. The fundamental unit of time in Microsoft Project 2003 is the minute. When you enter any other unit for a task duration, Project internally converts these terms into minutes, based on the definitions in the Options dialog box. All calculations dealing with duration are carried out in minutes. When you ask Microsoft Project 2003 to display a task duration in days, weeks, or months, Project uses these settings to convert the display. Therefore, the options Hours per Day, Hours per Week, and Days per Month are crucial to the interpretation and display of your estimates of task duration (refer to Figure 3.10). Thus, for example, if you estimate a task duration to be 2 days, Project uses the entry in the Hours per Day text box to internally set the duration to minutes. If the Hours per Day entry is 8.00, the duration is recorded as 960 minutes (that is, 2 daysx8 hours/dayx60 minutes/ hour ). If the Hours per Day entry is 10.00 and you estimate the duration to be 2 days, then the task duration is recorded as 1,200 minutes, which is much more work than if the Hours per Day entry is 8.00. You need to make sure these settings are appropriate for your organization. For example, if you work for an organization that has a 4-day work week (that is, each employee works 10 hours per day for 4 days each week), you should change the Hours per Day field to 10 and leave the Hours per Week field at 40. If your organization normally works 8 hours per day Monday through Friday and 1/ 2 day Saturday, you might prefer to change the Hours per Week to 44 so that when you estimate a task to take a week, the duration means the same thing to Microsoft Project 2003 as it does to you. Note that the definition of the task duration is set at the time you estimate it, according to the definition of the terms you use (day, week, or month). If you later change the definition of a day, for example, to be 10 instead of 8 hours, Project does not change the minutes defined for each task duration. However, the display of those minutes in days or weeks is affected.
CAUTION If you change the definitions for a day, week, or month after you enter the project data, Microsoft Project 2003 doesn't redefine the minute duration of tasks; it merely displays these minutes as a different number of days or weeks. For example, if you originally entered the duration of a task to be 1 week (at 40 hours per week) and later changed the number of hours in a week on the Calendar tab from 40 to 44 hours, the duration for the task would read .91w. The task would still be 40 hours, but 1 week would now be equal to 44 hours, not 40. This is one reason for establishing option settings before entering task and duration information. Defining the Default Start and End Time of DayWhen you define the working days, hours, and months for the Standard calendar (see "Defining a Calendar of Working Time," later in this chapter), you define the hour when work normally begins and ends. It's important that you also record those standards in the Default Start Time and Default End Time text boxes on the Calendar tab of the Options dialog box. Microsoft Project 2003 uses these settings in several places:
For example, say that the normal work hours for an organization are 7:00 a.m. to 4:00 p.m. If you define these hours in your Standard calendar but leave the setting for Default Start Time at 8:00 a.m., Microsoft Project 2003 schedules the first task in the project to start 1 hour later than the actual start of work. In addition, when you use the Tracking toolbar buttons to designate the percentage completed for a task, the time a task started is assumed to be the default start time from the Calendar tab in the Options dialog box. Even though time might not be displayed as part of the Start Date field format, it is stored with the date. So if the Standard calendar hours are from 7:00 a.m. to 4:00 p.m. and you mark a task as 100% complete, the actual start date shows the task starting at 8:00 a.m. and the actual finish date shows the task ending the next day at 8:00 a.m. If only the dates and not the time are displayed in the Start and Finish Date fields in the Gantt Chart view, it appears that there is an errora task with a duration of 1 day (8 hours) starts on one day but ends on the next day. The culprit is typically an inconsistency between the time used on the Standard calendar and the time designated on the Calendar tab of the Options dialog box. TIP It's a good idea to display a date format that also displays time. The Date Format setting is on the View tab of the Options dialog box. If you change the default start and end times, be careful to coordinate these time settings with the Standard calendar you create for your organization.
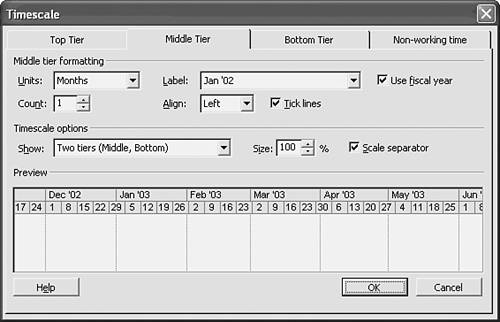
Defining the Start of the Fiscal YearThe name of the month that begins the fiscal year is a critical option. This choice affects displays and reports that show annual and quarterly amounts. If the fiscal year begins in October, for example, you might want all reports to include October through December figures in first-quarter totals and the annual figures to be calculated by using the October through September figures. The Fiscal Year setting is on the Calendar tab of the Options dialog box. By default, the fiscal year is assumed to be numbered by the year in which the fiscal year ends. Therefore, the year in which the fiscal year ends will be used with all months in that fiscal year. For instance, if the fiscal year begins October 2003 and ends September 2004, then the actual calendar month November 2003 would belong in the fiscal year that ends in 2004. On the Calendar tab, you have the option to have the fiscal year numbering use the starting year instead of the ending year (see Figure 3.11). If you select the Use Starting Year for FY Numbering check box, a fiscal year running from October 2003 to September 2004 would have the calendar month of February 2004 belong in fiscal year 2003; the second quarter of fiscal year 2003 would be the calendar months January, February, and March 2004. Figure 3.11. You can change the Fiscal Year Starts In option if you want to set some month other than January as the beginning of the fiscal year. TIP The Fiscal Year Starts In and Use Starting Year for FY Numbering settings are file-specific settings. If you want to change these settings for all future project files as well as the active file, click the Set as Default button near the bottom of the dialog box. In some previous versions of Microsoft Project 2003, changing the Fiscal Year Starts In setting in the Options dialog changed the display of the calendar in the timescale of the Gantt Chart view; since Project 2000, this has not been the case. You can either retain the calendar year or show the fiscal year. To choose whether to retain the calendar year or show the fiscal year, you must access the Timescale dialog box by either choosing Format, Timescale or right-clicking the timescale headings in the Gantt Chart view and choosing Timescale from the shortcut menu. The Timescale dialog box appears. To display the fiscal year instead of the calendar year, click the Use Fiscal Year check box (see Figure 3.12). Figure 3.12. The timescale headings can display fiscal years instead of calendar years . You can display the fiscal year on either the major or minor scale of the timescale, which is the first or second calendar displayed. A useful display would be to have the fiscal year on one scale and the calendar year on the other scale, using the same unit for both scales . NOTE You can only change settings in the timescale of the current view. To update the timescale in another view, such as the Task Usage or Resource Usage view, you have to display that view and change the Timescale settings there. The timescale display in the Gantt Chart view uses fiscal year numbers instead of calendar year numbers only when the timescale is formatted to display the year, not when displaying months or days. Setting Options in the Calendar TabTo set critical calendar preferences, follow these steps:
TIP Some organizations change the hours to reflect the hours they expect to work on the project minus the hours needed for other activities (for example, to account for meetings that normally happen in the course of a 40-hour work week). You might change Hours per Day to 6h, allowing 2 hours per day for other activities. This type of change is a judgment call on your part. If you change the hours in this way, make sure the Hours per Week and Hours per Month fields are changed as well.
Setting Other Useful OptionsYou can change other settings to make data entry easier. It is a good idea to review the current settings in the Options dialog box for each of the following items:
|

 To learn how Microsoft Project 2003 interprets duration,
| < Day Day Up > |
EAN: 2147483647
Pages: 283