Managing Enterprise Resources in Resource Center
| < Day Day Up > |
| In this view, users can perform the following functions:
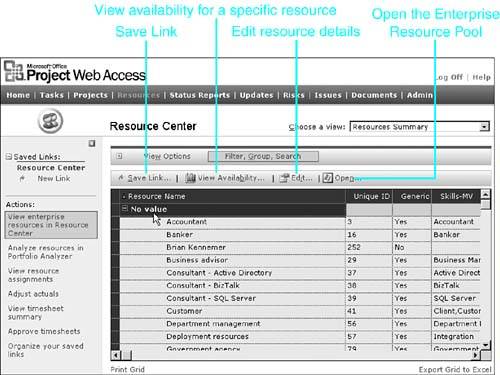
CAUTION You have the option of selecting a single or multiple resources to be opened in Project Professional 2003 for editing. If you go back to Project Web Access and select additional resources to be opened, then the second group of resources will open with a new session of Microsoft Project Professional 2003. Make sure you treat each instance where you have Enterprise Global Resource Pool opened as a separate session. This means that you must save changes in both sessions for changes to occur. Changes to the Enterprise Resource Global Pool will not be reflected immediately. You need to select Refresh in Project Web Access to view the updated information. Using the Resource Center's View OptionsYou can use the Resource Center's View Options tab to refine the content of the data being displayed. By clicking in the View Options tab, you will see the list of View options available, or you can click the plus and minus sign icons at the left side of the tab to expand or collapse the View Options display. All of the Resource Center View Options are listed below, organized by View. View Enterprise ResourcesUnder the View Enterprise Resources there are three options from which you can select to display the desired view:
View AvailabilityUnder the View Availability there are three options from which you can select to display the availability of resources:
After all the desired options have been selected, click on the Set Dates button to generate the graphic representing resource availability. View Resource AssignmentsUnder the View Resource Assignments you will find:
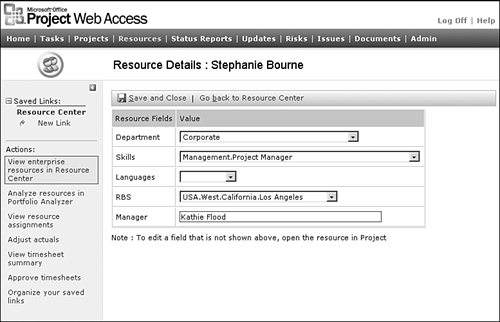
Using the Resource Center's Filter, Group, Search TabYou select the Filter, Group, Search tab to display or hide the Resource Center's filtering, grouping, and searching options. The options associated with the Resource Center's Filter, Group, Search tab are identical to that of the Project Center, the only difference being that you are operating on resource data instead of project data. Edit Resource Details ViewBy selecting a resource from the initial Resource Center view and selecting Edit Resource Details, you can see and edit (if you have the appropriate permissions) the resource's enterprise resource outline codes, as shown in Figure 27.3. Figure 27.3. Use the Edit Resource Details screen to view and edit Enterprise resource outline codes. You can have only one resource selected when you navigate to the Edit Resource Details screen. If you have more than one resource selected, you are prompted with an error message. Resource Availability ViewsFour predefined Resource Availability views are available from the Choose a View pull-down list:
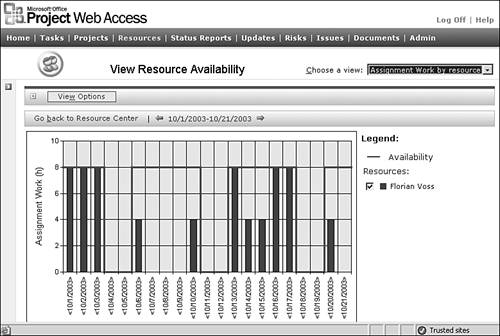
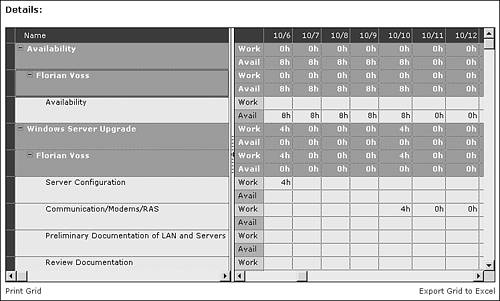
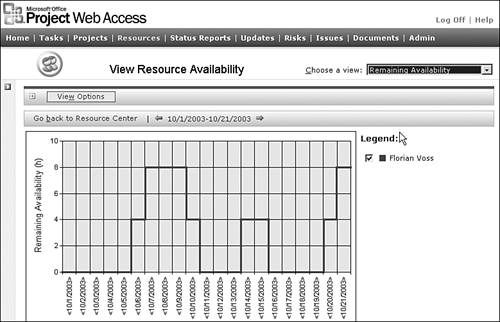
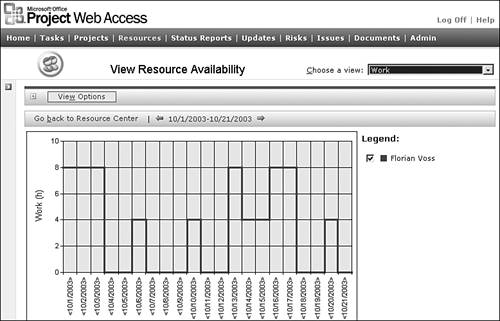
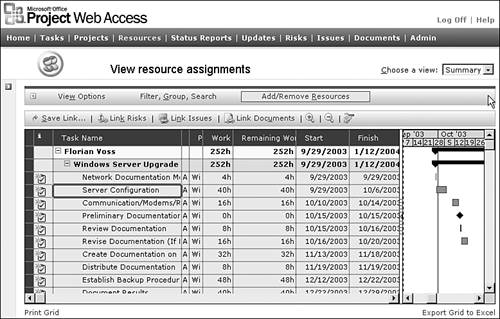
The Resource Center views provide ways for you to look at resource utilization across the enterprise. If you select the resource Florian Voss and click the View Availability button, for example, you can immediately see Florian's allocation displayed graphically, as shown in Figure 27.7. Analyzing Resources in Portfolio AnalyzerIf you navigate to Projects, Analyze Projects in Portfolio Analyzer, you get exactly the same view, and tools, as if you were in Web Access and selected Resources, Analyze Resources in Portfolio Analyzer. Viewing Resource AssignmentsThe Viewing Resource Assignments screen is similar to Project's Task Usage view in that it displays details for each assignment (for example, task name, percentage of work complete) per resource, as shown in Figure 27.8. This view is useful for those who need access to this type of information but don't have access to Microsoft Project. Figure 27.8. Assignments for the selected resource (Florian Voss) are grouped by resource, by project. To view the resource assignments, you have the option of selecting all resources or only specific ones. This can be accomplished through Add/Remove Resources tab in the View Resource Assignment view. The screen will display two panes. The left pane is a scroll-down list from which you select the resources you wish to view the assignments for, and the right pane tells you what resources have been selected for display. You have the option of adding all resources, or removing all resources. Click the Apply button to set the parameters once your selection is complete. After selecting a task, you can click the Link to Issues icon to navigate to the Issues page for the selected task. From the Issues screen you can create a new issue or create a link to an existing issue. After changes have been saved via the Save Changes tab, you can return to the Resource Assignments screen by selecting the Go Back to Assignments option. After selecting a task, you can click the Link Documents icon to navigate to the Documents page for the selected task. From the Documents screen you can upload a new document, or you can link the task to an existing one. After changes have been saved via the Save Changes tab, you can return to the Resource Assignments screen by selecting the Go Back to Assignments option. Resource assignments can be shown in either a Gantt chart format or a timesheet format. The Show Assignments Using section assumes a Gantt chart format, with items that are unique to a timesheet format. You have the option of displaying all assignments or restricting the view to current assignments, where current assignments are defined as those already in progress or that start within a specified number of days from the current date. The specified number of days is set by the administrator. The assignments are displayed in a grouped structure of tasks by resource, by projects. Both generic and specific named resources are displayed. For each resource within each project, the tasks are sorted in the same sequence in which they would be found in the project plan (by task ID). If you click on the Task Name column heading cell , the fields are sorted into alphabetically ascending sequence within project. If you click the cell again, the sort sequence is changed to alphabetically descending. Viewing Resource Assignments in Timesheet FormatResource assignment data can also be displayed in timesheet format, which shows the actual effort recorded against each assignment. There are two differences between the Timesheet format view and the Gantt chart view:
Adjusting ActualsProject Web Access provides for a new feature that allows project managers to adjust actual work previously submitted. There are two main benefits of this new feature:
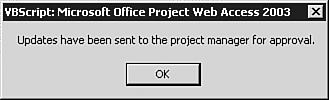
Project managers use the Resource Center Adjust Actuals function to modify time data. By clicking on Add/Remove Resources tab, the project manager will select the individual resources for timesheet data adjustment. When you click on the Apply button, the timesheet data for the selected resource(s) is displayed for editing. Once the desired timesheet view is displayed, the project manager can then enter the corrected actual work for the appropriate dates. To complete this operation, you must click on the Update Actuals button to apply the changes to the project schedule; otherwise all changes will be lost. The changes are sent to the project manager for action as a normal project time update request, as shown in Figure 27.9. Figure 27.9. Corrected actual work for the date range is also being sent to the project manager for final approval NOTE The Update Actuals function also alters the Actual Work Protected data in the date range for the affected task(s). This allows you to alter timesheets data even if the date range is closed for edits. The team member whose timesheet has been altered will see the new time entries in their personal timesheet view. You should create a business process to ensure timesheet data integrity is maintained . View Timesheet SummaryWhen all projects are published, the team members will see their assigned tasks within their personal timesheet. Team members fill in the amount of time they spend on each project (including the Administrative projects tasks), and submit their time for regular timesheet updates. Approved TimesheetsProject Web Access 2003 now provides the ability for multiple people to approve timesheet information before the time data is updated to a project schedule. The benefit of this function is to distribute responsibility for timesheet approval to people other than the project manager(s). After Project Web Access administration settings are complete, the home page of approvers (who may be project or resource managers, portfolio managers, or any other individual nominated to approve timesheets) will display messages indicating that there are timesheets awaiting approval. You can then accept or reject individual task timesheet rows submitted by the team members. NOTE It is up to the organization's senior and/or executive management to decide who has the authority to approve timesheets, and business processes should provide clear instructions in this regard. The timesheet approver marks the tasks as Accept or Reject, as appropriate. As a timesheet approver, click the Save button to forward the accepted tasks to the project manager for update to the project schedule; rejected tasks will be returned to the timesheet submitter for revision. Project Web Access 2003 also has a new feature to allow timesheet approvers to track the status of timesheets of team members within their direct supervision. A timesheet approver will see messages on their Home page indicating what timesheets have not yet been submitted. This feature provides an improved method to determine which resources within an organization have not yet submitted their timesheets. |

| < Day Day Up > |
EAN: 2147483647
Pages: 283