Using the Common Customization Controls
| < Day Day Up > |
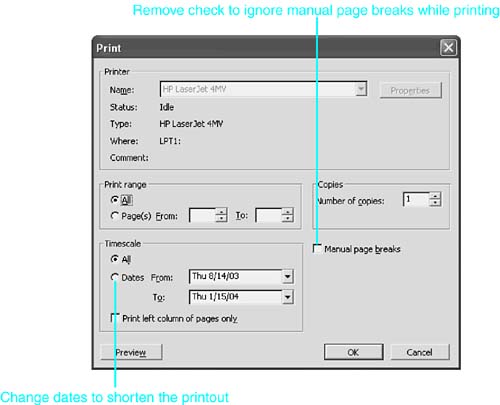
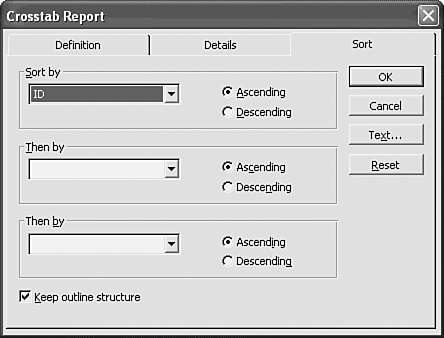
| With some custom options, the steps to make the changes are the same, regardless of whether you are changing an existing predefined report, a copy of a report, or a newly created report. You can change the way reports look by changing the text format, the page setup options, or the order in which the information is sorted. The following sections describe some of the common custom options. Controlling Page Breaks in a ReportYou cannot put page breaks directly into a report. However, when a report is printed, Project normally maintains the manual page breaks you have inserted in a task or resource list. (Manual page breaks are added by using the Insert, Page Break command.) You can tell Project to ignore page breaks by clearing the Manual Page Breaks box in the Print dialog box (see Figure 22.19). Figure 22.19. You can override manual page breaks through the Print dialog box. Choosing the Page Setup Options for a ReportWhile you're modifying a report, you might decide you'd prefer it to have different margins or to display a different header. These changes are controlled by the page setup. To access the page setup options from the Custom Reports dialog box, click the Setup button. If you are previewing the report, click the Page Setup button at the top of the preview screen. No matter how you access the Page Setup dialog box, the options you have are the same. Formatting Text in a ReportAlthough some of the editing options differ from report type to report type, you can always format the way the text appears in the report. To do so, click the Text button in the report definition dialog box. If the dialog box has multiple tabs, the Text button appears on each tab. Note that the text styles are automatically displayed when you edit the Project Summary report, because this is the only option you can customize on that report. In Figure 22.20, the Overallocated Resources report is being edited. Figure 22.20. You can click the Text button on any tab of a report definition dialog box to begin customizing the font styles used in a report. The Text Styles dialog box allows you to select special formatting for categories of tasks or resources and for the detail information included on the particular report. The box resembles the dialog box that appears when you choose Format, Text Styles from the main menu. Use the Text Styles dialog box to make certain types of information stand out in a report by changing the size , font, or formatting of categories of text. Specific information choices depend on the type of report you are modifying. The default format of each category is 8-point type with no distinguishing characteristics, unless specified in parentheses. By default, all text in the report will be affected by your choices, unless you select a specific type of information in the Item to Change drop-down list. There is no connection between the text format in a view and the text format in the corresponding report. When you're formatting text in a report, you need to format the text separately for each individual report and separately from the text format shown in the current view. For example, even if summary tasks are formatted as blue in the current Gantt Chart view, they will not appear in blue in a task report unless you select Summary Tasks in the Text Styles dialog box and apply the blue color . Changing the Sort Order for a ReportYou can sort the order of the rows in all Task, Resource, and Crosstab reports. From the definition dialog box for any report, select the Sort tab to access the sorting options for the report. The Sort tab in the Crosstab Report dialog box (shown in Figure 22.21) looks similar to the Sort By dialog box that you open by using the Project, Sort, Sort By command. The options on the Sort tab allow you to sort by as many as three fields in the report. Each Sort By field can be sorted in ascending or descending order. The field used for sorting does not have to be included in the report itself. Figure 22.21. To change the sort order of the rows displayed in a report, use the controls on the Sort tab. When you're sorting the information in a report, there is no connection between the sort displayed in a view and the sort selected in a report. Therefore, you can print a report sorted by a specific field, such as Priority (for tasks) or Name (for resources) without affecting the task order in the current working view. Collapsing Task Detail in a ReportTwo settings affect the level or type of tasks that appear in Task, Crosstab, or Monthly Calendar reports: the outline level of the tasks and filters. If the outline is collapsed in the view when you print a report, the subordinate tasks that are hidden are not printed in the report. You must expand the outline before you print the report if you want all tasks to be displayed. However, the reports ignore any filter that might have been applied to the current view onscreen. You can select filters within the report definitions to be automatically applied, regardless of the filter that might or might not be applied to the active view. Note, however, that subordinate tasks hidden by a collapsed outline at the time the report is printed are not included in the report, even though the defined filter usually selects these tasks. Collapsing an outline overrides the filter. |
 For additional information on how to change setup options,
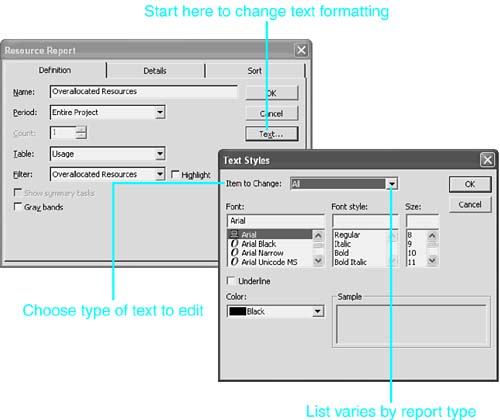
| < Day Day Up > |
EAN: 2147483647
Pages: 283