Customizing Reports
| < Day Day Up > |
Customizing ReportsVarying degrees of report customization are available in Microsoft Office Project, depending on the type of report. You can customize reports to change the way they look or the details of the information presented. You can start with an existing report and change the text formatting, the layout orientation, or the header and footer that appear when the report is printed. You can alter the details of the report by applying a different table or filter or by choosing a different sort order for the report.
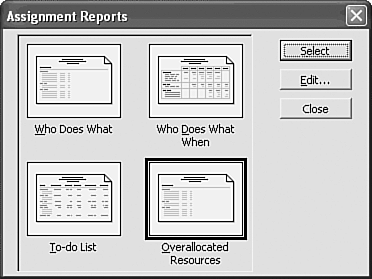
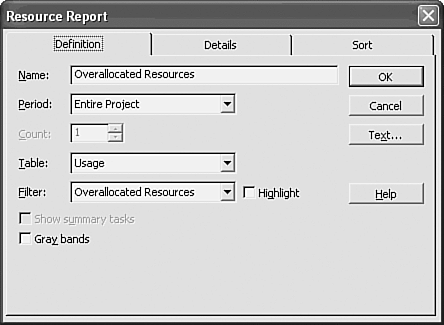
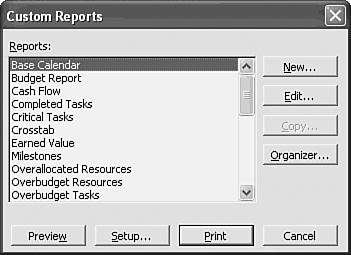
The Custom category in the Reports dialog box allows you to customize any of the existing predefined reports or create your own reports. This section explores the range of options available to those who want to develop customized reports adapted to their project communication needs. Customizing an Existing ReportIn Microsoft Office Project you can customize an existing report or create a custom report by making a copy of an existing report and make changes to the copy. You can customize an existing report in two places: from within the specific category in which the report is listed and from within the Custom category. (Earlier sections of this chapter describe the standard predefined reports.) To change a report from within a specific category, double-click the category or click once on the category and then click Select. In Figure 22.14, the Assignment category has been selected and the Overallocated Resources report has been chosen . The Edit button in the Assignment Reports dialog box allows you to edit the contents of the report. Figure 22.14. You can edit the content and level of detail while working in a category of reports. Clicking the Edit button shown in Figure 22.14 displays a dialog box with the editing changes you are allowed to make. The choices in this dialog box depend on the type of report you are modifying. Figure 22.15 shows an example of this report definition dialog box for a Resource report. Figure 22.15. The choices displayed in the report definition dialog box vary depending on the type of report you are editing. The editing choices listed in this dialog box are the same choices that would be available if you were editing the report through the Custom category (see the section "Customizing Specific Report Types," later in this chapter). TIP It is recommended that you not customize the predefined reports, but instead make a copy of a report, using it as a basis for a new report. This way, the original report is left intact for you to use at a later time. If you have already made changes to a predefined report, see the section "Undoing Changes to a Predefined Report," in the "Troubleshooting" section at the end of this chapter. Using the Custom Category of ReportsThe Custom category can be used to make content and level-of-detail changes to reports. All reports available within Project can be accessed through this category, as shown in Figure 22.16. Figure 22.16. Open the Custom Reports dialog box to select a report to customize or to create a new report. From the Custom category, you can do the following:
The New and Copy buttons in the Custom Reports dialog box function almost identically to the Edit button. However, the end result of using both New and Copy is a new report name that is added to the Custom Reports list. You use New to design a report from the ground up. You use Copy to use an existing report as a starting point for a new report. In both cases, editing begins at the Custom Reports dialog box. After you've modified or created a report, you can print or preview the custom report directly from the Custom Reports dialog box by clicking either Print or Preview. NOTE The Copy button is dimmed for the Base Calendar and Project Summary reports because these reports can be edited only for simple text-formatting changes. |
| < Day Day Up > |
EAN: 2147483647
Pages: 283