Adding Code to Your Program
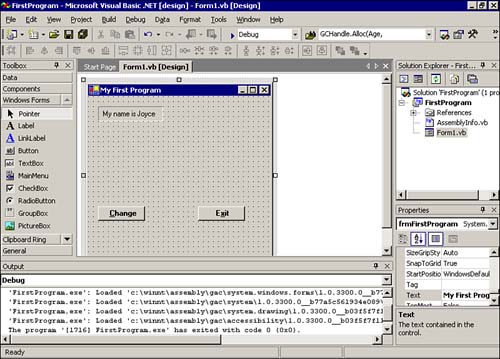
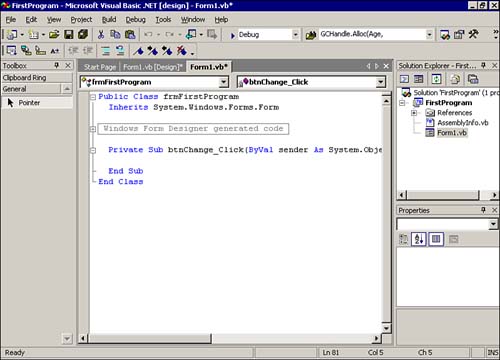
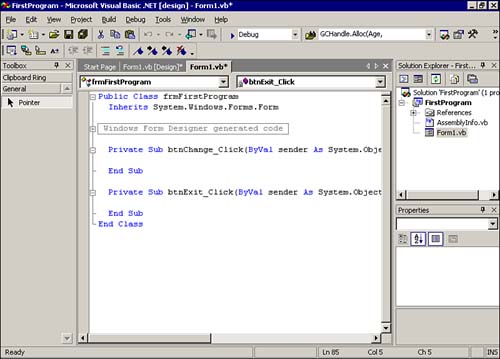
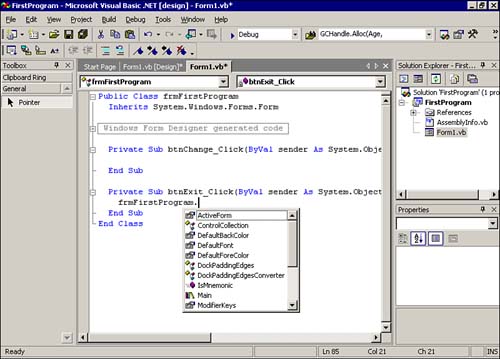
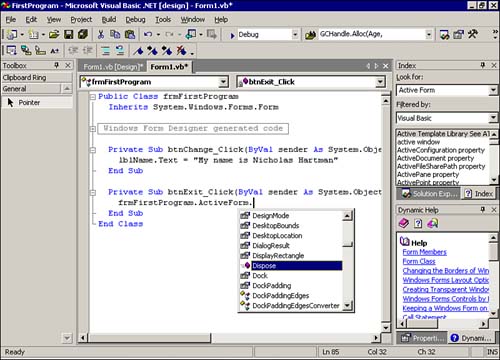
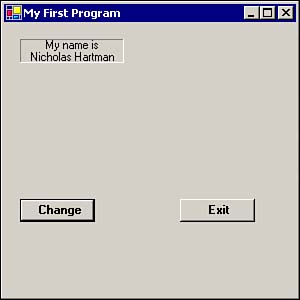
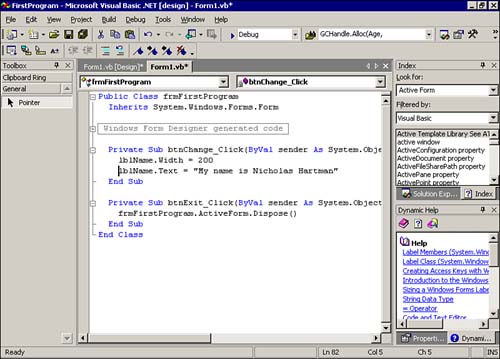
| After you've run the program, the display screen should look something like Figure 2.18, which shows a Debug window near the bottom of the display. Figure 2.18. The display screen after program execution. Right above the Debug window is the title bar for the Output window. To the extreme right of that title bar you should see an icon that looks like a push-pin and then the close box. Click the close box to dismiss the Output window. Your display should once again look like Figure 2.14. Now you are ready to write some code for your program. First, you need to move your mouse cursor over the Change button and double-click it. The display changes to reveal the Code window, as shown in Figure 2.19. First, notice that there are two tabs at the top of the Code window. The highlighted tab reads Form1.vb* and represents the Code window. The other tab reads Form1.vb [Design]* and represents the Design window. If you click that tab, the display changes to look like the Design window shown in Figure 2.14. For now, select the Code window, as shown in Figure 2.19. Figure 2.19. The Code window for the btnChange object's Click event. Notice that the cursor is sitting right below the word Private , waiting for you to type some code into the program for the btnChange object. Specifically, Visual Basic .NET is waiting for you to write some code for the btnChange object's Click() event. You know this from the information on the line above the cursor, which starts out like this: Private Sub btnChange_Click(... (The three periods after the opening parenthesis are called an ellipsis and indicate that additional details are present but not being shown. We will explain those missing details in Chapter 4.) Simply stated, these words say: "This marks the beginning of the code the program wants to execute each time the user clicks the btnChange button object." If you look directly below the cursor in Figure 2.19, you should see the words End Sub . This line marks the end of the code you want to execute each time the btnChange object is clicked. At the point where the cursor is located, type in the following code: lblName.Text = "My name is your-name " You should substitute your name for your-name in this code. For example, if your name is Nicholas Hartman, you type this: lblName.Text = "My name is Nicholas Hartman" Without getting bogged down in too many details, the following sections consider what this line does. The Dot OperatorLook at Figure 2.14 and recall that you added a Label object, named lblName , to your program. At that time, you set the Text property to My name is Joyce . The new code line you have added simply changes the Text property to display your name instead of Joyce's name. Notice the syntax you need to observe in order for this to work correctly: ObjectName.PropertyName Anytime you want to examine or alter the property of an object, you must first supply the name of the object (for example, lblName ), followed by a dot (that is, the dot operator), followed by the name of the property (for example, Text ) you want to examine or change. The dot operator is simply a period that is placed between the object you are working with and the property you want to examine or change. Don't underestimate the power of the dot operator! Think of the dot operator as the magic key that lets you gain access to the (encapsulated) object. Without the dot operator, all you can do is stand around outside the object and stare at it. Although such activity may be interesting, it's not terribly productive. The dot operator lets you get inside the object, and that's where the action is. The line you just typed into the program, therefore, is designed to change the Text property from My name is Joyce to My name is Your Name when the user clicks on btnChange object. In other words, what you are really saying to Visual Basic .NET with the line: lblName.Text = "My name is your-name " is "Find the object I named lblName , locate its Text property, and change whatever might currently be there to My name is your-name . " Now you can try a similar change to the btnExit object. First, click the Design window tab at the top of the Code window to change the display back to what is shown in Figure 2.14. Double-click the btnExit object. The Code window again appears, but it looks as shown in Figure 2.20. Figure 2.20. The Code window for the btnExit object's Click() event. As before, the cursor is waiting for you to type in some code for the btnExit object's Click() event. This time, instead of changing an object's property, you should invoke a method associated with a particular object, as described in the following section. Invoking an Object's MethodTo invoke a method associated with a particular object, you can begin by adding to the btnExit object some code that will cause the program to end when the user clicks the Exit button. This is pretty standard stuff for a Windows program. To end a program, you need to tell Visual Basic .NET to close down the currently active form that is being displayed. Because you have only one form, you can type the name of the form, followed by the dot operator. After you do this, your screen should look as shown in Figure 2.21. This is called an automatic property list, which lists the available properties for the object you've typed. Figure 2.21. Automatic property lists. Visual Basic .NET is smart enough to know that you want to perform some type of operation on your form, and it presents you with a list of properties from which to choose. You are interested in the ActiveForm attribute, so press the A key and press the spacebar. Visual Basic .NET automatically fills in the line with ActiveForm . Now, push the Backspace key to remove the blank space you just added. (This is a pain-in-the-butt step that Microsoft needs to address soon.) Now, press the period key to add another dot operator. Your screen should look like the one shown in Figure 2.22. Figure 2.22. Automatic method lists. Scroll the list down until you see the Dispose method, as shown in Figure 2.22. Double-click the Dispose method, and Visual Basic .NET fills it in on your program line automatically. The Dispose method for a form is used to dispose of the current form. Because you have only one form in your program, the Dispose method has the effect of ending your program. You have now added code to handle what the program should do when the user clicks the btnChange and btnExit objects. To compile the new version of your program, you can either select Build, Build Solution or simply press Ctrl+Shift+B. At the bottom left of the display screen you should quickly see a "Build succeeded" message, stating that everything went okay. Now you can click the Start button to run the program. When you click the Change button, you should see the display change to look like Figure 2.23. Figure 2.23. The new version of FirstProgram after a button's Click() event. In Figure 2.23, because the new name is longer than the label is wide, Visual Basic .NET folds the text to fit in the label. If you click the Exit button, the program ends. The Me KeywordThe following program line is quite a mouthful, but it accurately describes the currently active form in a program: frmFirstProgram.ActiveForm.Dispose() However, when you write Visual Basic .NET programs, referencing the currently active form is such a common task that Visual Basic .NET provides a shorthand form for it. If you change the preceding line to this: Me.Dispose() the program operates exactly as it did before. Therefore, you can use Me as a shorthand notation for the currently active form. Me is an example of a keyword in Visual Basic .NET. A keyword is any word that has special meaning to Visual Basic .NET. Other keywords you have seen (but that we haven't actually discussed yet) include Private , Sub , and End . Because keywords have special meaning to Visual Basic .NET, they can be used only within certain contexts. For example, you cannot use any Visual Basic .NET keyword as the name of an object, such as a form or a button. Therefore, using a Visual Basic .NET keyword as an object name is an inappropriate context within which to use a keyword. (We will continue the discussion about keywords in Chapter 4.) Experimenting with the Sample ProgramAs an experiment, try expanding the width of the lblName object. You can do this several ways. First, while in the Design window, you can move the mouse cursor over the middle box on the right side of the object. When you have the cursor positioned correctly, the cursor changes shape and becomes a double-pointed arrow. You can then click the mouse button and, while holding the button down, drag the cursor to the right to increase the width of the Button object. A second way to change the width of the lblName object is to do it through code when the program runs. In that case, you add the following line to the btnChange object's Click() event code: lblName.Width = 200 The Code window should look like Figure 2.24. Figure 2.24. Modifying the btnChange object's Click() event code. As you've probably guessed, this line expands the width of the Label object. It changes the Width property to 200 . (The original value was 100 .) You can see that this change causes the new line of text to be displayed without being folded as before, but what does this line actually do? It changes the width of the lblName object from 100 to 200 . But what units of measurement are being used? In earlier versions of Visual Basic the unit of measure defaulted to twips, which is a standard measure used in the printing business. (One inch is about 1,440 twips.) However, most programmers are more comfortable using pixels than twips when talking about display screens, so Visual Basic .NET uses pixels as its measure. A pixel is one dot on a display screen. Your code change simply tells Visual Basic .NET to expand the width of the lblName object from 100 pixels to 200 pixels when the user clicks the btnChange object. Notice that this change in the width of the lblName object, via the new line of code, causes the width to be changed as the program executes. This is called a runtime change in the property of an object. When you increase the width of the lblName object by using the mouse cursor to widen the lblName object before the program was run, this is called a design-time change. It's important to realize that you can change most properties of an object either at design time or at runtime. Which method is better depends on the task at hand. You'll learn more about these tradeoffs in later chapters. |
EAN: 2147483647
Pages: 238