The PhoneSSN Control
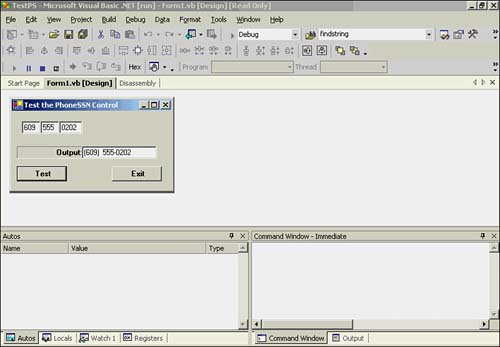
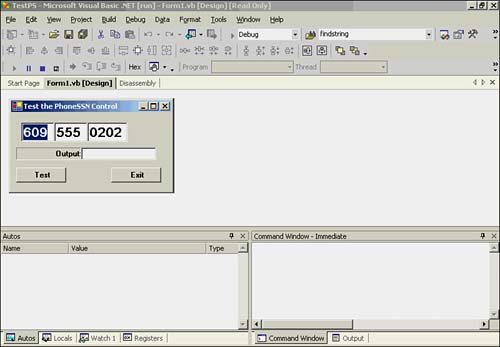
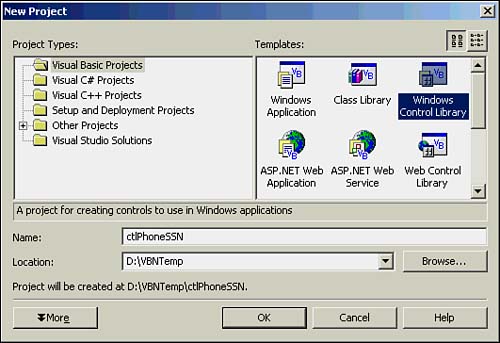
The PhoneSSN ControlIn this chapter you will build a control called the PhoneSSN control that accepts a phone number or a Social Security number (SSN) from the user . As you know, the format for an SSN is XXX-XX-XXXX, which is essentially a numeric variable stated in terms of three fields. A phone number is similar. It, too, has three fields consisting of the area code, the phone exchange, and the number (XXX-XXX-XXXX). The PhoneSSN control uses three TextBox controls to accept these three field numbers and then formats them into a string that can be treated as the requested data item. A sample run of the control is shown in Figure 21.1. Figure 21.1. A sample run of the PhoneSSN control. The PhoneSSN control is visible in the upper-left corner of Figure 21.1, and it appears to be nothing more than three text boxes. Indeed, the control is built from three standard text boxes, but it also exposes new properties that simplify the processing of the text boxes. You can resize the width of the control to automatically resize the three text boxes. Also, if you select a different font size, the control automatically resizes the height of the text boxes to accommodate the new font size. This is shown in Figure 21.2. Figure 21.2. A sample run of the PhoneSSN control using a larger font size. Building a custom control is a little like baking. Unlike cooking, where you can throw things together without a formal recipe and it usually tastes pretty good, baking is a little like chemistry . You need to carefully measure the ingredients and follow instructions precisely. If you don't, you might end up with a cake that's better suited for caulking bath tubs than eating as a dessert. Building your own controls is similar to cake baking, so you should follow the steps in this chapter carefully. With that caveat in mind, you can start building your custom control. Setting Up the ProjectTo begin building your custom control, the first thing you need to do is start a new project. You need to select File, New, Project to open the New Project dialog box. Select the Windows Control Library option from the available options in the New Project dialog box, as shown in Figure 21.3. Figure 21.3. Selecting the Window Control Library option from the New Project dialog box. Next you need to type the name ctlPhoneSSN for the project and select a location where you want the files to be placed. Programmer's Tip
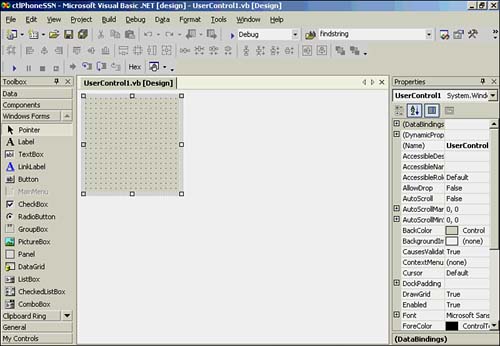
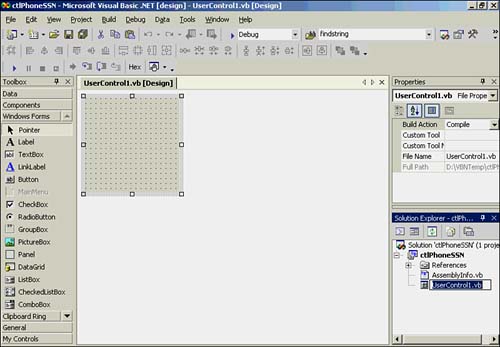
After you fill in the necessary information, you should click the OK button. The display changes to the screen shown in Figure 21.4. Figure 21.4. The Form window for designing a custom control. The UserControl FormIn the Form window you should see the UserControl form. Using the UserControl form is very similar to using a normal Visual Basic .NET Windows form. However, the purpose of the UserControl form is to act as a container in which you can place the controls you use to build your custom control. Naming a Custom ControlAt this stage of the game, you should supply the name that you want to use for the new control. You named the project ctlPhoneSSN so you can tell at a glance what the project contains. However, custom controls are usually not prefixed at this level. For example, Visual Basic .NET refers to the TextBox control on the toolbar as TextBox . Visual Basic .NET does not use the standard prefix conventions (for example, txt for a text box) for controls on the toolbar. Therefore, a good name for your new control is PhoneSSN . Users might want to add a prefix later, but there's no compelling reason for you to do that for them. To name the control, you go to the Solution Explorer window and click the UserControl1.vb entry, as shown in Figure 21.5. Figure 21.5. Naming a custom control. To name the control, you can type PhoneSSN.vb in the box and press the Enter key. (You can instead right-click the UserControl1.vb entry and select the Rename option from the menu that appears, or you can click the Property icon and enter the filename.) If you've done things correctly, the Solution Explorer should show PhoneSSN.vb , and the tab in the Form window should also show the new name. Placing Text Boxes on a ControlNext you need to place three text boxes on the PhoneSSN control, following the guidelines presented in Table 21.1. Table 21.1. Placement and Sizes of the PhoneSSN Control's Text Boxes
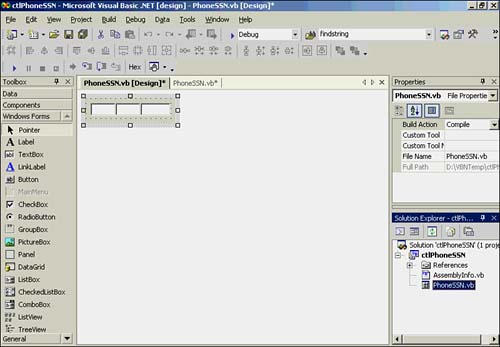
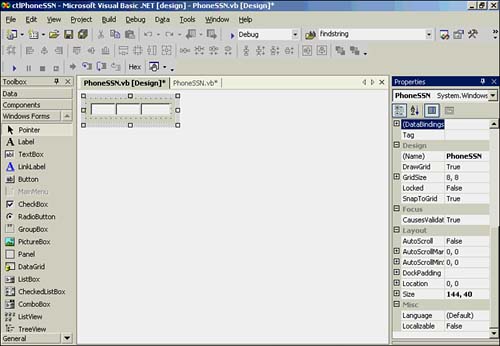
Notice that the first two text boxes have the same size, but the third is slightly larger. After you create the text boxes, you should shrink the UserControl control down to about 144x40. If you have followed the directions carefully, your control should look similar to the one shown in Figure 21.6. Figure 21.6. The visual interface for the PhoneSSN custom control. You have now created the visual interface for the PhoneSSN control. Adding Code to the PhoneSSN Custom ControlIf you right-click the Form window, you are given an option to view the code, or you can click the Code window icon in the Solution Explorer window. This should be the first line of the Code window: Public Class UserControl1 You should change that line to this: Public Class PhoneSSN The second line in the Code window tells you that the PhoneSSN class will inherit from the UserControl class. This class provides the core functionality for all Visual Basic .NET controls. Therefore, you have already written most of the code needed for your custom control simply by inheriting from the UserControl class. After you make sure that you renamed the project ctlPhoneSSN , you should save the project by selecting File, Save All. Component AttributesIf you look just under the title bar for the Properties window in Figure 21.6, you should see several icons. Perhaps the most familiar icon is the A “Z icon, which presents an alphabetized list of the properties for the control that has the focus. To the left of the A “Z icon are two plus signs. If you click the lower plus sign, the Properties window changes to show you the list of properties arranged by categories, rather than in alphabetic order (see Figure 21.7). Figure 21.7. The Properties window arranged by category rather than by alphabetic order. These are the categories for the properties:
What these categories do should be fairly clear if you look at the way the properties fit into each of these categories. Sometimes when you're working with a new control, this view of a control's properties may help you understand the organization of the properties. Because you are creating a new control that the user might be unfamiliar with, you should probably take advantage of this feature. Listing 21.1 shows the beginning of the code for the PhoneSSN control. You will see the complete listing for the control later in this chapter, but for now you need to spend a little time with smaller sections of it. Listing 21.1 The First Section of Code for the PhoneSSN Control Imports System.ComponentModel Public Class PhoneSSN Inherits System.Windows.Forms.UserControl ' Windows Form Designer generated code '============ The data members ============ ' The different formats available Enum Selection Phone = 0 SSN End Enum ' Private members Private mBoxType As Selection ' Do they want a Phone or SSN #? Private mAreaCode As String ' The area code Private mExchange As String ' The exchange Private mNumber As String ' The rest of the number Private mComplete As String ' The complete string '============ The property procedures ============ ' InputType() <Description("Will you enter phone numbers or Zip codes?"), _ Category("Behavior")> _ Property InputType() As Selection Get Return mBoxType End Get Set(ByVal Value As Selection) mBoxType = Value End Set End Property The first line of Listing 21.1 imports the ComponentModel object library of the System class. The System class contains the members necessary to work with the Properties window in the manner described earlier. Using Enum Data Types for Property ChoicesThe first thing you declare in Listing 21.1 is an Enum data type named Selection that has members that describe the functions of the control. There are only two members: Phone and SSN . Remember that an Enum-End Enum statement block does not define a data object. Rather, it is a declaration that tells what the members of the Enum are. An Enum declaration defines a cookie cutter from which you can create objects of the Enum type. In the statement line following the Enum declaration is a definition of the class member named mBoxType , which is of type Selection . Why use an Enum for the property choices? You do so because the ComponentModel class knows how to place these choices in a drop-down list for the field of the property. You will see how this works a bit later in the chapter. The remaining class members are String variables that are used to hold the appropriate string parts of either a phone number or an SSN. Describing and Categorizing a Property ProcedureRather than use the property procedure code you've seen before, the property signature in Listing 21.1 is prefaced with this: <Description("Will you enter phone numbers or Zip codes?"), _ Category("Behavior")> _ As you have probably guessed, the angle brackets surround category information about the property so that it can be used when the property is displayed in the Properties window. In this case, the Description() method contains a string literal that is displayed at the bottom of the Properties window when the InputType property is selected. The Category() method contains another string literal that tells where the property is to be placed when the Category() option is used to display the properties, as shown in Figure 21.7. If you do not specify the Category() method, the property defaults to the Misc. property category. You are not limited to the standard categories listed earlier. You can create your own if the need arises. To do so, you simply supply the string literal that you want to use instead of one of the defaults. If you want to hide a property from being displayed in the Properties window, perhaps because it is a ReadOnly property, you simply change the display information to something like this: <Browsable(False)> _ ReadOnly Property Hush() as Integer ' The rest of the property code Obviously, if the property is to be hidden, there is no need for the Description() or Category() methods . The default is for the Browsable() method to be logic True , which is the normal state for most properties. The only time you need to specify the Browsable() method is when you want to prevent the property from appearing in the Properties window. Programmer's Tip
The InputType Property Procedure CodeThe code for the InputType property is similar to the code in Chapter 16, "Class Properties." The only difference is that the return data type from the property Set() procedure is the Selection data type declared earlier. You must write property Get() and Set() procedures for the properties that you wish to expose to the user as part of the control's interface. Adding a New Tab to the ToolboxAs you gain experience with Visual Basic .NET, you will find yourself writing more and more custom controls. Although you could place your new custom controls on the Windows Forms tab of the toolbox, it is useful to add a new tab to the toolbox and place your controls on it. That way, you can keep your custom controls separate from the standard Visual Basic .NET controls. To add a new tab to the toolbox, you right-click the toolbox to bring up the menu shown in Figure 21.8. Figure 21.8. Adding a new tab to the toolbox. You then select the Add Tab option that appears near the middle of the menu. A text box appears at the bottom of the toolbox. Type My Controls (or whatever you would like to name the new tab) in the text box and press the Enter key. The new tab then appears on the toolbox. We will come back to this tab later in this chapter. The Remaining PhoneSSN Class CodeListing 21.2 presents the remaining code for your custom control. The code for the properties should look familiar to you by now. However, you need to learn about the new methods for the control. These new methods are discussed in the following sections. Listing 21.2 The Remaining Code for the PhoneSSN Class ' AreaCode() <Description("The area code or first three digits of SSN.")> _ Property AreaCode() As String Get Return Me.txtAreaCode.Text End Get Set(ByVal Value As String) Me.txtAreaCode.Text = Value End Set End Property ' Exchange() <Description("The phone exchange or middle two digits of SSN.")> _ Property Exchange() As String Get Return Me.txtExchange.Text End Get Set(ByVal Value As String) Me.txtExchange.Text = Value End Set End Property ' Number() <Description("The last four digits of phone number or SSN.")> _ Property Number() As String Get Return Me.txtNumber.Text End Get Set(ByVal Value As String) Me.txtNumber.Text = Value End Set End Property ' Complete() <Description("A complete phone number or SSN.")> _ Property Complete() As String Get If mBoxType = Selection.Phone Then mComplete = "(" & Me.txtAreaCode.Text & ") " & _ Me.txtExchange.Text & "-" & _ Me.txtNumber.Text Else mComplete = Me.txtAreaCode.Text & "-" & Me.txtExchange.Text & "-" & _ Me.txtNumber.Text End If Return mComplete End Get Set(ByVal Value As String) Me.txtNumber.Text = Value End Set End Property '============ Class methods ============ ' These constants are derived by taking the ratio of box width to the ' control width. This is a little bit of ugliness, but it works. Private Const TWODIGITS As Single = 0.19 Private Const THREEDIGITS As Single = 0.238 Private Const FOURDIGITS As Single = 0.286 Protected Overrides Sub OnFontChanged(ByVal e As System.EventArgs) MyBase.OnFontChanged(e) ResizeFieldBoxes() End Sub Private Sub PhoneSSNTextBox_Resize(ByVal sender As Object, _ ByVal e As System.EventArgs) _ Handles MyBase.Resize ResizeFieldBoxes() End Sub Private Sub ResizeFieldBoxes() Dim ControlWidth As Integer = Me.ClientRectangle.Width Dim ControlHeight As Integer = Me.ClientRectangle.Height Dim TwoBox, ThreeBox, FourBox As Integer If ControlHeight < 24 Then ' Set a minimum control height ControlHeight = 32 Me.Height = 32 End If If ControlWidth < 104 Then ' Set a minimum control width ControlWidth = 104 Me.Width = ControlWidth End If TwoBox = ControlWidth * TWODIGITS ' Set relative sizes ThreeBox = ControlWidth * THREEDIGITS FourBox = ControlWidth * FOURDIGITS txtAreaCode.SetBounds(8, 8, ThreeBox, 0) If mBoxType = Selection.Phone Then txtExchange.SetBounds(ThreeBox + 8, 8, ThreeBox, 0) txtNumber.SetBounds(ThreeBox * 2 + 8, 8, FourBox, 0) Else txtExchange.SetBounds(ThreeBox + 8, 8, TwoBox, 0) txtNumber.SetBounds(ThreeBox + TwoBox + 8, 8, FourBox, 0) End If End Sub End Class The Resizing() Event CodeThe methods for the PhoneSSN class are primarily concerned with what happens when the user attempts to resize the control. The resizing code for the control is fairly simple because you need to worry about changing only the control's horizontal dimension. This is true because you cannot resize the height of a text box. The only time the height of a text box is changed is in response to a change in the font size or if the text box has the Multiline property set to logic True . Font Changes and ResizingThe first method in the PhoneSSN class is used to override the OnFontChanged() method of the standard TextBox control. The Protected access specifier is used to limit access to this method for this (and, possibly, any derived) class. Recall from Chapter 18, "Polymorphism," that Overrides means that you want this code to be called instead of the code in the base class. The code presented here, however, simply serves as a wrapper around the OnFontChanged() call to the base class (via MyBase.OnFontChanged() ) plus the call to the ResizeFieldBoxes() method. The effect of the PhoneSSNTextBox() resizing procedure is to let the base class OnFontChanged() method handle most of the work associated with sizing the text boxes in response to a font change. When OnFontChanged() finishes its work, you call your own resizing procedure to do the special processing you need for the PhoneSSN control. Resizing the Text BoxesThe ResizeFieldBoxes() method is concerned with maintaining the relative sizes of the text boxes if the user changes the size of the PhoneSSN control. The method begins by getting the current size of the PhoneSSN control and assigning the width and height to ControlWidth and ControlHeight . You use these two measurements in a couple If statements to make sure the user doesn't shrink the control below a size that would obscure the text boxes. Next, you set three working variables to values that represent the relative width of each text box as a ratio of the control's width. For example, the variable TwoBox is the relative control width necessary to hold two-digit characters . ThreeBox and FourBox are designed to hold three- and four-digit characters, respectively. The call to the SetBounds() method is derived from the UserControl class and is used to set the bounds of the control. Therefore, this statement sets the size and location of the txtAreaCode text box 8 pixels in from the left side of the control and 8 pixels down from the top of the control: txtAreaCode.SetBounds(8, 8, ThreeBox, 0) The ThreeBox variable sets the width of the text box (which is a relative measure of the current width of the control). The last argument in the call is the height of the control, but only a font change can alter the text box height, so you set the height argument to . Programmer's Tip
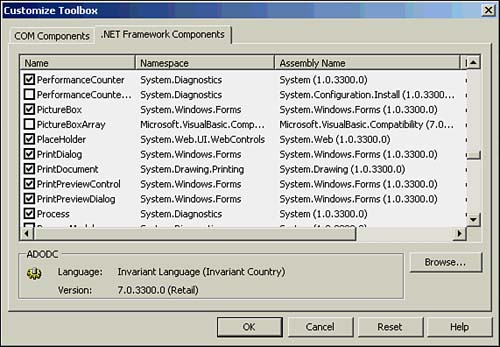
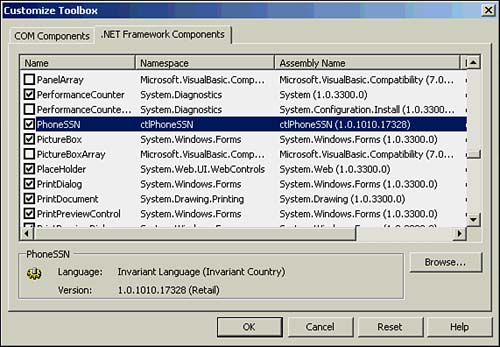
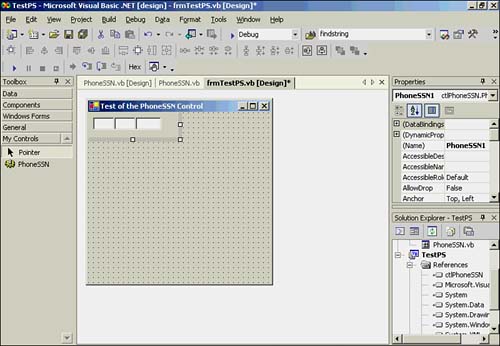
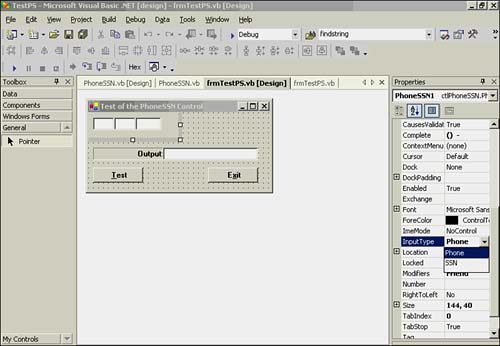
The If statement block checks whether the control is formatting a phone number or an SSN by examining the current state of mBoxType . Calls to SetBounds() size the remaining two text boxes accordingly . That's it! All you need to do now is create a test program to see if the control works. Testing the PhoneSSN ControlAt this point, you're all dressed up with no place to go. An inherited user control like PhoneSSN cannot exist by itself. Your new control needs a host form in which to exist. Therefore, you need to add a new Windows project before you can proceed. Adding the TestPS ProjectTo add a new Windows project, you select File, Add Project, New Project, and then select Windows Application from the New Project dialog box. You should name the project TestPS and then name the new form frmTestPS and change the Text property to "Test of the PhoneSSN control" . At this point, you have two projects showing in the Code window, and you need to tell Visual Basic .NET which one will serve as the startup project. To do so, in the Solution Explorer window, right-click the TestPS project and click the Set As Startup Project menu option. Then you can compile the project. Adding the PhoneSSN Control to the ToolboxYou can now add your custom PhoneSSN control to the toolbox. To do this, you click the My Controls tab that you added to the toolbox. This brings that tab to the foreground, although there is nothing on it yet. Next, you right-click the My Controls tab, which brings up a menu selection. Finally, you should click Customize Toolbox and then click the .NET Framework Components tab. You should see a dialog box similar to the one shown in Figure 21.9. Figure 21.9. The Customize Toolbox dialog box. Next you need to click the Browse button in the dialog box and locate the dynamic link library (DLL) file that was generated by the compilation. The file should be located in the bin directory of the control project. For example, you created the ctlPhoneSSN project in directory VBTemp on drive D . Therefore, you should find your DLL file in D:\VBTemp\ctlPhoneSSN\bin , and the file should be named ctlPhoneSSN.dll . If you select the file, the display changes to that shown in Figure 21.10. Figure 21.10. The Customize Toolbox dialog box after the ctlPhoneSSN.dll file is selected. Your DLL file is added to the list of controls, as shown in Figure 21.10. After you click the OK button, the new control should appear on the My Controls tab. If you double-click the new PhoneSSN control, a copy of the control should appear on the test form (that is, frmTestPS ). Your screen should look like the one shown in Figure 21.11. Figure 21.11. The test form after the PhoneSSN control is added. At this point, you should be able to resize the control and see the text boxes change. Note that the height of the text boxes should not change unless you select a new font size. (Try selecting the Font property and changing it to a point size of 16 . What happens to the PhoneSSN control?) Now you should add a new text box named txtOutput , a label, and two buttons named btnTest and btnExit , as shown in Figure 21.1. The code in Listing 21.3 shows the complete test code. Listing 21.3 Test Code for the frmTestPS ProjectPublic Class frmTestPS Inherits System.Windows.Forms.Form ' Windows Form Designer generated code Private Sub btnTest_Click(ByVal sender As System.Object, ByVal e As _ System.EventArgs) Handles btnTest.Click txtOutput.Text = PhoneSSN1.Complete End Sub Private Sub btnExit_Click(ByVal sender As System.Object, ByVal e As _ System.EventArgs) Handles btnExit.Click Me.Dispose() End Sub End Class You should click the PhoneSSN1 control and then move the cursor to the BoxType property field. If you click the drop-down icon that appears in the field, you should see the two type members you declared for the Selection Enum (see Figure 21.12). The fact that you can see the Phone and SSN choices in the InputType property field tells you that the UserControl class is correctly managing our field choices. Figure 21.12. BoxType property choices. Now you should compile and run the project. You should be able to type in a phone number or an SSN and click the Test button and then see the result of the test. This statement shows how to access the mComplete class member through its property Get() procedure: txtOutput.Text = PhoneSSN1.Complete |

EAN: 2147483647
Pages: 238