The Form Control
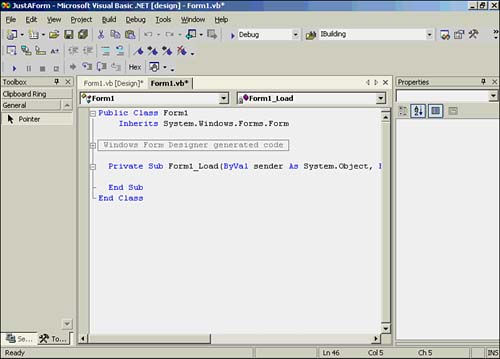
The Form ControlYou have used the Visual Basic .NET Form control in almost every chapter of this book, so you are probably pretty comfortable using it by now. However, there are a few details about the Form control that might be useful to you. First of all, the Form control is the canvas on which you paint the user interface for the program. That is, you use a Form control to hold the other control objects with which the user interacts while running a program. A form is a container for other controls. To see this in action, let's create a new project called JustAForm and consider the Form control in its uncluttered state. The Form Control's Load() EventSo far in this book, each of the program examples has used a single form. When you run such a program, one of the first things that happens is that the form associated with the program is loaded into memory. This is accomplished by the Form control's Load() event. The important thing to notice about this event is that it occurs before anything is displayed onscreen for view by the user. To see this for yourself, double-click the form in your project. This switches the Integrated Development Environment (IDE) to the Code window. Your screen should look similar to Figure 20.1. Because you have not given the form a name yet, Visual Basic .NET automatically names the form Form1 . Figure 20.1. The Code window for the Form control's Load() event. Notice the generalized syntax for the Load() event: Private Sub ControlName _Event(Args) Handles MyBase.Event Every event that can occur in a Windows program is assigned an event handler. An event handler is simply a procedure that is responsible for carrying out the task associated with the event. (You will learn more about event handlers in Chapter 21, "Creating Your Own Controls.") If you look at any of the programs in previous chapters, you'll see that all the event procedures have this general syntax format. (Just turn back to any chapter and look for a button's Click() event. All these Click() events end with the words Handles ButtonName.Click . This is an easy way to locate event handlers in code.) The default access specifier for an event handler is Private . This makes sense. For example, if you have a program with multiple forms, each form might have a Close button on it so that the user can close the form when he or she is done with it. Further, each of the Close buttons would probably be named btnClose . If you used the Public access specifier, there would be name conflicts among the various Close buttons. This is because use of the Public access specifier gives namespace scope to the button procedures, leading to the naming conflicts. As a rule, therefore, you should always use the Private access specifier for event Sub procedures. For the Form control's Load() event, the event handler is responsible for loading the form into memory and preparing to display the form to the user. However, the Form control's Load() event is executed before the form becomes visible to the user. To see this for yourself, you can set a breakpoint on the End Sub statement of the Form control's Load() event and run the program. You should see that the program stops at the breakpoint before the form is displayed. Recall the five program steps from Chapter 3, "Thinking About Programs." The first step is the initialization step. If your form (or program, if there is only one form) needs some setup or initialization tasks completed before the program actually begins, the Form control's Load() event is often a good place to put such code. After the code in the Form control's Load() event is executed, the form becomes visible to the user. The user can then see the form and interact with the user interface that is defined. Form Control PropertiesAs mentioned earlier in this chapter, there are a lot of properties associated with a form. In fact, there are more than 50 entries in the Properties window for a blank form, and some of those can be expanded to reveal additional properties. This section discusses the properties that you are most likely to use in your programs. The properties are discussed in alphabetical order, so you can easily follow along with the properties shown in the Properties window. Programmer's Tip
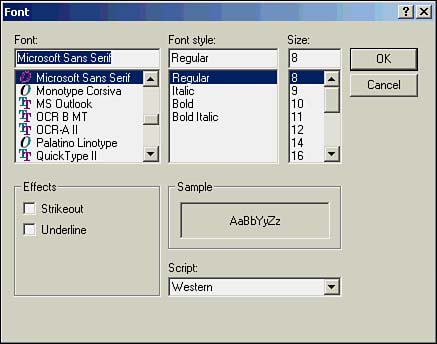
The AcceptButton PropertyThe AcceptButton property tells Visual Basic .NET which button Click() event is to be executed if the user presses the Enter key. Therefore, the AcceptButton property ties the pressing of the Enter key to a specified button's Click() event handler. To experiment with the AcceptButton property, you should add an Exit button to your form. You might want pressing the Enter key to have the same effect as clicking the Exit button. If so, you need to place the cursor in the AcceptButton property field; a drop-down list with the names of the form's controls appears. You should select the Exit button from the list. Then, any time a user presses the Enter key, Visual Basic .NET will execute the code you have in the btnExit object's Click procedure. The Visual Basic .NET default is not to have an AcceptButton property for a form. One reason for this is that new computer users often think that the Enter key is used to terminate text box input. That is, in a form that asks novice Windows users to type in their names, quite frequently they type their names and then press the Enter key. If you have the AcceptButton property tied to the Exit button, the moment the user presses the Enter key, the form disappears and the user wonders what went wrong. To see this effect in action, you should add the following statement to the btnExit button's Click() event: Me.Dispose() Next , you should add a text box to the form and set the AcceptButton field to btnExit . Then you should compile and run the program. Finally, you should move the cursor to the text box, type something, and press the Enter key. The form disappears, and the program ends. This could be very confusing to someone who is not familiar with the standard operation of a Windows program. You can also set the AcceptButton property in code. For example, this statement has the same effect as setting the AcceptButton property in the Properties window: Me.AcceptButton = btnExit There's nothing wrong with using the AcceptButton property. You just need to be careful about what the associated button does when the Enter key is pressed. The CancelButton PropertyThe CancelButton property is similar to the AcceptButton property, but it is associated with the action that occurs when the user presses the Esc key. To activate the CancelButton property, you place the cursor in its field and select from the drop-down list the button you want to tie to the Esc key. To see how this works, place a button named btnExit on the form and set the CancelButton property to btnExit . You can also set the CancelButton property in code ”for example, by using this statement: Me.CancelButton = btnExit This ties the CancelButton property to the btnExit object's Click code. Note that nothing prevents you from using the btnExit button for the CancelButton control and the AcceptButton control if you want to do so. It is common to be able to terminate the current task in a Windows program by pressing the Esc key. Therefore, the CancelButton property is often tied to the code associated with the Exit button. The ControlBox PropertyThe ControlBox property lets you determine whether the control box icon is displayed at the upper-left portion of the form in the title bar. Clicking that icon displays the system control menu, as shown in Figure 20.2. Figure 20.2. The system control menu. Setting the ControlBox property to logic True displays the icon. Note that this property also controls the Minimize, Maximize, and Close buttons that appear on the right edge of the form's title bar. However, the user can activate the system menu by pressing Atl+F4. Using the ControlBox property is a personal choice, but it doesn't seem to bring much to the party in terms of functionality. (How often have you used the system menu from within a program?) The Font PropertyYou can use the Font property to set the print font to be used with a form. Note that virtually every control that has a Text property also has a Font property. To activate the Font dialog box, you can move the cursor to the Font property field and click the ellipsis ( ) button. The dialog box that allows you to set the Font property is shown in Figure 20.3. Figure 20.3. The Font dialog box. By default, Visual Basic .NET forms use 8-point Microsoft Sans Serif font for regular printing. Whether you elect to change the default is a matter of choice. Programmer's Tip
The IsMdiContainer PropertyMdi in the name of the IsMdiContainer property is an abbreviation for multiple-document interface. If you set this property to logic True , you are stating that you want the form to serve as an MDI form. An MDI form is often referred to as the parent form. Any form that is subsequently placed within the client area of the parent form is called a child form. Usually, the parent form is persistent ”that is, it is always visible. The child forms are layered on top of the parent form. Most word processing programs use this approach, and a user's documents are child forms. We are not going to discuss MDI application programming, so just tuck this information away in the gray matter for later use. The Location PropertyThe Location property determines the upper-left corner of the form, expressed in screen coordinates. As you know, you can click the small plus sign at the left edge of a property field to expand the property and view its details. For the Location property, these details are the x- and y-coordinate values. The screen coordinate system is discussed in Chapter 22, "Visual Basic .NET Graphics." For the moment, you can think of these coordinates as being pixel values. To see how these values may be viewed , you can add the following three statements to your form's Load() event: Dim x, y As Integer x = Me.Location.X y = Me.Location.Y Next, you should set a breakpoint at the statement that follows these statements. You can use the End Sub statement of the form's Load() event for the breakpoint statement. Next, you should compile and run the program. If X and Y are both , your form is at the extreme upper-left corner of the screen. Next, you should scroll down to the StartPosition property (discussed later in this chapter, in the section "The StartPosition Property") and select CenterScreen from the drop-down list. Then, you should recompile and run the program. Your form should be centered in the screen, and the values for x and y should be positive values. (The exact values depend on your system settings.) As you can see, you can set the Location property to specific values to position your form wherever you want it. You can also read the Location property to find the current location of the form. You might want to use this property in MDI applications to place the child forms at specific locations on the display. The Maximize and Minimize PropertiesThe Maximize and Minimize properties determine whether the maximize and minimize icons are active for a form. These two icons appear to the left of the Close icon (that is, the icon with the x in it at the right edge of a form's title bar). If you set the Maximize property to logic False , the maximize icon is grayed out to show that it is disabled. If you set the Minimize property to logic False , the minimize icon is likewise grayed out. However, if both the Maximize and Minimize properties are set to logic False , both icons are removed from the title bar. For most programs, you should leave these properties set to their default values of logic True . The Size PropertyThe Size property consists of two values: the height of the form and the width of the form. As an experiment, you should add the following lines to a button's Click() event code: Dim x, y As Integer y = CInt(Me.Size.Height * 1.2) x = CInt(Me.Size.Width * 1.2) Dim newpoint As New Size(x, y) Me.Size = newpoint The first statement defines the working variables x and y . The next two statements set their values to be 20% larger than the current height and width of the form. Because the form's dimensions are expressed in terms of a Size object, you can define a Size object and pass the values of x and y to the form's Size property. The final statement uses the new values to resize the form. This type of resizing can be useful if you want to hide another control, such as a DataGrid control, before it's filled in with a program's output values. When the processing is completed, the user can click a View Output button that expands the form to reveal the hidden DataGrid control with the output. The StartPosition PropertyThe StartPosition property allows you to determine where the form should appear when it is loaded. The StartPosition property presents you with a list of alternative starting positions for the form. Note that the CenterScreen value is not necessarily the same as CenterParent . CenterScreen does what it sounds like it does: It centers the form in the display device. CenterParent means the form is a child form and centered within the client area of the parent form. If the parent form is skewed to the left, any child form may be centered in the parent's client area but still appear toward the left side of the screen. I like to use the CenterScreen form, but I can't give you a really good technical reason for this preference. I just think it looks good. The Text PropertyThe Text property of a form controls the text that appears in the title bar of the form. You can use other properties of the form (for example, Font ) to affect the appearance of this text. The purpose of the Text property is to provide the user with some idea about the purpose of the form. You can use the title bar to display information that changes as the program runs, such as an employee's name. However, you should not rely on the user watching what is displayed in the title bar. My experience is that users tend to ignore what's written in the title bar after they become familiar with the program. The Window State PropertyThe Window State property lets you determine whether you want the form displayed as normal, maximized, or minimized. When the Normal state is set, the window is displayed using the default values for the Size , Location , and StartPosition properties for the form. If you select Maximized for the Window State property, the form fills the container within which the form is displayed. This is usually the entire display, but it could be the client area of a parent form if the form is a child form. If you select Minimized , the form is displayed as a minimized box at the bottom of the screen. Selecting the Maximized state for the form usually looks a little goofy because the default positioning of the controls remains the same. The Anchor property (discussed later in this chapter, in the section "The Anchor Property") defaults to positioning all controls relative to the top-left corner of the form. So when the Anchor property is at its default and the Maximized state of the form is selected, the form fills the screen, but it looks like all the controls have been slid toward the upper-left corner of the form. It is not a pretty thing. As a general rule, you will use the Normal (default) state. Form Control MethodsSeveral Form control methods may prove useful to you. We have already discussed the Dispose() method that is used to close the current form. The following sections describe this and other important methods. The Activate MethodThe Activate method is often used after a form has been loaded but the focus has been given to some other form. You can use this method to activate the form and give it the program focus. For example, it is not uncommon for a program to load several forms when the program first starts but show only one of them. This process fires each form's Load() event. At some later time, you might want to show one of the undisplayed forms. The Activate method fires when the form is activated but before the form is displayed. Therefore, the Activate method gives you a place where you can place code that you want to execute after the form Load() event but before the form is actually displayed. The Dispose MethodAs you learned in Chapter 2, "The Basics of Object-Oriented Programming," you call the Dispose() method when you want to release the resources associated with the form and then dispose of the form itself. Note that this is different from hiding a form because the form is removed from memory. If you want to use the form again, you have to reload the form. The Hide and Show MethodsThe Hide and Show methods are closely related to each other. To see how they work, you can place a new button on your form and place the following statements in the button's Click() event procedure: Me.Hide() MessageBox.Show("Press the button") Me.Show() The first statement calls the Hide() method to remove the form from the display screen. Note that this does not destroy the form or any objects contained on the form. The Hide() method has the effect of making the form invisible to the user. The second statement pauses the program and allows the user to restart it. When the user clicks the OK button of the message box, the Show() method causes the form to reappear on the display. Therefore, the Hide() and Show() methods provide a simple means for temporarily removing a form from the display. |

EAN: 2147483647
Pages: 238