Collections
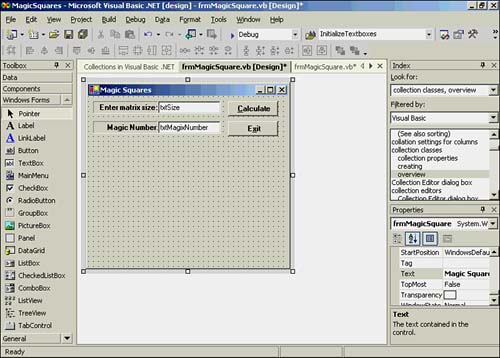
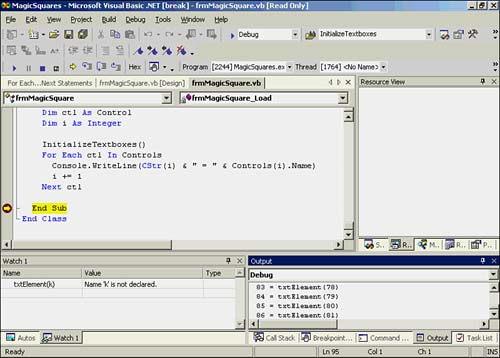
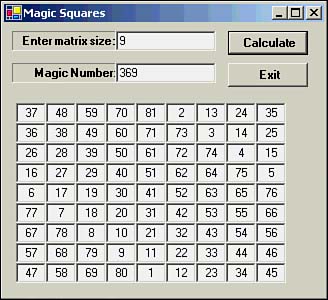
| This is a good place to introduce you to the concept of a collection. A collection is a simply a group of related objects. Although you can define your own collections, in this introduction we'll use the predefined Controls collection to show how it can be used. Every form you create has a Controls collection. The Controls collection object lets you reference all the controls on the form. Magic SquaresLet's write a program that produces a magic squares matrix. As you may know, a magic squares matrix is one where all the rows, columns , and main diagonals in the matrix add to a single value. The controls for the magic squares form are shown in Figure 14.15. Figure 14.15. The controls for the Magic Squares program. The controls include two text boxes named txtSize and txtMagicNumber and two buttons , btnCalc and btnExit . What isn't shown in Figure 14.15 are the text boxes that we add to the form at runtime. The following code fragment shows the top four lines of the program that defines the array of text box objects: Public Class frmMagicSquare Inherits System.Windows.Forms.Form Dim txtElement(81) As TextBox Dim MatrixSize As Integer The third line says that we have 81 text box objects defined for use in the program. However, because we haven't used the New keyword, we haven't actually created an instance of the text boxes at this time. Listing 14.7 shows the code for the frmMagicSquare_Load event. As you will recall, the form_load event code is the code that executes when the form is first loaded into memory. Listing 14.7 The Form Load Event for the Magic Squares ProgramPrivate Sub frmMagicSquare_Load(ByVal sender As System.Object, _ ByVal e As System.EventArgs) Handles MyBase.Load Dim ctl As Control Dim i As Integer InitializeTextboxes() For Each ctl In Controls Console.WriteLine(CStr(i) & " = " & Controls(i).Name) i += 1 Next End Sub The first thing the procedure does is call a subroutine named InitializeTextboxes() . The primary duty of the initialization procedure is to create an instance of the 81 text boxes that we'll use in the program. I'll show that code in a moment. Of greater interest at the moment is the loop that follows the initialization routine. For Each , NextThe For Each , Next loop is used to iterate through a Visual Basic .NET collection. The syntax for the For Each , Next loop is For Each ControlVariable In TheCollectionGroup ' loop statement block Next [ ControlVariable ] ControlVariable is a variable that's used to iterate through the elements in the collection. Notice that the name of the control variable ( ControlVariable ) is optional after the Next keyword. However, I suggest that you always include it. The type of the control variable ( ControlVariable ) must match the type in the collection ( TheCollectionGroup ). In Listing 14.7, the ControlVariable is named ctl and is defined as a type Control . The reason it must be of the Control type is because we want to inspect the controls on the form. This information is held in the Controls collection of the form. In the statement block, we're simply displaying the name of the controls in the debug window by calling Console.WriteLine() to display the control's index number and name. Figure 14.16 shows a sample run, with a breakpoint set and the End Sub statement in Listing 14.7. Figure 14.16. The Debug output window showing the text box control names . In the lower-right corner of Figure 14.16, you'll see the last few lines that are displayed by the For Each , Next loop in Listing 14.7. The information in the Debug window tells us that there are 86 controls on the form. The text box named txtElement(81) is the last control in the Controls collection for the form. With that in mind, let's now turn to the initialization code that we skipped over a moment ago. This code is presented in Listing 14.8. Listing 14.8 Initialization Code for Text Boxes Private Sub InitializeTextboxes() ' Purpose: To initialize the array of text boxes. Dim i As Integer Dim MySize As Size MySize.Width = 30 MySize.Height = 20 For i = 1 To 81 ' since max size is 9 txtElement(i) = New TextBox() Me.Controls.Add(txtElement(i)) txtElement(i).Size = MySize txtElement(i).TextAlign = HorizontalAlignment.Center txtElement(i).Visible = False txtElement(i).Name = "txtElement(" & CStr(i) & ")" Next i txtMagicNumber.Visible = False lblMagicNumber.Visible = False End Sub The MySize variable is a type Size data type, which is simply an object that holds width and height values, as measured in pixels. We're defining each text box to be 30 pixels wide and 20 pixels high. The program then enters a For loop to create an instance of all 81 text boxes. I selected 81 because I chose to limit the maximum size of the (symmetrical) matrix to 9. The first statement in the For statement block creates an instance of txtElement(i) using the New keyword. The next statement places that text box object on the current form using the Add() method of the Controls collection object. The next four statements simply set several properties of the text boxes for later use. Notice that we haven't specified a location for the text boxes. Therefore, all 81 text boxes are stacked on top of each other in same default location near the upper-left corner of the form. They aren't visible because we have set the Visible property to False for each text box. With , End WithSetting properties of objects in collections is so common that Visual Basic .NET provides a shorthand notation. To illustrate , we can take the lines txtElement(i).Size = MySize txtElement(i).TextAlign = HorizontalAlignment.Center txtElement(i).Visible = False txtElement(i).Name = "txtElement(" & CStr(i) & ")" from Listing 14.8 and replace them with With txtElement(i) .Size = MySize .TextAlign = HorizontalAlignment.Center .Visible = False .Name = "txtElement(" & CStr(i) & ")" End With and the program will function as before. The With keyword is followed by the name of the object for which you want to set the properties. Each statement in the With statement block begins with the dot operator, followed by the name of the property you want to set. Therefore, the first statement in the With statement block: .Size = MySize is syntactically equivalent to txtElement(i).Size = MySize which is the form shown in Listing 14.8. The End With keywords mark the end of the With statement block. We started with the long form shown in Listing 14.8 so that I could show you how the With statement block is used as an alternative. I suggest that you modify Listing 14.8 to use the With statement block code. After the user enters the matrix size she wants to use, that input is checked by CheckForValidMatrix() to make sure that it's an odd- sized matrix of size 9 or less. Assuming the matrix size checks out, the ShowMatrix() procedure is called. The code for ShowMatrix() is shown in Listing 14.9. Listing 14.9 Code for the ShowMatrix() RoutinePrivate Sub ShowMatrix() ' Purpose: This just displays the matrix Dim i, j, k, offset, sum As Integer Dim Coor As Point sum = 0 k = 1 offset = 80 ' Pixels from edge For i = 0 To MatrixSize - 1 ' rows For j = 0 To MatrixSize - 1 ' columns Coor.X = 30 * j + 12 ' Position Coor.Y = offset With txtElement(k) .Location = Coor ' Set location .Text = CStr(Magic(i + 1, j + 1, MatrixSize)) .Visible = True End With k += 1 Next j sum += CInt(txtElement(i + 1).Text) offset += 20 Next i txtMagicNumber.Text = CStr(sum) txtMagicNumber.Visible = True lblMagicNumber.Visible = True End Sub Basically, all the procedure does is set the location of the text boxes using Coor and make the text boxes visible. The call to Magic() calculates the numeric value that is to be filled in the text box. The statement Coor.X = 30 * j + 12 ' Position causes each text box to be spaced 12 pixels apart. The expression 30 * j is necessary because each text box is 30 pixels wide. If you single-step through this expression, you'll see how this results in the spacing of the text boxes. The variable offset is used to move the next row below the previous row. That is, offset is used to set the Y coordinate. Notice how a With block is used to set the properties of each text box. The last three lines simply display the magic number for the matrix in the txtMagicNumber text box. Figure 14.17 shows a sample run of the program. Figure 14.17. Sample run of the Magic Squares program. The magic number in Figure 14.17 is 369. Therefore, if you add the numbers in the text boxes for any row, column, or main diagonal, the sum of the values is 369. Although the code is limited to odd matrix sizes of 9 or less, larger odd matrix sizes are possible if you increase the array of text box objects and the size checks. You would also have to enlarge the size of the form. (Algorithms exist for calculating even-sized magic squares, but the code is considerably more complex.) |
EAN: 2147483647
Pages: 238