Your First MFC Application
It's time to build your first MFC application. And what better place to start than with one that displays "Hello, MFC" in a window? Based on the classic "Hello, world" program immortalized in Brian Kernighan and Dennis Ritchie's The C Programming Language (1988, Prentice-Hall), this very minimal program, which I'll call Hello, demonstrates the fundamental principles involved in using MFC to write a Windows application. Among other things, you'll get a close-up look at MFC's CWinApp and CFrameWnd classes and see firsthand how classes are derived from them and plugged into the application. You'll also learn about the all-important CPaintDC class, which serves as the conduit through which text and graphics are drawn in a window in response to WM_PAINT messages. Finally, you'll be introduced to message mapping, the mechanism MFC uses to correlate the messages your application receives with the member functions you provide to handle those messages.
Figure 1-3 lists the source code for Hello. Hello.h contains the declarations for two derived classes. Hello.cpp contains the implementations of those classes. Among C++ programmers, it's traditional to put class definitions in .h files and source code in .cpp files. We'll honor that tradition here and throughout the rest of this book. For large applications containing tens or perhaps hundreds of classes, it's also beneficial to put class declarations and implementations in separate source code files. That's overkill for the programs in the first few chapters of this book, but later on, when we begin working with documents and views, we'll give each class its own .h and .cpp files. On the CD in the back of the book, in the folder named Chap01, you'll find a folder with copies of Hello.h and Hello.cpp as well as a folder containing a copy of the compiled executable (Hello.exe).
Figure 1-3. The Hello application.
Hello.h class CMyApp : public CWinApp { public: virtual BOOL InitInstance (); }; class CMainWindow : public CFrameWnd { public: CMainWindow (); protected: afx_msg void OnPaint (); DECLARE_MESSAGE_MAP () }; |
Hello.cpp #include <afxwin.h> #include "Hello.h" CMyApp myApp; ///////////////////////////////////////////////////////////////////////// // CMyApp member functions BOOL CMyApp::InitInstance () { m_pMainWnd = new CMainWindow; m_pMainWnd->ShowWindow (m_nCmdShow); m_pMainWnd->UpdateWindow (); return TRUE; } ///////////////////////////////////////////////////////////////////////// // CMainWindow message map and member functions BEGIN_MESSAGE_MAP (CMainWindow, CFrameWnd) ON_WM_PAINT () END_MESSAGE_MAP () CMainWindow::CMainWindow () { Create (NULL, _T ("The Hello Application")); } void CMainWindow::OnPaint () { CPaintDC dc (this); CRect rect; GetClientRect (&rect); dc.DrawText (_T ("Hello, MFC"), -1, &rect, DT_SINGLELINE ¦ DT_CENTER ¦ DT_VCENTER); } |
Figure 1-4 shows the output from Hello. When you run the application, notice that the window is entirely functional; you can move it, resize it, minimize it, maximize it, and close it. And when the window is resized, "Hello, MFC" is redrawn in the center of the window.
Most of Hello's functionality comes from Windows. Windows, for example, draws the exterior, or nonclient area, of the window: the title bar, the buttons on the title bar, and the window's border. It's your responsibility to create the window and process WM_PAINT messages indicating that all or part of the window's interior, or client area, needs updating. Let's examine the source code to see how Hello works.
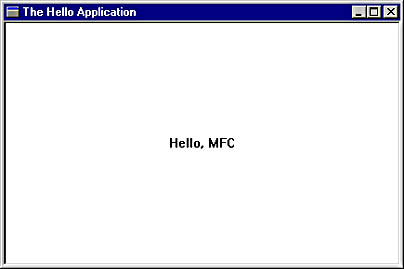
Figure 1-4. The Hello window.
The Application Object
The heart of an MFC application is an application object based on the CWinApp class. CWinApp provides the message loop that retrieves messages and dispatches them to the application's window. It also includes key virtual functions that can be overridden to customize the application's behavior. CWinApp and other MFC classes are brought into your application when you include the header file Afxwin.h. An MFC application can have one—and only one—application object, and that object must be declared with global scope so that it will be instantiated in memory at the very outset of the program.
Hello's application class is named CMyApp. It is instantiated in Hello.cpp with the statement
CMyApp myApp; |
CMyApp's class declaration appears in Hello.h:
class CMyApp : public CWinApp { public: virtual BOOL InitInstance (); }; |
CMyApp declares no data members and overrides just one function inherited from CWinApp. InitInstance is called early in the application's lifetime, right after the application starts running but before the window is created. In fact, unless InitInstance creates a window, the application doesn't have a window. That's why even a minimal MFC application must derive a class from CWinApp and override CWinApp::InitInstance.
The InitInstance Function
CWinApp::InitInstance is a virtual function whose default implementation contains just one statement:
return TRUE; |
The purpose of InitInstance is to provide the application with the opportunity to initialize itself. The value returned by InitInstance determines what the framework does next. Returning FALSE from InitInstance shuts down the application. If initialization goes as planned, InitInstance should return TRUE in order to allow the program to proceed. InitInstance is the perfect place to perform initializations that need to be done each time the program starts. At the very least, this means creating the window that will represent the application on the screen.
CMyApp's implementation of InitInstance, which appears in Hello.cpp, creates the Hello window by instantiating Hello's CMainWindow class. The statement
m_pMainWnd = new CMainWindow; |
constructs a CMainWindow object and copies its address to the application object's m_pMainWnd data member. After the window is created, InitInstance displays it—remember, a window is not initially visible unless it is created with a WS_VISIBLE attribute—by calling ShowWindow and UpdateWindow through the CMainWindow pointer:
m_pMainWnd->ShowWindow (m_nCmdShow); m_pMainWnd->UpdateWindow (); |
ShowWindow and UpdateWindow are CWnd member functions common to all window objects, including objects of the CFrameWnd class from which CMainWindow is derived. These functions are little more than wrappers around the API functions of the same name. To call a regular Windows API function from an MFC program, make it a practice to preface the function name with the global scope resolution operator ::, as in
::UpdateWindow (hwnd); |
This notation will ensure that the API function is called even if the object that makes the call has a member function with the same name. In the remainder of this book, Windows API functions will be prefaced with :: to distinguish them from MFC member functions.
ShowWindow accepts just one parameter: an integer that specifies whether the window should initially be shown minimized, maximized, or neither minimized nor maximized. In accordance with Windows programming protocol, Hello passes ShowWindow the value stored in the application object's m_nCmdShow variable, which holds the nCmdShow parameter passed to WinMain. The m_nCmdShow value is usually SW_SHOWNORMAL, indicating that the window should be displayed in its normal unmaximized and unminimized state. However, depending on how the user starts an application, Windows will occasionally slip in a value such as SW_SHOWMAXIMIZED or SW_SHOWMINIMIZED. Unless there is a specific reason for it to do otherwise, InitInstance should always pass the m_nCmdShow variable instead of a hardcoded SW_ value to ShowWindow.
UpdateWindow completes the job that ShowWindow started by forcing an immediate repaint. Its work done, InitInstance returns TRUE to allow the application to proceed.
Other CWinApp Overridables
InitInstance is just one of several virtual CWinApp member functions you can override to customize the behavior of the application object. Look up the CWinApp overridables in your MFC documentation and you'll see a list of more than a dozen others with names such as WinHelp and ProcessWndProcException. Many of these functions are seldom overridden, but they're handy to have around nonetheless. For example, you can use ExitInstance to clean up when an application terminates. If you use InitInstance to allocate memory or other resources, ExitInstance is the perfect place to free those resources. The default implementation of ExitInstance performs some routine cleanup chores required by the framework, so you should be sure to call the base class version if you've overridden ExitInstance. Ultimately, the value returned by ExitInstance is the exit code returned by WinMain.
Other interesting CWinApp overridables include OnIdle, Run, and PreTranslateMessage. OnIdle is handy for performing background processing chores such as garbage collection. Because OnIdle is called when an application is "idle"—that is, when there are no messages waiting to be processed—it provides an excellent mechanism for performing low-priority background tasks without spawning a separate thread of execution. OnIdle is discussed at length in Chapter 14. You can override Run to customize the message loop, replacing it with a message loop of your own. If you just want to perform some specialized preprocessing on certain messages before they are dispatched, you can override PreTranslateMessage and save yourself the trouble of writing a whole new message loop.
How MFC Uses the Application Object
To someone who has never seen an MFC application's source code, one of the more remarkable aspects of Hello will be that it contains no executable code outside of the classes it defines. It has no main or WinMain function, for example; the only statement in the entire program that has global scope is the statement that instantiates the application object. So what actually starts the program running, and when does the application object come into the picture?
The best way to understand what goes on under the hood is to look at the framework's source code. One of the source code files provided with MFC—Winmain.cpp—contains an AfxWinMain function that is MFC's equivalent of WinMain. (That's right: when you purchase Visual C++, you get the source code for MFC, too.) AfxWinMain makes extensive use of the application object, which is why the application object must be declared globally. Global variables and objects are created before any code is executed, and the application object must be extant in memory before AfxWinMain starts.
Right after starting, AfxWinMain calls a function named AfxWinInit to initialize the framework and copy hInstance, nCmdShow, and other AfxWinMain function parameters to data members of the application object. Then it calls InitApplication and InitInstance. In 16-bit versions of MFC, InitApplication is called only if the hPrevInstance parameter passed to AfxWinMain is NULL, indicating that this is the only instance of the application currently running. In the Win32 environment, hPrevInstance is always NULL, so the framework doesn't bother to check it. A 32-bit application could just as easily use InitApplication to initialize itself as InitInstance, but InitApplication is provided for compatibility with previous versions of MFC and should not be used in 32-bit Windows applications. If AfxWinInit, InitApplication, or InitInstance returns 0, AfxWinMain terminates instead of proceeding further and the application is shut down.
Only if all of the aforementioned functions return nonzero values does AfxWinMain perform the next critical step. The statement
pThread->Run(); |
calls the application object's Run function, which executes the message loop and begins pumping messages to the application's window. The message loop repeats until a WM_QUIT message is retrieved from the message queue, at which point Run breaks out of the loop, calls ExitInstance, and returns to AfxWinMain. After doing some last-minute cleaning up, AfxWinMain executes a return to end the application.
The Frame Window Object
MFC's CWnd class and its derivatives provide object-oriented interfaces to the window or windows an application creates. Hello's window class, CMainWindow, is derived from MFC's CFrameWnd class, which is derived from CWnd. CFrameWnd models the behavior of frame windows. For now, you can think of a frame window as a top-level window that serves as an application's primary interface to the outside world. In the greater context of the document/view architecture, frame windows play a larger role as intelligent containers for views, toolbars, status bars, and other user-interface (UI) objects.
An MFC application creates a window by creating a window object and calling its Create or CreateEx function. Hello creates a CMainWindow object in CMyApp::InitInstance. CMainWindow's constructor creates the window you see on the screen:
Create (NULL, _T ("The Hello Application")); |
_T is a macro that's used to make string literals character set neutral. It's discussed later in this chapter. Create is a CMainWindow member function that's inherited from CFrameWnd. It's one of approximately 20 member functions that CFrameWnd defines in addition to the functions it inherits from CWnd. CFrameWnd::Create is prototyped as follows:
BOOL Create (LPCTSTR lpszClassName, LPCTSTR lpszWindowName, DWORD dwStyle = WS_OVERLAPPEDWINDOW, const RECT& rect = rectDefault, CWnd* pParentWnd = NULL, LPCTSTR lpszMenuName = NULL, DWORD dwExStyle = 0, CCreateContext* pContext = NULL) |
Default values are defined for six of the eight parameters Create accepts. Hello does the minimum amount of work required, specifying values for the function's first two parameters and accepting the defaults for the remaining six. The first parameter—lpszClassName—specifies the name of the WNDCLASS that the window is based on. Specifying NULL for this parameter creates a default frame window based on a WNDCLASS registered by the framework. The lpszWindowName parameter specifies the text that will appear in the window's title bar.
The dwStyle parameter specifies the window style. The default is WS_OVERLAPPEDWINDOW. You can change the window style by specifying an alternative style or combination of styles in the call to Create. You'll find a complete list of window styles in the documentation for CFrameWnd::Create. Two of the styles frequently used with frame windows are WS_HSCROLL and WS_VSCROLL, which add horizontal and vertical scroll bars to the bottom and right edges of the window's client area. The statement
Create (NULL, _T ("Hello"), WS_OVERLAPPEDWINDOW ¦ WS_VSCROLL); |
creates an overlapped window that contains a vertical scroll bar. As this example illustrates, multiple styles may be combined using the C++ ¦ operator. WS_OVERLAPPEDWINDOW combines the WS_OVERLAPPED, WS_CAPTION, WS_SYSMENU, WS_MINIMIZEBOX, WS_MAXIMIZEBOX, and WS_THICKFRAME styles, so if you'd like to create a window that looks just like a WS_OVERLAPPEDWINDOW window but lacks the maximize button in the title bar, you could call Create this way:
Create (NULL, _T ("Hello"), WS_OVERLAPPED ¦ WS_CAPTION ¦ WS_SYSMENU ¦ WS_MINIMIZEBOX ¦ WS_THICKFRAME); |
An alternative way to specify a window style is to override the virtual PreCreateWindow function that a window inherits from CWnd and modify the style field of the CREATESTRUCT structure passed to PreCreateWindow. This capability is handy to have when the framework creates your application's main window for you, as is frequently the case in document/view applications, but it's not necessary when your code calls Create directly and therefore controls the parameters passed to it. Later in this book, you'll see examples demonstrating when and how PreCreateWindow is used.
Additional window styles known as extended styles can be specified in CFrameWnd::Create's dwExStyle parameter. Window styles are divided into standard and extended styles for a historical reason: Windows 3.1 added support for additional window styles by introducing the ::CreateWindowEx API function. ::CreateWindowEx is similar to ::CreateWindow, but its argument list includes an additional parameter specifying the window's extended style. Windows 3.1 supported just five extended styles. More recent versions of Windows offer a much greater selection that includes the WS_EX_WINDOWEDGE and WS_EX_CLIENTEDGE styles, which give window borders a more pronounced 3D look. MFC automatically adds these two styles to frame windows for you, so you rarely need to specify them yourself.
After the dwStyle parameter comes rect, which is a C++ reference to a CRect object or a C-style RECT structure specifying the window's initial screen position and size. The default is rectDefault, which is a static member of the CFrameWnd class that simply tells Windows to choose the window's default initial position and size. If you want to, you can specify the initial position and size by initializing a CRect object with coordinates describing a rectangle on the screen and passing it to Create. The following statement creates a standard overlapped window whose upper left corner is located 32 pixels to the right of and 64 pixels down from the upper left corner of the screen and whose initial width and height are 320 and 240 pixels, respectively:
Create (NULL, _T ("Hello"), WS_OVERLAPPEDWINDOW, CRect (32, 64, 352, 304)); |
Note that the window's width and height are determined by the difference between the first and third parameters and the second and fourth parameters rather than by the absolute values of the third and fourth parameters. In other words, the CRect object specifies the rectangular region of the screen that the window will occupy. The four parameters passed to CRect's constructor specify, in order, the rectangle's left, top, right, and bottom screen coordinates.
The pParentWnd parameter to Create identifies the window's parent or owner. Don't worry for now about parents and owners. This parameter is always NULL for top-level windows because top-level windows have neither parents nor owners. (Actually, specifying NULL for pParentWnd makes the desktop window—the window that forms the backdrop for the screen—the window's owner. But that's an implementation detail that matters only to Windows.)
Create's lpszMenuName parameter identifies the menu associated with the window. NULL indicates that the window has no menu. We'll begin using menus in Chapter 4.
The final parameter to CFrameWnd::Create, pContext, contains a pointer to a CCreateContext structure that is used by the framework when it initializes frame windows in document/view applications. Outside the document/view architecture, this parameter is meaningless and should be set to NULL.
Create offers a tremendous variety of options to the programmer. The number of choices might seem overwhelming at this early stage, especially if you haven't programmed for Windows before, but experience will teach you how and when to exercise the options available to you. Meanwhile, the class library's use of default function arguments hides much of the complexity when a standard CFrameWnd-type window is all you need. This is one example of the ways in which MFC makes Windows programming just a little bit easier.
Painting the Window
Hello doesn't draw to the screen just whenever it wants to. Instead, it draws in response to WM_PAINT messages from Windows signaling that it's time to update the window.
WM_PAINT messages can be generated for a variety of reasons. A WM_PAINT message might be sent because another window was moved, exposing a part of Hello's window that was previously obscured, or it could be sent because the window was resized. Whatever the stimulus, it is the application's responsibility to paint the client area of its window in response to WM_PAINT messages. Windows draws the nonclient area so that all applications will have a consistent look, but if the application doesn't implement its own drawing routines for the client area, the interior of the window will be blank.
In Hello, WM_PAINT messages are processed by CMainWindow::OnPaint, which is called anytime a WM_PAINT message arrives. OnPaint's job is to draw "Hello, MFC" in the center of the window's client area. It begins by constructing a CPaintDC object named dc:
CPaintDC dc (this); |
MFC's CPaintDC class is derived from MFC's more generic CDC class, which encapsulates a Windows device context and includes dozens of member functions for drawing to screens, printers, and other devices. In Windows, all graphical output is performed through device context objects that abstract the physical destinations for output. CPaintDC is a special case of CDC that is used only in WM_PAINT message handlers. Before drawing in response to a WM_PAINT message, an application must call the Windows ::BeginPaint API function to obtain a device context and prepare the device context for painting. When it's finished painting, the application must call ::EndPaint to release the device context and inform Windows that painting is complete. If an application fails to call ::BeginPaint and ::EndPaint when it processes a WM_PAINT message, the message will not be removed from the message queue. Not surprisingly, CPaintDC calls ::BeginPaint from its constructor and ::EndPaint from its destructor to ensure that this doesn't happen.
In MFC, you'll always draw to the screen with a CDC object of some type, but you must use a CPaintDC object only inside OnPaint handlers. Furthermore, it's good practice to create CPaintDC objects on the stack so that their destructors will be called automatically when OnPaint ends. You can instantiate a CPaintDC object with the new operator if you want to, but then it becomes critical to delete that object before OnPaint ends. Otherwise, ::EndPaint won't be called, and your application won't redraw properly.
After creating a CPaintDC object, OnPaint constructs a CRect object representing a rectangle and calls CWnd::GetClientRect to initialize the rectangle with the coordinates of the window's client area:
CRect rect; GetClientRect (&rect); |
OnPaint then calls CDC::DrawText to display "Hello, MFC" in the window's client area:
dc.DrawText (_T ("Hello, MFC"), -1, &rect, DT_SINGLELINE ¦ DT_CENTER ¦ DT_VCENTER); |
DrawText is a powerful general-purpose function for outputting text. It accepts four parameters: a pointer to the string to display, the number of characters in the string (or -1 if the string is terminated with a NULL character), the address of a RECT structure or CRect object specifying the formatting rectangle (the rectangle in which the string is displayed), and flags specifying output options. In Hello, CMainWindow::OnPaint combines the DT_SINGLELINE, DT_CENTER, and DT_VCENTER flags to display a single line of text that is centered both horizontally and vertically in the formatting rectangle. rect describes the window's client area, so the resulting output is perfectly centered in the window.
Conspicuously missing from DrawText's argument list are parameters specifying basic properties of the output such as the font and text color. These and other characteristics of the output are attributes of the device context and are controlled with CDC member functions such as SelectObject and SetTextColor. Because Hello didn't change any of the device context's attributes, the default font and default text color (black) were used. DrawText also fills a small rectangle surrounding the text it outputs with the device context's current background color. The default is white, so you don't see it if your system's default window background color also happens to be white. But change the window background color to gray and the white text background will stick out like a sore thumb.
In Chapter 2, you'll learn how to customize the output from DrawText and other CDC drawing functions by modifying device context attributes. Once you know how to do it, it's simple to change the text color or tell DrawText to paint the text background with "transparent" pixels.
The Message Map
How is it that a WM_PAINT message from Windows turns into a call to CMainWindow::OnPaint? The answer lies in the message map. A message map is a table that correlates messages and member functions. When Hello's frame window receives a message, MFC scans the window's message map, sees that a handler exists for WM_PAINT messages, and calls OnPaint. The message map is MFC's way of avoiding the lengthy vtables that would be required if every class had a virtual function for every possible message it might receive. Any class derived from CCmdTarget can contain a message map. What MFC does internally to implement message maps is hidden behind some rather complex macros, but using a message map is exceedingly simple. Here's all you have to do to add a message map to a class:
- Declare the message map by adding a DECLARE_MESSAGE_MAP statement to the class declaration.
- Implement the message map by placing macros identifying the messages that the class will handle between calls to BEGIN_MESSAGE_MAP and END_MESSAGE_MAP.
- Add member functions to handle the messages.
Hello's CMainWindow class handles just one message type, WM_PAINT, so its message map is implemented as follows:
BEGIN_MESSAGE_MAP (CMainWindow, CFrameWnd) ON_WM_PAINT () END_MESSAGE_MAP () |
BEGIN_MESSAGE_MAP begins the message map and identifies both the class to which the message map belongs and the base class. (Message maps are passed by inheritance just as other class members are. The base class name is required so that the framework can find the base class's message map when necessary.) END_MESSAGE_MAP ends the message map. In between BEGIN_MESSAGE_MAP and END_MESSAGE_MAP are the message map entries. ON_WM_PAINT is a macro defined in the MFC header file Afxmsg_.h. It adds an entry for WM_PAINT messages to the message map. The macro accepts no parameters because it is hardcoded to link WM_PAINT messages to the class member function named OnPaint. MFC provides macros for more than 100 Windows messages, ranging from WM_ACTIVATE to WM_WININICHANGE. You can get the name of the message handler that corresponds to a given ON_WM macro from the MFC documentation, but it's fairly easy to deduce the name yourself by replacing WM_ with On and converting all the remaining letters except those at the beginning of the word to lowercase. Thus, WM_PAINT becomes OnPaint, WM_LBUTTONDOWN becomes OnLButtonDown, and so on.
You'll need to consult the MFC documentation to determine what kinds of arguments a message handler receives and what type of value it returns. OnPaint takes no arguments and returns no value, but OnLButtonDown is prototyped like this:
afx_msg void OnLButtonDown (UINT nFlags, CPoint point) |
nFlags contains bit flags specifying the state of the mouse buttons and the Ctrl and Shift keys, and point identifies the location at which the click occurred. The arguments passed to a message handler come from the wParam and lParam parameters that accompanied the message. But whereas wParam and lParam are of necessity generic, the parameters passed to an MFC message handler are both specific and type-safe.
What happens if you want to process a message for which MFC doesn't provide a message-map macro? You can create an entry for the message using the generic ON_MESSAGE macro, which accepts two parameters: the message ID and the address of the corresponding class member function. The following statement maps WM_SETTEXT messages to a member function named OnSetText:
ON_MESSAGE (WM_SETTEXT, OnSetText) |
OnSetText would be declared like this:
afx_msg LRESULT OnSetText (WPARAM wParam, LPARAM lParam); |
Other special-purpose message-map macros provided by MFC include ON_COMMAND, which maps menu selections and other UI events to class member functions, and ON_UPDATE_COMMAND_UI, which connects menu items and other UI objects to "update handlers" that keep them in sync with the internal state of the application. You'll be introduced to these and other message-map macros in the chapters that follow.
Getting back to Hello for a moment, CMainWindow's OnPaint function and message map are declared with the following statements in Hello.h:
afx_msg void OnPaint (); DECLARE_MESSAGE_MAP () |
afx_msg is a visual reminder that OnPaint is a message handler. You can omit it if you'd like because it reduces to white space when compiled. The term afx_msg is meant to connote a function that behaves as if it were a virtual function but does so without requiring a vtable entry. DECLARE_MESSAGE_MAP is usually the final statement in the class declaration because it uses C++ keywords to specify the visibility of its members. You can follow DECLARE_MESSAGE_MAP with statements declaring other class members, but if you do, you should also lead off with a public, protected, or private keyword to ensure the visibility you want for those members.
How Message Maps Work
You can find out how message maps work by examining the DECLARE_MESSAGE_MAP, BEGIN_MESSAGE_MAP, and END_MESSAGE_MAP macros in Afxwin.h and the code for CWnd::WindowProc in Wincore.cpp. Here's a synopsis of what goes on under the hood when you use message-mapping macros in your code, and how the framework uses the code and data generated by the macros to convert messages into calls to corresponding class member functions.
MFC's DECLARE_MESSAGE_MAP macro adds three members to the class declaration: a private array of AFX_MSGMAP_ENTRY structures named _messageEntries that contains information correlating messages and message handlers; a static AFX_MSGMAP structure named messageMap that contains a pointer to the class's _messageEntries array and a pointer to the base class's messageMap structure; and a virtual function named GetMessageMap that returns messageMap's address. (The macro implementation is slightly different for an MFC application that's dynamically rather than statically linked to MFC, but the principle is the same.) BEGIN_MESSAGE_MAP contains the implementation for the GetMessageMap function and code to initialize the messageMap structure. The macros that appear between BEGIN_MESSAGE_MAP and END_MESSAGE_MAP fill in the _messageEntries array, and END_MESSAGE_MAP marks the end of the array with a NULL entry. For the statements
// In the class declaration DECLARE_MESSAGE_MAP () // In the class implementation BEGIN_MESSAGE_MAP (CMainWindow, CFrameWnd) ON_WM_PAINT () END_MESSAGE_MAP () |
the compiler's preprocessor generates this:
// In the class declaration private: static const AFX_MSGMAP_ENTRY _messageEntries[]; protected: static const AFX_MSGMAP messageMap; virtual const AFX_MSGMAP* GetMessageMap() const; // In the class implementation const AFX_MSGMAP* CMainWindow::GetMessageMap() const { return &CMainWindow::messageMap; } const AFX_MSGMAP CMainWindow::messageMap = { &CFrameWnd::messageMap, &CMainWindow::_messageEntries[0] }; const AFX_MSGMAP_ENTRY CMainWindow::_messageEntries[] = { { WM_PAINT, 0, 0, 0, AfxSig_vv, (AFX_PMSG)(AFX_PMSGW)(void (CWnd::*)(void))OnPaint }, {0, 0, 0, 0, AfxSig_end, (AFX_PMSG)0 } }; |
With this infrastructure in place, the framework can call GetMessageMap to get a pointer to CMainWindow's messageMap structure. It can then scan the _messageEntries array to see if CMainWindow has a handler for the message, and if necessary it can grab a pointer to CFrameWnd's messageMap structure and scan the base class's message map, too.
That's a pretty good description of what happens when a message for CMainWindow arrives. To dispatch the message, the framework calls the virtual WindowProc function that CMainWindow inherits from CWnd. WindowProc calls OnWndMsg, which in turn calls GetMessageMap to get a pointer to CMainWindow::messageMap and searches CMainWindow::_messageEntries for an entry whose message ID matches the ID of the message that is currently awaiting processing. If the entry is found, the corresponding CMainWindow function (whose address is stored in the _messageEntries array along with the message ID) is called. Otherwise, OnWndMsg consults CMainWindow::messageMap for a pointer to CFrameWnd::messageMap and repeats the process for the base class. If the base class doesn't have a handler for the message, the framework ascends another level and consults the base class's base class, systematically working its way up the inheritance chain until it finds a message handler or passes the message to Windows for default processing. Figure 1-5 illustrates CMainWindow's message map schematically and shows the route that the framework travels as it searches for a handler to match a given message ID, beginning with the message map entries for CMainWindow.
What MFC's message-mapping mechanism amounts to is a very efficient way of connecting messages to message handlers without using virtual functions. Virtual functions are not space-efficient because they require vtables, and vtables consume memory even if the functions in them are not overridden. The amount of memory used by a message map, in contrast, is proportional to the number of entries it contains. Since it's extremely rare for a programmer to implement a window class that includes handlers for all of the different message types, message mapping conserves a few hundred bytes of memory just about every time a CWnd is wrapped around an HWND.
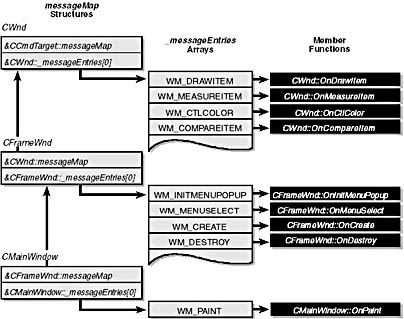
Figure 1-5. Message-map processing.
Windows, Character Sets, and the _T Macro
Microsoft Windows 98 and Microsoft Windows NT use two different character sets to form characters and strings. Windows 98 and its predecessors use the 8-bit ANSI character set, which is similar to the ASCII character set familiar to many programmers. Windows NT and Windows 2000 use the 16-bit Unicode character set, which is a superset of the ANSI character set. Unicode is ideal for applications sold in international markets because it contains a rich assortment of characters from non-U.S. alphabets. Programs compiled with ANSI characters will run on Windows NT and Windows 2000, but Unicode programs run slightly faster because Windows NT and Windows 2000 don't have to perform an ANSI-to-Unicode conversion on every character. Unicode applications won't run on Windows 98, period, unless you convert every character string passed to Windows from Unicode to ANSI format.
When an application is compiled, it is compiled to use either ANSI or Unicode characters. If your application will be deployed on both Windows 98 and Windows 2000, it may behoove you to make strings character set neutral. Then, by making a simple change to the project's build settings or adding a #define to a header file, you can tell the compiler whether to produce an ANSI build or a Unicode build. If you encode a string literal like this:
"Hello" |
the compiler forms the string from ANSI characters. If you declare the string like this:
L"Hello" |
the compiler uses Unicode characters. But if you use MFC's _T macro, like this:
_T ("Hello") |
the compiler will emit Unicode characters if the preprocessor symbol _UNICODE is defined, and ANSI characters if it is not. If all your string literals are declared with _T macros, you can produce a special Windows NT_only build of your application by defining _UNICODE. Defining this symbol implicitly defines a related symbol named UNICODE (no underscore), which selects the Unicode versions of the numerous Windows API functions that come in both ANSI and Unicode versions. Of course, if you'd like the same executable to run on either platform and you're not concerned about the performance hit an ANSI application incurs under Windows NT, you can forget about the _T macro. I'll use _T throughout this book to make the sample code character set neutral.
Is wrapping string literals in _T macros sufficient to make an application completely agnostic with regard to character sets? Not quite. You must also do the following:
- Declare characters to be of type TCHAR rather than char. If the _UNICODE symbol is defined, TCHAR evaluates to wchar_t, which is a 16-bit Unicode character. If _UNICODE is not defined, TCHAR becomes plain old char.
- Don't use char* or wchar_t* to declare pointers to TCHAR strings. Instead, use TCHAR* or, better yet, the LPTSTR (pointer to TCHAR string) and LPCTSTR (pointer to const TCHAR string) data types.
- Never assume that a character is only 8 bits wide. To convert a buffer length expressed in bytes to a buffer size in characters, divide the buffer length by sizeof(TCHAR).
- Replace calls to string functions in the C run-time library (for example, strcpy) with the corresponding macros in the Windows header file Tchar.h (for example, _tcscpy).
Consider the following code snippet, which uses the ANSI character set:
char szMsg[256]; pWnd->GetWindowText (szMsg, sizeof (szMsg)); strcat (szMsg, " is the window title"); MessageBox (szMsg); |
Here's what the same code would look like if it were revised to be character set neutral:
TCHAR szMsg[256]; pWnd->GetWindowText (szMsg, sizeof (szMsg) / sizeof (TCHAR)); _tcscat (szMsg, _T (" is the window title")); MessageBox (szMsg); |
The revised code uses the generic TCHAR data type, it makes no assumptions about the size of a character, and it uses the TCHAR-compatible string-concatenation function _tcscat in lieu of the more common but ANSI character set_dependent strcat.
There's more that could be said about ANSI/Unicode compatibility, but these are the essentials. For additional information, refer to the online documentation that comes with Visual C++ or to Jeffrey Richter's Advanced Windows (1997, Microsoft Press), which contains an excellent chapter on Unicode and a handy table listing the string macros defined in Tchar.h and their C run-time counterparts.
Building the Application
The CD in the back of this book contains everything you need to use the Hello program in Visual C++. The folder named \Chap01\Hello contains the program's source code as well as the files that make up a Visual C++ project. To open the project, simply select Open Workspace from Visual C++'s File menu and open Hello.dsw. If you modify the application and want to rebuild it, select Build Hello.exe from the Build menu.
You don't have to use the Hello files on the CD. If you'd prefer, you can create your own project and type in the source code. Here are step-by-step instructions for creating a new project in Visual C++ 6:
- Select New from the Visual C++ File menu, and click the Projects tab to go to the Projects page.
- Select Win32 Application, and enter a project name in the Project Name text box. If desired, you can change the path name—the drive and folder where the project and its source code will be stored—in the Location text box. Then click OK.
- In the Win32 Application window, select An Empty Project and then click Finish.
- Add source code files to the project. To enter a source code file from scratch, select New from the File menu, select the file type, and enter the file name. Be sure the Add To Project box is checked so that the file will be added to the project. Then click OK, and edit the file as you see fit. To add an existing source code file to a project, go to the Project menu, select Add To Project and then Files, and pick the file.
- Select Settings from the Project menu. In the Project Settings dialog box, be sure that the project name is selected in the left pane and then click the General tab if the General page isn't already displayed. Select Use MFC In A Shared DLL from the drop-down list labeled Microsoft Foundation Classes, and then click OK to register the change with Visual C++.
Choosing Use MFC In A Shared DLL minimizes your application's executable file size by allowing MFC to be accessed from a DLL. If you choose Use MFC In A Static Library instead, Visual C++ links MFC code into your application's EXE file and the file size grows considerably. Static linking uses disk space less efficiently than dynamic linking because a hard disk containing 10 statically linked MFC applications contains 10 copies of the same MFC library code. On the other hand, an application that is statically linked can be run on any PC, whether or not the MFC DLL is present. It's your call whether to link to MFC statically or dynamically, but remember that if you distribute a dynamically linked EXE, you'll need to distribute the DLL that houses MFC, too. For a release-build MFC application created with Visual C++ version 6, that DLL is named Mfc42.dll if the program uses ANSI characters and Mfc42u.dll if it uses Unicode characters.
The Big Picture
Before we move on, let's pause for a moment and review some of the important concepts learned from the Hello application. The very first thing that happens when the application is started is that a globally scoped application object is created. MFC's AfxWinMain function calls the application object's InitInstance function. InitInstance constructs a window object, and the window object's constructor creates the window that appears on the screen. After the window is created, InitInstance calls the window's ShowWindow function to make it visible and UpdateWindow to send it its first WM_PAINT message. Then InitInstance returns, and AfxWinMain calls the application object's Run function to start the message loop. WM_PAINT messages are converted by MFC's message-mapping mechanism into calls to CMainWindow::OnPaint, and OnPaint draws the text "Hello, MFC" in the window's client area by creating a CPaintDC object and calling its DrawText function.
If you're coming to MFC straight from the Windows SDK, this probably seems like a pretty strange way to do business. Two-step window creation? Application objects? No more WinMain? It's definitely different from the way Windows used to be programmed. But compare Hello's source code to the C program listing back in Figure 1-2, and you'll find that MFC undeniably simplifies things. MFC doesn't necessarily make the source code easier to understand—after all, Windows programming is still Windows programming—but by moving a lot of the boilerplate stuff out of the source code and into the class library, MFC reduces the amount of code you have to write. That, combined with the fact that you can modify the behavior of any MFC class by deriving from it a class of your own, makes MFC an effective tool for programming Windows. The benefits will really become apparent when you begin tapping into some of the more sophisticated features of Windows or building ActiveX controls and other Windows-based software components. With MFC, you can get an ActiveX control up and running in nothing flat. Without it—well, good luck.
Hello lacks many of the elements that characterize a full-blown Windows program, but it's still a good first step on the road to becoming an MFC programmer. In subsequent chapters, you'll learn about menus, dialog boxes, and other components of an application's user interface. You'll also see how Windows programs read input from the mouse and keyboard and learn more about drawing in a window. Chapter 2 leads off by introducing some additional CDC drawing functions and demonstrating how to add scroll bars to a frame window so that you can view a workspace larger than the window's client area. Both are essential next steps in building the knowledge base required to become a Windows programmer.
EAN: 2147483647
Pages: 101
- Article 230 Services
- Article 328 Medium-Voltage Cable Type MV
- Article 354 Nonmetallic Underground Conduit with Conductors Type NUCC
- Article 500 Hazardous (Classified) Locations, Classes I, II, and III, Divisions 1 and 2
- Example No. D2(c) Optional Calculation for One-Family Dwelling with Heat Pump(Single-Phase, 240/120-Volt Service) (See 220.82)