| To manage a cluster effectively, an administrator must be familiar with managing cluster groups and resources using one or more cluster management applications. Microsoft provided two cluster management applications for Cluster Service: one GUI-based and one command linebased. Cluster Administrator The Cluster Administrator, shown in Figure 31.8, gives an administrator a GUI-based tool for managing clusters. This tool can be used to manage local and remote clusters, including tasks such as creating new clusters, adding nodes to existing clusters, and creating cluster resource groups or resources. This tool can also be used to remove (evict) nodes from a cluster and perform manual failovers of cluster groups. Figure 31.8. Sample Cluster Administrator tool screen. 
The Cluster.exe Utility Cluster.exe is a command-line utility that can be used to manage a local or remote cluster from a command line or a shell. This tool can be used to access a cluster when the GUI-based Cluster Administrator will not open. Additionally, this tool can be used in a script to remotely deploy or change cluster configurations. Cluster Automation Server The Cluster Automation server provides a mechanism for software developers and Independent Software Vendors (ISVs) to create custom cluster-management applications to enhance or provide administration of clusters. The Cluster Automation server provides a set of Component Object Model (COM) objects to allow developers to create scripts to automate the management of their clusters. Configuring Failover and Failback Clusters that contain two or more nodes automatically have failover configured for each defined cluster group when the second node and following nodes join the cluster. By manually adding additional nodes to existing cluster groups, the administrator can add failover functionality to every node in the cluster on a group-by-group basis. Failback is never configured by default and needs to be manually configured for each cluster group if desired. Failback allows a designated preferred server to always run a particular cluster group when it is available. Cluster Group Failover Configuration To create a failover and failback process, the cluster group failover configuration needs to be set up properly. Follow these steps to configure cluster group failover: 1. | Click Start, Administrative Tools, Cluster Administrator.
| 2. | When the Cluster Administrator opens, choose Open Connection to Cluster and type the name of the cluster in the Cluster Name text box. Click OK to continue. If the local machine is part of the cluster, enter . (period) as the cluster name, and the program will connect to the cluster running on the local machine.
| 3. | Right-click the appropriate cluster group and select Properties.
| 4. | Select the Failover tab and set the maximum number of failovers allowed during a predefined period of time. When the number of failovers is exceeded within the Period interval, shown as a threshold of 10 in Figure 31.9, Cluster Service will change the group to a failed state.
Figure 31.9. Setting failover thresholds for the cluster group. 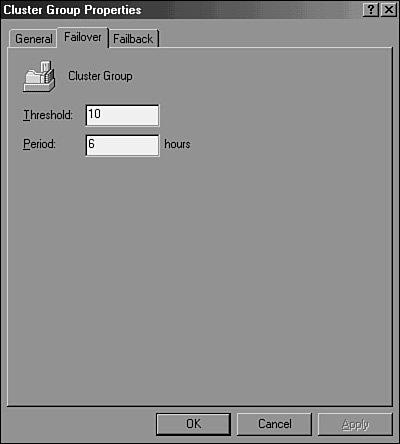
| | | 5. | Click Next and then Finish to complete the failover configuration.
| 6. | Select File, Close to exit Cluster Administrator.
|
Cluster Group Failback Configuration The cluster group failback process involves making configuration changes in the Cluster Administrator utility. Follow these steps to configure cluster group failback: 1. | Click Start, Administrative Tools, Cluster Administrator.
| 2. | When Cluster Administrator opens, choose Open Connection to Cluster and type the name of the cluster in the Cluster Name text box. Click OK to continue.
| 3. | Right-click the appropriate cluster resource group and select Properties.
| 4. | On the General tab, click the Modify button to select the preferred owners. Doubleclick the node or nodes you prefer the cluster group to run on and click OK to return to the cluster group's General tab.
| 5. | Select the Failback tab, choose the Allow Failback radio button, and set time options for allowing failback.
| 6. | Click Next and then Finish to complete the failback configuration.
| 7. | Select File, Close to exit Cluster Administrator.
|
Note To reduce the chance of having a group failing back to a node during regular business hours after a failure, configure the failback schedule to allow failback only during nonpeak times or after hours using settings similar to those made in Figure 31.10. Figure 31.10. Setting failback for a cluster file group. 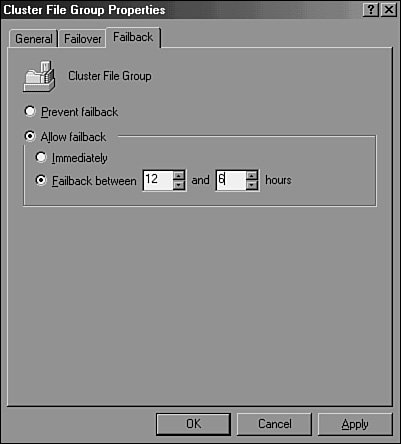
Testing Clusters After all the desired cluster nodes are added and failover and failback are configured for each cluster group to complete cluster installation, it is time to test cluster functionality. For these tests to be complete, failover and, when applicable, failback of cluster groups need to be tested. They can be tested by manual failover and also by taking a cluster node off the network by unplugging network cards. However, the cluster is not tested by disconnecting shared storage device connections because this may cause possible corruption in the shared storage data. Note Clusdiag.msi, located in the Windows Server 2003 Resource Kit, can be used to diagnose and test the cluster. It can also aid in troubleshooting failures by providing administrators reports based on prior testing.
Testing Cluster Group Manual Failover To test the cluster group failover manually, follow these steps: 1. | Open Cluster Administrator, right-click the desired cluster group, and choose Take Offline.
| 2. | Right-click the same cluster group and choose Move Group. If the cluster contains more than two nodes, choose the node to which you want to move the group.
| 3. | Right-click the same cluster group and choose Bring Online.
| 4. | The group now should start on the node you chose in step 2. Repeat steps 13 for each cluster group, moving back and forth between all available cluster nodes.
| 5. | When testing is complete, move cluster groups to their desired cluster nodes and bring all groups online.
|
Initiating Failure of a Cluster Resource To simulate a cluster resource failure, a cluster administrator can initiate a resource failure using the Cluster Administrator utility. This utility can be used to verify how a failing cluster resource will affect the cluster group. To test the failure of a cluster resource, follow these steps: 1. | Open Cluster Administrator.
| 2. | Right-click the cluster resource you will manually fail and select Properties.
| | | 3. | Select the Advanced tab and note how many failures this resource will tolerate before it finally fails completely or fails the entire cluster group.
| 4. | Close the resource's property page.
| 5. | Right-click the cluster resource you will manually fail and choose Initiate Failure.
| 6. | Repeat the preceding steps as necessary to ensure proper operation during resource failure conditions.
| 7. | When testing is complete, move cluster groups to their desired cluster nodes and bring all groups online.
|
Initiating Cluster Node Network Failure To simulate and verify how cluster groups will fail over during a cluster node network or network card failure, perform the following steps: 1. | Log on to the desired cluster node with Cluster Administrator or Local Administrator permissions.
| 2. | Click Start, Control Panel.
| 3. | Double-click the Network Connections applet.
| 4. | Right-click each of the cluster node's private network and public network adapters and choose Disable.
| 5. | On an available cluster node, log in using a Cluster Administrator account.
| 6. | Click Start, Administrative Tools, Cluster Administrator.
| 7. | If the Cluster Administrator does not connect to the cluster or connects to a different cluster, choose File, Open Connection.
| 8. | From the Active drop-down box, choose Open Connection to Cluster. Then, in the Cluster or Server Name drop-down box, type . (period) and click OK to connect.
| 9. | Verify that the network-disabled node appears as offline and that all cluster groups have failed over to other available cluster nodes.
| 10. | When testing is complete, enable all disabled network cards on the network-disabled node.
| 11. | Move cluster groups to their desired cluster nodes and bring all the groups online.
|
Maintaining Cluster Nodes Applications are clustered due to the critical part they play in a business. Even though the highest availability and fault tolerance are needed, each cluster node will, at one point or another, require maintenance for hardware or software upgrades. To prepare a cluster node for maintenance, a few preliminary and post steps need to occur. Pre-Maintenance Tasks Before maintenance is run on a cluster node, several tasks need to be completed. To prepare a cluster node for maintenance, do the following: 1. | Whether you're planning a software or hardware upgrade, research to see whether the changes will be supported on a cluster node.
| 2. | Log on to a cluster node that will remain online using an account that has Administrative permissions on the cluster.
| 3. | Click Start, Administrative Tools, Cluster Administrator.
| 4. | If Cluster Administrator does not open to the correct cluster or does not open a cluster, pull down the Cluster Server menu and choose to connect to an existing cluster. Then enter the cluster's fully qualified domain name and click OK.
| 5. | Find the server that will be going offline for maintenance and double-click it.
| 6. | Double-click Active Groups.
| 7. | If there are any active groups, when appropriate (after hours or during a change control session) right-click each active group and choose Move Group. If there are more than two nodes in the cluster, choose the node you are taking offline for maintenance.
| 8. | Repeat step 7 for each remaining active group.
| 9. | In the right pane, right-click the appropriate node and choose Pause Node.
| 10. | Close Cluster Administrator.
|
Perform necessary maintenance, including any reboots if necessary. Check to see that all updates have been applied successfully and the server hardware and software are running as expected. When all checks are completed, you are ready to make this node available in the cluster. Post-Maintenance Tasks After maintenance has been conducted on a cluster, several tasks need to be completed. To perform follow-up maintenance, do the following: 1. | Log on to a cluster node that has remained online using an account that has Administrative permissions on the cluster.
| 2. | Click Start, Administrative Tools, Cluster Administrator.
| 3. | If Cluster Administrator does not open to the correct cluster or does not open to any cluster, pull down the Cluster Server menu and choose Connect to an Existing Cluster. Then enter the cluster's fully qualified domain name and click OK.
| | | 4. | Find the server that is paused for maintenance, right-click it, and choose Resume Node.
| 5. | In the right pane, double-click the cluster name at the top of the window.
| 6. | Double-click Groups.
| 7. | In the left pane, right-click a cluster group that you want running back in the updated node and choose Move Group. (If there are more than two nodes in the cluster, choose the upgraded node.)
| 8. | Repeat step 7 for any additional cluster groups you want running on the upgraded node. When finished selecting the cluster groups, click OK to execute.
|
Creating Additional Cluster Groups and Resources The Cluster server supports multiple cluster groups that can be used to support several purposes. For instance, a cluster group can be created to consolidate a standalone file server to a virtual server running on the cluster or to run as a separate cluster application group. Also, some applications like Microsoft SQL Server 2000 may require separate cluster groups to operate efficiently. When additional cluster groups are necessary, they can be easily created using the Cluster Administrator program. Creating Groups To create new cluster groups, perform the following steps: 1. | Click Start, Administrative Tools, Cluster Administrator.
| 2. | When Cluster Administrator opens, choose Open Connection to Cluster and type the name of the cluster in the Cluster Name text box. Click OK to continue.
| | | 3. | Right-click the cluster and select New and then Group, as shown in Figure 31.11.
Figure 31.11. Adding a new group for cluster configuration. 
| 4. | Enter the appropriate information to complete the group addition.
| 5. | Click Next and then Finish after all groups have been created.
| 6. | Select File, Close to exit Cluster Administrator.
|
Creating New Resources To create new resources, follow these steps: 1. | Click Start, Administrative Tools, Cluster Administrator.
| 2. | When Cluster Administrator opens, choose Open Connection to Cluster and type the name of the cluster in the Cluster Name text box. Click OK to continue.
| 3. | Right-click the cluster and select New Resource.
| 4. | Type in the appropriate name and description for the resource.
| 5. | Choose the correct resource type and which cluster group it will reside in.
| | | 6. | Choose which servers can run the resource and click Next to continue.
| 7. | Choose which existing resources the new resource will depend on and click Next to continue.
| 8. | Enter any remaining resource parameters to complete the resource creation because certain resources have resource requirements. For instance, a network name resource depends on an IP address resource, so an IP resource must first be configured in a cluster group before a network name resource will be allowed.
| 9. | In Cluster Administrator, right-click the new resource and bring online.
| 10. | Select File, Close to exit Cluster Administrator.
|
Changing the Cluster Service Account Password In previous versions of Cluster Service, changing the Cluster Service account password required bringing the Cluster Service down on each node and manually changing the cluster password using the Change Password applet. Then the Cluster Service logon credentials had to be changed in the Services applet in the Control Panel. Starting with Windows Server 2003, the Cluster Service account password can be changed with the cluster online. Do not, however, change the password using the Active Directory Users and Computers snap-in or the Windows security box if logged in with that account. Instead, run the Cluster.exe command-line utility from a server on the network. At a command prompt, enter the following command to complete the password-changing operation: Cluster.exe /cluster:clustername /changepass:currentpassword, newpassword
Then press Enter to continue. Note All nodes in the cluster must be running on the Windows Server 2003 operating system for this password-changing command to work.
Moving Cluster Groups Moving a cluster group from one node to another makes the resources unavailable during the time necessary to take the group offline and bring it online on the next node. If the administrator moves a group for the purposes of performing maintenance on a node, she must be sure to pause the node after all cluster groups are moved off. This ensures that no cluster groups will move to this node until the administrator resumes node operation after maintenance is performed. If you want to move a group, right-click the cluster group and select Move Group. If more than two nodes are possible owners of this cluster group, choose the appropriate node to move this group to. Removing a Node from a Cluster Cluster nodes can be removed from a cluster for a number of reasons, and this process can be accomplished quite quickly. Note If you're removing nodes on an MNS cluster, be sure that a majority of the nodes remain running to keep the cluster in a working state.
To remove a node from a cluster, follow these steps: 1. | Click Start, Administrative Tools, Cluster Administrator.
| 2. | When the Cluster Administrator opens, choose Open Connection to Cluster and type the server name of a node in the cluster that will remain up and running during this process.
| 3. | Double-click the node that will be removed from the cluster and click Active Groups.
| 4. | If any groups are running on the node, at the appropriate time move these groups to other available nodes.
| 5. | Right-click the cluster node and choose Stop Cluster Service.
| | | 6. | Right-click the cluster node and choose Evict Node, as shown in Figure 31.12.
Figure 31.12. Evicting a node. 
| 7. | Confirm the eviction process by choosing Yes, and the node will be removed from the cluster immediately.
| | | 8. | From a command line, run the following command to remove a node from a cluster:
Cluster.exe /cluster:clustername node nodename /evict
Then press Enter to evict the node.
| 9. | Select File, Close to exit Cluster Administrator.
|
|