| To install DFS, an administrator of a fileserver on the network needs to install the DFS component of Windows 2003 R2 onto a server. The component installation is as follows: 1. | Log on to the desired server using an account with Local Administrator access.
| 2. | Select Start, Settings, Control Panel, Add/Remove Programs.
| 3. | Click Add/Remove Windows Components, and select the Distributed File System component.
Note When you select the Distributed File System component, if you click the Details button, you will notice there are subcomponents that can be selected or deselected individually. The subcomponents are DFS Management, DFS Diagnostic and Configuration Tools, and DFS Replication Service. To take advantage of all the capabilities of DFS, keep all three components enabled as part of the installation process. | 4. | Click Next to install the component, and then click Finished when done.
|
Creating the DFS Root File Share In creating DFS in a Windows 2003 environment, the administrator must start by creating a DFS root. To create the root, the administrator requires Local Administrator access on the server hosting the root. If a domain root is being created, Domain Administrator permissions are also necessary. A DFS root requires a file share. When the DFS root is created, the name is matched to a file share name. The wizard searches the specified server for an existing file share matching the DFS root name; if it does not locate one, the wizard will create the share. As a best practice, the file share should be created and have permissions configured properly before the DFS root is created. Doing so ensures that the intended permissions are already in place. Because share and NTFS permissions are not managed through the DFS console, using the wizard to create the share is fine as long as the share and NTFS permissions are configured immediately following the DFS root creation. To create a file share for a DFS root, follow the steps outlined in the "Managing File Shares" section earlier in this chapter. Note Using NTFS volumes is recommended for DFS root and link target file shares, to enable file- and folder-level security. Also, domain DFS links can be replicated only between file shares on NTFS volumes.
Creating the DFS Root To create a DFS root, follow these steps: 1. | Click Start, All Programs, Administrative Tools, Distributed File System.
| 2. | Right-click Distributed File System in the left pane and select New Root.
| 3. | Click Next on the New Root Wizard Welcome screen to continue.
| 4. | Select the root type and click Next.
| 5. | If you chose a domain root, select the correct domain from the list, or type it in and click Next. (If you chose a standalone root, skip this step.)
| 6. | On the Host Server page, type in the fully qualified domain name of the server that will host the DFS root and click Next to continue. If necessary, click the Browse button to search for the server.
| 7. | On the Root Name page, enter the desired name for the root, enter a comment describing the root, and click Next.
Note The initial DFS root name must match the name of the file share created previously. If the share does not exist, the wizard will prompt you to create a file share from an existing folder or a new folder. Although the wizard can simplify the process by automating this task, it does not provide a method of configuring permissions. | 8. | Click Finish on the Completing the New Root Wizard page to create the root and complete the process.
|
Creating a DFS Link Creating a DFS link is similar to creating the DFS root. A link can be created only to target already-existing shares. The recommendation is to create the file share on an NTFS folder, if possible, to enable file and folder security. To create a file share for a DFS link, follow the steps outlined previously in "Managing File Shares." To create the link, follow these steps: 1. | Click Start, All Programs, Administrative Tools, Distributed File System.
| 2. | If the root you want to host the link is not already shown in the left pane, right-click Distributed File System and select Show Root.
| 3. | In the Show Root window, expand the domain and select the DFS root. Or, for a standalone root, type in the server and share name of the DFS root. Then click OK to open the DFS root.
| 4. | In the left pane, right-click the DFS root and select New Link.
| 5. | On the New Link page, enter the link name, path (UNC server and share name), any comments, and the caching interval and click OK to create the link. A sample configuration is shown in Figure 30.14.
Figure 30.14. Configuring a DFS link. 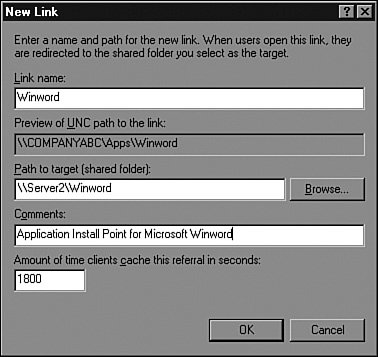
|
The caching interval is the amount of time a client will assume the target is available before the DFS client verifies that the target server is online. Adding Additional Targets Domain-based DFS supports adding multiple targets at the root and link levels. Standalone DFS supports only multiple link targets. To create additional root targets, follow these steps: | | 1. | Click Start, All Programs, Administrative Tools, Distributed File System.
| 2. | If the root you want is not already shown in the left pane, right-click Distributed File System and select Show Root.
| 3. | In the Show Root window, expand the domain and select the DFS root. Or, for a standalone root, type in the server and share name of the DFS root. Then click OK to open the DFS root.
| 4. | In the left pane, right-click the DFS root and select New Root Target.
| 5. | Enter the host server with the additional target file share and click Next. When you're creating additional root targets, the file share must already exist on the host server with the same name as the root.
| 6. | Click Finish in the Completing the New Root Wizard page to create the additional root target.
|
To create an additional link target, follow these steps: 1. | Open the DFS console and connect to the root you want, as outlined in the first step of the preceding section.
| 2. | Click the plus sign next to the DFS root shown and select the DFS link you want.
| 3. | Right-click the DFS link and select New Target.
| 4. | On the New Target page, enter the path to the server and share.
| 5. | The New Target page contains a check box labeled Add This Target to the Replication Set. Leaving this box checked will simply start the Configure Replication Wizard immediately after creating the target. Uncheck this box because replication will be handled next.
| 6. | Click OK to create the target.
|
Publishing DFS Roots in Active Directory Domain-based DFS roots can be published in Active Directory to make locating the root much easier. After the root is published, it can be located by querying Active Directory for files and folders. To publish a root in Active Directory, follow these steps: 1. | Open the DFS console and locate the root you want.
| 2. | Right-click the root and select Properties.
| 3. | Select the Publish tab and check the Publish This Root in Active Directory box.
| | | 4. | Enter the description, owner account name, and keywords used to locate the root and click OK when completed.
| 5. | Click OK to close the Properties page.
|
Best Practices for DFS Replication Following best practices for DFS replication can help ensure that replication occurs as expected. Because file replication is triggered by a file version change or last-saved or modified time stamp, a standard file share may generate many replication changes, which can saturate the network bandwidth. To avoid such scenarios, follow as many of these suggestions as possible: Start with an empty DFS root folder to keep from having to replicate any data at the root level. Also, this can simplify the restore process of a DFS root folder because it contains only links that are managed by DFS. Do not replicate DFS roots because the roots will try to replicate the data in the root folders plus the data contained within the link targets. Replication is not necessary if the links are already replicating. Because the roots will not replicate for redundancy, deploy domain DFS roots and add additional root targets. If possible, use DFS for read-only data. When data is being replicated, FRS always chooses the last-saved version of a file. If a group share is provided through a replicated DFS link and two employees are working on the same file, each on different replica targets, the last user who closes and saves the file will have his change(s) saved and replicated over the changes of other previously saved edits. Replicate only during nonpeak hours to reduce network congestion. For replicating links that contain frequently changing data, this may not be possible, so to provide data redundancy in the unified namespace, create only a single target for that link and deploy it on a cluster file share. This provides server-level redundancy for your file share data. Back up at least one DFS link target and configure the backup to not update the archive bit. Changing the archive bit may trigger unnecessary replication. Thoroughly test server operating system antivirus programs to ensure that no adverse effects are caused by the scanning of files on a replicated DFS target. Verify that the drive that will contain the staging folder for a replication connection contains ample space to accept the amount of replicated data inbound and outbound to this server.
Having a high number of read-write operations is not desirable because it causes heavy replication, and in a scenario like this, DFS replication should be performed during nonpeak hours. |