Using Fault-Tolerant Disk Arrays
| Windows Server 2003 supports both hardware- and software-based RAID volumes to create fault tolerance for disk failures. Redundant Array of Inexpensive Disks (RAID) provides different levels of configuration that deliver disk fault tolerance, and formatting such volumes using the NT File System (NTFS) also allows directory- and file-based security, data compression, and data encryption to be enabled. Hardware-based RAID is preferred because the disk management tasks are offloaded to the RAID controller, reducing the load on the operating system. When a disk is available to Windows Server 2003, it can be configured as a basic disk or a dynamic disk. Disk TypesWindows Server 2003 can access disks connected directly to the server from an IDE controller, SCSI controller, or an external RAID controller. RAID disks can provide faster disk access times but also can provide fault tolerance for disk failures. Hardware-based RAID is achieved when a separate RAID disk controller is used to configure and manage the RAID array. The RAID controller stores the information on the array configuration, including disk membership and status. Hardware-based RAID is preferred over Windows Server 2003 software-based RAID because the disk management processing is offloaded to the RAID card, reducing processor utilization. As mentioned previously, Windows Server 2003 supports two types of disks: basic and dynamic. Basic disks are backward compatible, meaning that basic partitions can be accessed by previous Microsoft operating systems such as MS-DOS and Windows 95 when formatted using FAT; and when formatted using NTFS, Windows NT, Windows 2000, and Windows Server 2003 can access them. Dynamic disks are managed by the operating system and provide several configuration options, including software-based RAID sets and the ability to extend volumes across multiple disks. Basic DisksBasic disks can be accessed by Microsoft Windows Server 2003 and all previous Microsoft Windows or MS-DOS operating systems. These disks can be segmented into as many as four partitions. The combination of partitions can include up to four primary partitions or three primary partitions and one extended partition. Primary partitions can be used to start legacy operating systems and are treated as a single volume. An extended partition can be broken into multiple logical drives. Each logical drive is managed as a separate volume, allowing administrators to create as many volumes on a basic disk as necessary. Basic partitions and logical drives can be formatted as either FAT, FAT32, or NTFS disks. Basic partitions are also referred to as basic volumes. Dynamic DisksDynamic disks can be segmented into several logical drives referred to as dynamic volumes. Dynamic disks are managed by the operating system using the Virtual Disk Service (VDS). Many volumes can be defined on a dynamic disk, but limiting the number of volumes to 32 or fewer is recommended. After a disk is converted to a dynamic disk, it can be mounted only by Windows Server 2003 systems, but the data can still be accessed by other operating systems using Windows Server 2003 file services, including Web services, FTP services, file shares, and other client/server-based applications. In some configurations, dynamic volumes can span two or more disks and provide disk fault tolerance. Dynamic volume types provided in Windows Server 2003 include the following:
Tip As a best practice, try to provide disk fault tolerance for your operating system and data drives, preferably using hardware-based RAID sets. For the rest of this chapter, both basic partitions and dynamic volumes will be referred to as volumes. Disk FormattingWindows Server 2003 supports formatting basic and dynamic volumes using the NTFS, FAT, or FAT32 file system. FAT volumes are supported by MS-DOS and all Microsoft Windows operating systems, but should be limited to 2GB if MS-DOS access is necessary. FAT32 was first supported by Microsoft with Windows 95, but these partitions cannot be read by MS-DOS, Windows for Workgroups, or Windows NT. Windows Server 2003 NTFS volumes are supported by Windows NT 4.0 with Service Pack 6a or higher and all versions of Windows 2000, Windows XP, and Windows Server 2003. File shares can be created on each type of disk format, but NTFS volumes provide extended features such as volume storage quotas, shadow copies, data compression, file- and folder-level security, and encryption. Managing DisksDisks in Windows Server 2003 can be managed using a variety of tools included with the operating system. Disk tasks can be performed using the Disk Management Microsoft Management Console (MMC) snap-in from a local or remote server console or using a command-line utility called diskpart.exe. Using the Disk Management MMC Snap-inMost disk-related administrative tasks can be performed using the Disk Management MMC snap-in. This tool is located in the Computer Management console, but the stand-alone snap-in can also be added in a separate Microsoft Management Console window. Disk Management is used to identify disks, define disk volumes, and format the volumes. Starting in Windows Server 2003, the Disk Management console can be used to manage disks on remote machines. If a disk is partitioned and formatted during the Windows Server 2003 setup process, when installation is complete, the disk will be identified as a basic disk. After Windows Server 2003 is loaded and disk management can be accessed, this disk can be converted to a dynamic disk, giving server administrators more disk configuration options. Using the Diskpart.exe Command-Line UtilityDiskpart.exe is a functional and flexible command-line disk management utility. Most disk tasks that can be performed using the Disk Management console can also be performed using this command-line utility. Using diskpart.exe, both basic volumes and dynamic volumes can be extended, but Disk Management can extend only dynamic volumes. Diskpart.exe can be run with a script to automate volume management. As a sample of scripting diskpart.exe, using a filename like c:\drive info.txt, the following information can be used to extend a volume using unallocated space on the same disk: Select Volume 2 Extend Exit When you're creating the command script file, be sure to press Enter at the end of each command so that when the script is called out, the Enter keystroke is executed. At the command prompt, run Diskpart.exe /s c:\drive_info.txt Now volume 2 will be extended with all the remaining unallocated disk space on the same disk. Note If you want to extend a basic volume using diskpart.exe, the unallocated disk space must be on the same disk as the original volume and must be contiguous with the volume you are extending. Otherwise, the command will fail. Creating Fault-Tolerant VolumesWindows Server 2003 supports fault-tolerant disk arrays configured and managed on a RAID disk controller or configured within the operating system using dynamic disks. To create arrays using a RAID controller, refer to the manufacturer's documentation and use the appropriate disk utilities. Software-based RAID can be configured using the Disk Management console or the command-line utility diskpart.exe. Converting Basic Disks to Dynamic DisksBefore an administrator can create software-based fault-tolerant volumes, the necessary disk must be converted to a dynamic disk. To convert a basic disk to a dynamic disk, follow these steps:
Creating Fault-Tolerant Disk Volumes Using Dynamic DisksCreating a fault-tolerant disk volume in Windows Server 2003 requires having two disks available for a mirrored volume and at least three disks for a RAID 5 volume. To create a mirrored system volume, follow these steps:
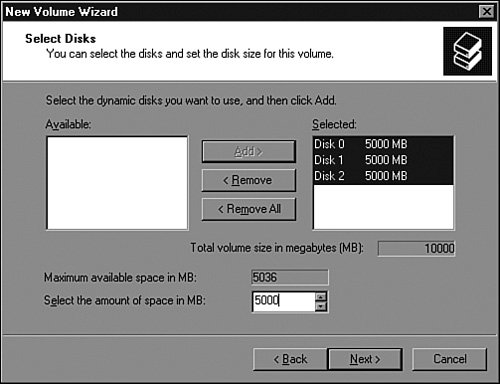
A Windows Server 2003 RAID 5 volume requires three separate dynamic disks, each containing an equal amount of unallocated disk space for the volume. To create a RAID 5 volume using Disk Management, follow these steps:
Tip Before you start using the volume, you should check it for health using the Disk Management MMC snap-in. |
EAN: 2147483647
Pages: 499