Real-Life Scenarios of Group Policy Management
| Now that you have some working recommendations for managing network clients with Group Policy, the remainder of this chapter guides you in a detailed fashion on Group Policy strategies for specific network client scenarios. Every organization has groups and individuals who have unique requirements of the company's network resources. Users who dial in to the network have different needs than office workers who always work from their desks. A network administrator requires a different workstation environment than an employee with a limited set of applications. Technologies in the Windows Server 2003 framework, including Group Policy, enable you to accommodate these different needs. When you can identify the particular types of network clients that you support, you can begin to develop particular strategies and Group Policy solutions for managing those clients. The following sections address some of the most common types of network clients and provide recommendations for managing their unique scenarios. Working with Mobile UsersMany companies have employees who either frequently travel or are located away from the typical office environment. These mobile users are unique because they usually log on to the company network through a portable computer from different locations over a slow-link dial-up modem connection. Although mobile users differ, both the slow-link connection and lack of local access should be used as the defining qualities for this type of network client. As such, your Windows Server 2003 and Group Policy strategy for managing this type of user should take into account the slow link and lack of local access. Because mobile users are away from the local office, they are in the unique situation of often having to provide for their own computer support. As such, you may want to grant your mobile users more privileges than standard office users. To do this, you apply a Group Policy Object to your mobile clients that would allow the users to perform functions such as printer or software installs, while at the same time protect critical system files. Mobile users also expect access to their critical data whether or not their portable computers are connected to the network. The Offline Files feature of IntelliMirror simplifies management of mobile users in that it allows the users to work on network files when they are not actually connected to the network. Even though Offline files are enabled in Windows 2000 and XP by default, you still need to select the network files and folders for synchronization before giving portable computers to the users. To set up a folder for offline access, perform the following steps:
Note For offline folders to work, the offline folder function needs to be enabled. To enable it, within Windows Explorer, select Tools, Folder Options. Next, click the Offline Files tab, select Enable Offline Files, and then click OK. Combining folder redirection with offline file access makes sense for mobile users. If you redirect the My Documents folder to a network share, when users save files to My Documents, they will be automatically made available for offline use. Note Mobile users are likely to disconnect from their dial-up session to the network without properly logging off. It is recommended that you set offline files to synchronize when users log on and periodically synchronize in the background. This way, you can ensure that the users' files are always up to date. To redirect the My Documents folder to a network share, perform the following steps:
Software installation for mobile users requires a unique strategy. It is not recommended to assign or publish software for mobile users who are rarely in the office. If they periodically work in the office, you can set the Group Policy slow-link detection to the default in the user interface so that software will install only when the user is connected directly to the local area network (LAN). You can verify or adjust the connection speed for Group Policy settings in the Group Policy slow-link detection setting. To do this in the Group Policy Object Editor, navigate to Computer Configuration/Administrative Templates/System/Group Policy or User Configuration/Administrative Templates/System/Group Policy. Mobile users should not, for the most part, be running networkbased applications. Typically, your mobile users' portable computers should have all the core software installed before they have to work outside the office. If users require additional software after they are in the field and cannot return to the office to have it installed, it may make sense to copy your software packages to CD to be installed locally by the mobile users with elevated privileges. Managing Remote UsersRemote users share many of the characteristics of the mobile users discussed in the preceding section. As such, they also benefit from many of the same technological recommendations made for managing mobile users. This includes offline file access combined with folder redirection. Remote users as a network client type may be distinguished from mobile users in that they typically connect to a network from a static location (although remote from the office), and they often benefit from a higher-speed connection such as DSL or cable modem. Whereas a traveling mobile user logs in to your network from hotel rooms and airport kiosks over a dial-up modem, the remote user often works from home and connects over a high-speed DSL or cable modem. With the added benefit of a high-speed connection, software installations that are published or assigned through Group Policy can be implemented to remote users. This, in turn, allows you to lock down some of the privileges you may have granted to your mobile users through Group Policy (such as software installation). Preventing your remote users from installing their own software or making configuration changes to their computers reduces total cost of ownership. If you intend to implement additional security to your remote users' connections to the network, you should implement a virtual private network (VPN) server solution. A VPN is a Windows Server 2003 Point-to-Point Tunneling Protocol (PPTP) and Layer Two Tunneling Protocol (L2TP) technology deployment that creates a secure remote access network connection. Although implementing a VPN solution is outside the context of this chapter, some policy-related items should be considered. You should create an Active Directory group (such as VPN_Users) for those remote users who will be connecting to the network over the VPN connection. You will use this group name in the conditions section of the Remote Access Policy. In the dial-in properties of each user account, you should set Control Access through Remote Access Policy. Next, create the Group Policy Object for the Remote Access policy that will define the authentication and encryption settings for the remote users. Assuming you already have a Windows Server 2003 server configured for VPN using Routing and Remote Access, you can configure additional remote access policies through Routing and Remote Access as follows:
Locking Down WorkstationsIn some companies, employees have total control of their desktop computers regardless of their business function or computer expertise. When these users have problems, they call you or your IT department. This scenario proves to be very expensive to support. These support costs are decreased the more you adopt and enforce network client standards and limit the ability of users to change the standard configurations. The degree to which you choose to limit your users' control over their desktop environment depends on the roles these users play in the company and their level of computer expertise. You should limit some groups more than others. For example, a data entry clerk who uses a computer solely to input data into a database requires little or no control over the desktop configuration, whereas a software programmer possessing a high level of computer expertise requires more control of the desktop environment. You can create different organizational units (OUs) and apply different group policies based on the level of desktop control you allow these groups of network clients. This section reviews Group Policy configuration recommendations for a highly managed network client. A good example of a highly managed network client would be a data entry clerk. Data entry clerks use computers to enter data that will then be available for other corporate functions. Data entry workers are dedicated to a single task and normally use a single line-of-business application (or a small number of related applications) to do their jobs. System services such as virus checkers are the only other applications installed. Bank tellers, data entry personnel, factory line workers, and transcriptionists fall into this category. These users require a standard application with no specialized or customized configurations. To manage the data entry clerk, you should implement a highly managed configuration that does not require the user to have computer skills for data management, software installs, or system configuration. Characteristics of the policies associated with the highly managed network client include the following:
Figure 29.2. Options for limiting the Start menu and taskbar. Supporting Power UsersAs you can see from the preceding section, you can really lock down a network client's ability to change the desktop standards you set in place. Of course, for many of your network clients, to have a workstation that's too restrictive would hamper productivity and cause great frustration. There are always groups in every organization that require more control of the workstation. To meet this need, you should not have to provide complete control of your carefully designed desktop standards. You can still maintain a level of control over your network clients while at the same time provide a productive desktop environment to your more demanding users. This section focuses on these more demanding users, who can be characterized as lightly managed network clients. A good example of a lightly managed network client is a software developer. Software developers' job success is completely dependent on their use of technology. They require highly specialized software applications to carry out their jobs and make relatively little use of office productivity applications. These workers can be either project-driven or process-driven. Because their salaries are high and their job value is directly tied to their use of technology, computer downtime for these individuals is extremely costly. Financial traders and other types of engineers also fall into this category. To manage your software developer network client, you should implement a lightly managed desktop policy. You can maximize the user's ability to perform the job function by removing obstacles and distractions, while at the same time maintaining a level of manageability to reduce total cost of ownership. Characteristics of the policies associated with the lightly managed desktop include the following:
Providing a High Level of SecurityIn the preceding scenarios, you were presented with recommendations on how to provide or limit particular functionality to the network client based on the role that client played in the organization. In this section, the focus is on how to increase the security of the network client. Most organizations have groups or individual network clients who work with or require access to highly confidential data. You may have such users working in the Human Resources or Payroll departments of your company. Executives in the company also fall under this category. Because these users are privileged to very sensitive information, it is important for you to secure the network accounts used to access this information as well as the means by which this data is accessed. Though Windows Server 2003 security is addressed in Part IV, "Security," in this book, this section outlines some security recommendations as they relate to managing high-security network clients through Group Policy. Because you probably store sensitive data on servers that is, in turn, accessed by privileged network clients, you should secure that data as it passes from server to client. Most data is not protected when it travels across the network, so employees, supporting staff members, or visitors may be able to plug in to your network and copy data for later analysis. They can also mount network-level attacks against other computers. Internet Protocol Security (IPSec), a built-in feature of Windows Server 2003, is a key component in securing data as it travels between two computers. IPSec is a powerful defense against internal, private network, and external attacks because it encrypts data packets as they travel on the wire. You can create and modify IPSec policies using the IP Security Policy Management snap-in available in the Microsoft Management Console. IPSec policies can then be assigned to the Group Policy Object of a site, domain, or organizational unit. If your sensitive data is located on a server, you should assign the predefined Secure Server policy to the server so that it always requires secure communication. You can then assign the predefined Client (Respond Only) policy to the network clients that will communicate with the secure server. This policy ensures that when the network client is communicating with the secure server, the communication is always encrypted. The network client can communicate normally (unsecured) with other network servers. To assign the Client (Respond Only) IPSec policy in the Group Policy Object Editor, perform the following steps:
Although it may be okay for your high-security network client to communicate normally (unsecured) with other servers within your organization that do not contain sensitive data, you may still want to limit that client's ability to communicate outside the organization. You can enable several settings within Group Policy to prevent a user from modifying or creating new network connections. For example, a Group Policy setting can be applied to prohibit connecting a remote access connection. To enable Group Policy settings related to network connections in the Group Policy Editor, navigate to User Configuration/Administrative Templates/Network. Figure 29.3 displays the settings you can enable in this category. Figure 29.3. Settings for network connections.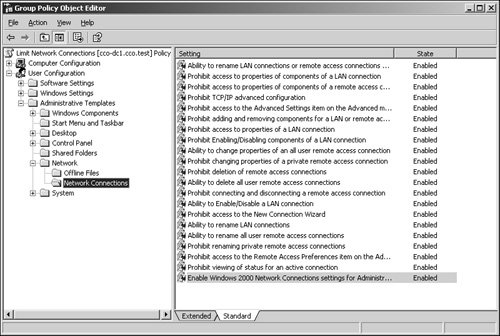 If your secure network clients save sensitive data to their local workstations, you can provide additional security to this data through the Encrypting File System (EFS). Because EFS is integrated with the file system, it is easy to manage and difficult to attack. Moreover, once a user has specified that a file be encrypted, the actual process of data encryption and decryption is completely transparent to the user. How data encryption and decryption works is explained in detail in Chapter 12, "Server-Level Security." To encrypt a file or folder, follow these steps:
To encrypt and decrypt files, a user must have a file encryption certificate. If the file encryption certificate is lost or damaged, access to the files is lost. Data recovery is possible through the use of a recovery agent. A user account of a trusted individual can be designated as a recovery agent so that a business can retrieve files in the event of a lost or damaged file encryption certificate or to recover data from an employee who has left the company. One of the many advantages of using Windows Server 2003 domains is that you can configure a domain EFS recovery policy. In a default Windows Server 2003 installation, when the first domain controller (DC) is set up, the domain administrator is the specified recovery agent for the domain. The domain administrator can log on to the first DC in the domain and then change the recovery policy for the domain. If you want to create additional recovery agents, the user accounts must have a file recovery certificate. If available, a certificate can be requested from an enterprise Certificate Authority (CA) that can provide certificates for your domain. However, EFS does not require a CA to issue certificates, and EFS can generate its own certificates to users and to default recovery agent accounts. Maintaining Administrator WorkstationsAt this point, you have established and applied Group Policy to all your network clients based on their function, location, and security needs to provide a productive and manageable desktop or laptop experience. You must now turn your attention to the network clients that manage the network: the administrators' workstations. In many companies, the administrators' workstations have no controls in place at all. The accounts the administrators use to log on to the network give them access to control every aspect of the workstation, as well as the servers. Because these accounts have so much power over the network, it is recommended that policies are in place to protect that power (see Figure 29.4). This section suggests some recommendations in the proper configuration and use of the administrator workstation. Figure 29.4. Public key policy options and settings.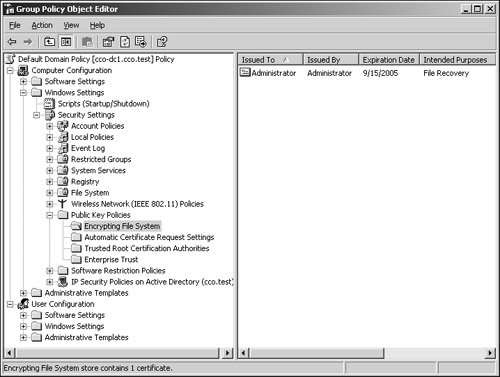 To make changes in Active Directory, perform system maintenance, run backups and restores, and install software, administrators require a logon account that gives them elevated privileges. At the same time, administrators also perform normal network activity such as reading email, writing documents, and setting schedules. For this reason, administrators should have two or more accounts. They should have an account that behaves as a normal network client account with the same privileges and subject to the same Group Policy as most normal users or power users. This account would then be used as the standard logon for the administrator workstation. They should then have other accounts for workstation administration and network or domain administration that remain secure in virtue of not being used during the day-to-day network client work. Even administrators can inadvertently make damaging changes to a workstation or server configuration if they are logged in with Domain Admin privileges all the time. The Run As feature of Windows Server 2003 and Windows 2000 can be used from an administrator workstation or any network client to elevate privileges temporarily to perform administrative functions. For example, while logged in to a workstation with a user account that has standard user privileges, you can run Active Directory Users and Computers using the Run As command to execute the utility from an administrative account. To run an application with the Run As command, do the following:
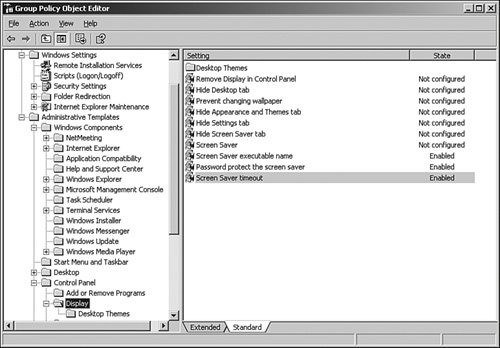
It is also recommended to enforce a password-protected screensaver with a short timeout interval on administrator workstations. This protects the workstation from malicious users taking advantage of the administrator's credentials should the administrator be temporarily away from the machine. To specify a particular screensaver with password protection and timeout in a Group Policy, do the following:
Note Group Policy administrators should keep in mind that user accounts belonging to the Domain Admins or Enterprise Admins groups do not have group policy applied to their accounts by default and should be enabled with extreme caution. Finally, when you're dealing with a large organization with distributed administration, it is a good idea to delegate authority for your network clients to administrator groups based on geographical location. Some organizations make the mistake of creating a global administrators group populated with every administrator in the company. Just because an administrator in the Santa Clara office requires administrative rights over the network clients in his office does not mean that he should also get administrative rights over network clients in Papua, New Guinea. Keeping your administrators organized also protects your network clients from receiving improper Group Policy assignments. |

EAN: 2147483647
Pages: 499