Leveraging the Capabilities of the Quarantine Policy Check Tool
| The most significant tool in the Windows 2003 Resource Kit for remote access environments is the Quarantine Policy Check add-in. This is one of those hidden gems buried in the Resource Kit that would otherwise be overlooked if not brought to your attention. The Quarantine Policy Check tool enables an administrator to stop a VPN user from directly accessing a network by first checking to make sure the user's system meets minimum network requirements before accessing the network. The policy check can confirm whether the remote system has the latest security patches applied, or that the system has been recently scanned for viruses and worms. If the system fails the validation, the system is quarantined and an additional policy can be initiated to conduct the appropriate patch updates and virus scan and cleaning before the remote system is connected to the production network. If the system passes the policy check, the remote user system is allowed connection to the network. How the Quarantine Policy Check WorksThe Quarantine Policy Check works in conjunction with the Connection Manager and is a post-connection action that initiates a network policy script immediately after a remote user properly authenticates into the network, but before the user is actually connected to the production network. The network policy script performs a validation check on the remote access client system to verify that the system conforms to the security policies for patch updates and virus-clean requirements of the organization. When the script has run successfully and the remote system has satisfied the requirements of the network policy, the system is allowed access to the network. If the script fails, the remote access user is denied access to the production network and is commonly redirected to an organization Web page that describes how users can make their systems comply with organizational policies. This may include redirecting the user to a script that performs the appropriate updates and virus-scan cleans necessary to get the remote system updated for a subsequent logon attempt to the production network. The various files in the Windows 2003 Resource kit for the Quarantine Policy Check tool are rqc.exe, rqs.exe, and rqs_setup.bat. After RRAS is up and running on a Windows 2003 server for VPN and/or dial-up client access use, an administrator can run the rqs_setup batch file that "installs" the rqs server agent. The rqc agent is installed on remote systems and acts as the remote administrative control component for the quarantine check and validation processes. Quarantine Control Components and System RequirementsTo be able to use the Quarantine Policy Check tools, a network should be running Windows Active Directory so that group policies can be enabled to manage the quarantine checks. Although it is possible to put a Windows 2003 RRAS server on a Windows NT4 domain and use system policies to enable the Quarantine Policy Check functionality, for the purpose of this Windows 2003-focused book, it is assumed that the organization already has Active Directory enabled in the environment and that all policies will be group policies in Active Directory. The components needed to enable Quarantine Policy Check include the following:
The remote access clients that are supported for the Quarantine Policy Check include the following:
Note Although Windows Millennium and Windows 98 Second Edition systems are supported by the Quarantine Policy Check client tool, because these editions of Windows do not support Windows 2003 group policies, the quarantine policies cannot be enforced on these systems. Without the ability of forcing policies, the full benefits of Quarantine Policy Check enforcement are greatly limited. It is recommended that remote client systems use Windows 2000 or XP Professional, or Windows 2000/2003 Server at a minimum. Installing the RQS.EXE Utility on an RRAS ServerTo get the Quarantine Policy Check working, download and install the Windows 2003 Resource Kit on the Windows 2003 server that will be the RRAS server for the organization. The Windows 2003 Resource Kit can be downloaded at http://www.microsoft.com/windowsserver2003/downloads/default.mspx. After the Resource Kit has been installed, three files will be needed to run the Quarantine Policy Check: RQS.EXE, RQC.EXE, and RQS_Setup.BAT. After confirming the files exist, do the following:
RQS_Setup /install installs all of the necessary files in the c:\system32\RAS folder on the server system. Note RQS_Setup/install does not start the Remote Access Quarantine Agent service, nor is the Remote Access Quarantine Agent service configured to start automatically. The agent requires the RRAS service to start before it starts. After the RQS Registry settings have been set up and configured, a script file should be created and a CM Profile created and installed on remote client systems. Note To remove RQS.EXE, type RQS_Setup /remove and the setup file will remove the Registry settings added during the installation process. Creating a Script File for Post-Connection ExecutionDuring the Quarantine Policy check process, a script is run to check the status of system parameters on the remote client system. Dependent on the results of the script, the remote system either is logged on to the network or is quarantined for further system updates. The script file can be set to look for specific system variables or parameters that indicate the status of patch installations, antivirus software checks and updates, and so on. A sample script file is shown here. The %1, %2, %3, and %4 variables will be passed to the batch file when the batch file is executed. The variables will be highlighted in the next section of this chapter, "Creating a Quarantine Connection Manager Profile." @echo off REM This file should be saved as script.bat echo RAS Connection = %1 echo Tunnel Connection = %2 echo Domain = %3 echo User Name = %4 set MYSTATUS= REM REM Check if Internet Connection Firewall is enabled. REM Set ICFCHECK to 1 if it is (pass). REM Set ICFCHECK to 2 if it is not (fail). REM REM Check if Virus checker is running and has correct signature file installed. REM Set VIRCHECK to 1 if it is (pass). REM Set VIRCHECK to 2 if it is not (fail). REM REM Based on the test results, run Rqc.exe. REM if "%ICFCHECK%" == "2" goto :TESTFAIL if "%VIRCHECK%" == "2" goto :TESTFAIL rqc.exe %1 %2 7250 %3 %4 Version1 REM %1 = %DialRasEntry% REM %2 = %TunnelRasEntry% REM 7250 is the TCP port on which Rqs.exe is listening REM %3 = %Domain% REM %4 = %UserName% REM Version1 is the script version string if "%ERRORLEVEL%" == "0" ( set MYERRMSG=Success! ) else if "%ERRORLEVEL%" == "1" ( set MYERRMSG=Unable to contact remote access gateway. Quarantine support may be disabled. ) else if "%ERRORLEVEL%" == "2" ( set MYERRMSG=Access denied. Please install the Connection Manager profile from http://www.companyabc.com/VPNDenied.htm and reconnect. ) else ( set MYERRMSG=Unknown failure. The client will remain in quarantine mode. ) echo %MYERRMSG% goto :EOF :TESTFAIL echo echo Your computer has failed network compliance tests. Either echo Internet Connection Firewall is not enabled or you do not echo have the correct virus-checking program with the current echo signature file loaded. For information about how to configure echo or install these components, see echo http://www.companyabc.com/remote_access_tshoot.htm. echo :EOF This is just a sample of what the script.bat file can screen for during the connect process. The batch file can be customized for the specific needs of the organization. Creating a Quarantine Connection Manager ProfileAfter a script batch file has been created, a new quarantine Connection Manager (CM) profile needs to be created with the Windows 2003 Connection Manager Administration Kit (CMAK). The CM Profile will be part of the remote client access connection manager configuration that instructs the remote client system to launch the script.bat file and prepare information that the Quarantine Policy Check Server will be able to validate that the remote system can connect to the network. The CMAK is a Windows component of Windows Server 2003. To install the CMAK, do the following:
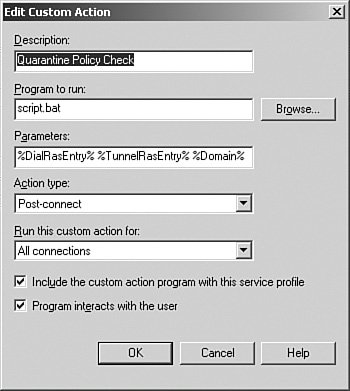
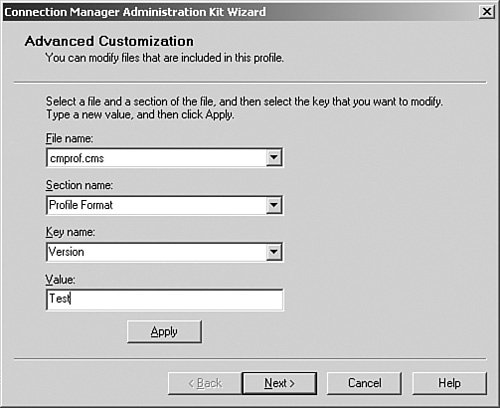
After CMAK has been installed, a custom action needs to be configured in a profile that will be distributed to remote client systems. To configure the custom action, do the following:
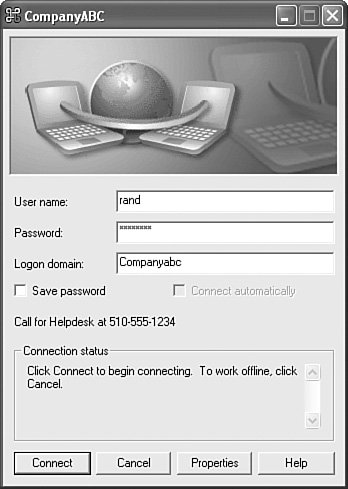
After creating the CM Profile, the files stored on the RRAS server in the \Program Files\Cmak\Profiles\cmprof directory need to be distributed to remote users accessing the network. Use any number of software distribution tools to deploy the CM Profile files, such as using a Group Policy, Logon Script installation, or Microsoft Systems Management Server (SMS). Launching the CM Profile on Remote Access Client SystemsAfter the CM Profile has been created with the CMAK and distributed to remote access client systems, the executable file created (cmprof.exe in the case of the file created from the "Creating a Quarantine Connection Manager Profile" section) needs to be run. When executed, the file installs the connection manager system profile that creates a network connection icon on the remote system. When remote users launch the network connection icon, they are prompted with the information entered into the CMAK configuration wizard. In the example in the "Creating a Quarantine Connection Manager Profile" section, the user will see a screen similar to the one in Figure 26.14. Figure 26.14. Network connection by remote access user. If the remote access user settings do not comply with the settings defined in the script.bat file, the user logon will be halted, effectively quarantining the user session until action is taken. The action, dependent on what was noted in the CMAK, may be to send users to a Web site where they are prompted to call for help desk support or to install certain patches and updates, or the remote system may be scanned, cleaned, and updated automatically. |
EAN: 2147483647
Pages: 499