Upgrading a Windows 2000 Active Directory Forest
| In many cases, the Windows 2000 environment that will be migrated includes one or many Active Directory domains and forests. Because Active Directory is one of the most important portions of a Microsoft network, it is subsequently one of the most important areas to focus on in a migration process. In addition, many of the improvements made to Windows Server 2003 are directly related to Active Directory, making it even more appealing to migrate this portion of an environment. The decision to upgrade Active Directory should focus on these key improvement areas. If one or more of the improvements to Active Directory justifies an upgrade, it should be considered. The following list details some of the many changes made to Active Directory in Windows Server 2003:
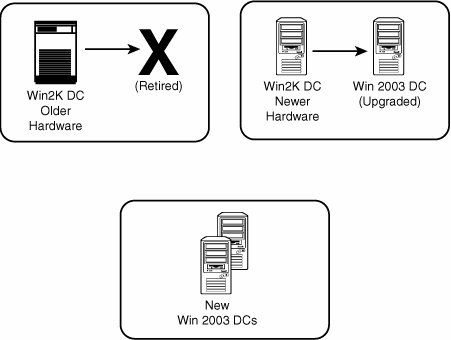
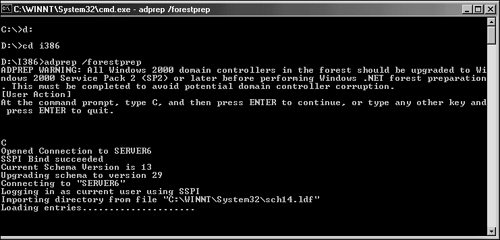
Note For more information on the improvements to Active Directory and the ways they can be used to determine whether your organization should upgrade, refer to Chapter 4, "Active Directory Primer," Chapter 5, "Designing a Windows Server 2003 Active Directory," Chapter 6, "Designing Organizational Unit and Group Structure," and Chapter 7, "Active Directory Infrastructure." Migrating Domain ControllersAfter the decision is made to migrate the Active Directory environment, it is considered wise to make a plan to upgrade all domain controllers in an environment to Windows Server 2003. Unlike with member servers, the full benefits of the Active Directory improvements in Windows Server 2003 are not fully realized until the entire environment is "Windows Server 2003 functional," and all DCs are upgraded. With this in mind, a mixed Windows 2000/Windows Server 2003 domain controller environment can be maintained. However, upgrading all domain controllers in an environment to Windows 2000 Service Pack 2 or higher is highly recommended because an issue with replication between domain controllers was first addressed by that service pack. There are two approaches to migrating domain controllers, similar to the logic used in the "Upgrading a Standalone Server" section. The domain controllers can either be directly upgraded to Windows Server 2003 or replaced by newly introduced Windows Server 2003 domain controllers. The decision to upgrade an existing server largely depends on the hardware of the server in question. The rule of thumb is, if the hardware will support Windows Server 2003 now and for the next two to three years, a server can be directly upgraded. If this is not the case, using new hardware for the migration is preferable. Note A combined approach can be and is quite commonly used, as indicated in Figure 17.3, to support a scenario in which some hardware is current but other hardware is out-of-date and will be replaced. Either way, the decisions applied to a proper project plan can help to ensure the success of the migration. Figure 17.3. Combined approach to the upgrade process. Upgrading the AD Schema Using adprepThe introduction of Windows Server 2003 domain controllers into a Windows 2000 Active Directory requires that the core AD database component, the schema, be updated to support the increased functionality. In addition, several other security changes need to be made to prepare a forest for inclusion of Windows Server 2003. The Windows Server 2003 CD includes a command-line utility called adprep that will extend the schema to include the extensions required and modify security as needed. Adprep requires that both forestprep and domainprep be run before the first Windows Server 2003 domain controller can be added. The Active Directory schema in Windows 2000 is composed of 1,006 attributes, by default, as shown in Figure 17.4. After running adprep forestprep, the schema will be extended to include additional attributes that support Windows Server 2003 functionality. Figure 17.4. ADSI Edit before running forestprep.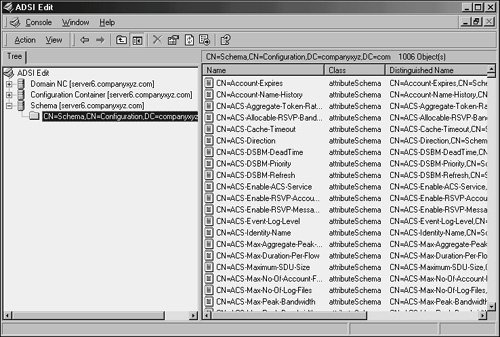 Note Windows Server 2003 R2 contains additional schema updates, above and beyond the additions that the RTM version of Windows Server 2003 introduced. If ADPrep is run from a server running R2, the schema will be extended to include not only the 2003 enhancements but the R2 ones as well. The Adprep utility must be run from the Windows Server 2003 CD or copied from its location in the \i386 folder. The adprep /forestprep operation can be run on the server that holds the Schema Master Operations Master (OM) role by following these steps:
After this step is accomplished, the domainprep procedure must be run. The adprep /domainprep operation must be run once in every domain in a forest. It must be physically invoked on the server that holds the Operations Master (OM) role. The steps for executing the domainprep procedure are as follows:
After the forestprep and domainprep operations are run, the Active Directory forest will be ready for the introduction or upgrade of domain controllers to Windows Server 2003. The schema is extended and includes support for application partitions and other enhancements. The process of upgrading the domain controllers to Windows Server 2003 can then commence. Note Any previous extensions made to a Windows 2000 schema, such as those made with Exchange 2000/2003, are not affected by the adprep procedure. This procedure simply adds additional attributes and does not change those that currently exist. Upgrading Existing Domain ControllersIf the decision has been made to upgrade all or some existing hardware to Windows Server 2003, the process for accomplishing this is straightforward. However, as with the standalone server, you need to ensure that the hardware and any additional software components are compatible with Windows Server 2003. After establishing this, the actual migration can occur. The procedure for upgrading a domain controller to Windows Server 2003 is nearly identical to the procedure outlined in the previous section "Upgrading a Single Member Server." Essentially, simply insert the CD and upgrade, and an hour or so later the machine will be updated and functioning as a Windows Server 2003 domain controller. Replacing Existing Domain ControllersIf you need to migrate specific domain controller functionality to the new Active Directory environment but plan to use new hardware, you need to bring new domain controllers into the environment before retiring the old servers. The process for installing a new server is similar to the process in Windows 2000, and the DCPromo utility can be used to promote a server to domain controller status. Windows Server 2003 supports an enhanced Configure Your Server Wizard, however, which allows an administrator to designate a server into multiple roles. This is the most thorough approach, and the following steps show how to accomplish this to establish a new domain controller in a Windows 2000 Active Directory domain:
Moving Operation Master RolesActive Directory sports a multimaster replication model, in which any one server can take over directory functionality, and each domain controller contains a read/write copy of directory objects. There are, however, a few key exceptions to this, in which certain forest-wide functionality must be held by a single domain controller. These exceptions are known as Operation Master (OM) roles, also known as Flexible Single Master Operation (FSMO) roles. There are five OM roles, as follows:
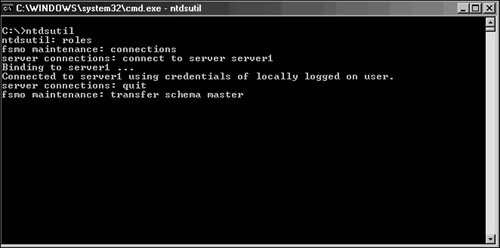
If the server or servers that hold the OM roles are not directly upgraded to Windows Server 2003 but will instead be retired, these OM roles will need to be moved to another server. The best tool for this type of move is the nTDsutil command-line utility. Follow these steps using nTDsutil to move all OM roles to a single Windows Server 2003 domain controller:
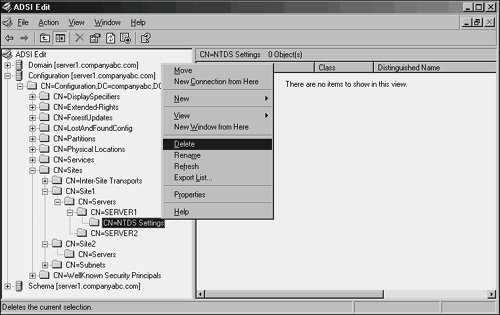
Retiring Existing Windows 2000 Domain ControllersAfter the entire Windows 2000 domain controller infrastructure is replaced by Windows Server 2003 equivalents and the OM roles are migrated, the process of demoting and removing all down-level domain controllers can begin. The most straightforward and thorough way of removing a domain controller is by demoting them using the dcpromo utility, per the standard Windows 2000 demotion process. After you run the dcpromo command, the domain controller becomes a member server in the domain and can safely be disconnected from the network. Retiring "Ghost" Windows 2000 Domain ControllersAs is often the case in Active Directory, domain controllers may have been removed from the forest without first being demoted. This may happen due to server failure or problems in the administrative process, but you must remove those servers from the directory before completing an upgrade to Windows Server 2003. Simply deleting the object from Active Directory Sites and Services does not work. Instead, you need to use a low-level directory tool, ADSI Edit, to remove these servers. The following steps outline how to use ADSI Edit to remove these "ghost" domain controllers:
At this point, after the NTDS Settings are deleted, the server can be normally deleted from the Active Directory Sites and Services snap-in. Upgrading Domain and Forest Functional LevelsWindows Server 2003 does not immediately begin functioning at a native level, even when all domain controllers have been migrated. In fact, a fresh installation of Windows Server 2003 supports domain controllers from Windows NT 4.0, Windows 2000, and Windows Server 2003. You first need to upgrade the functional level of the forest and the domain to Windows Server 2003 before you can realize the advantages of the upgrade. Windows Server 2003 supports four functional levels. The following levels allow Active Directory to include down-level domain controllers during an upgrade process:
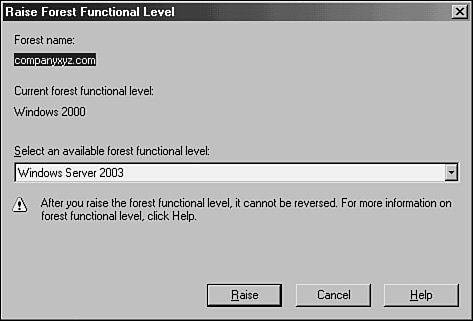
After all domain controllers are upgraded or replaced with Windows Server 2003, you can raise the domain and then the forest functional levels by following these steps:
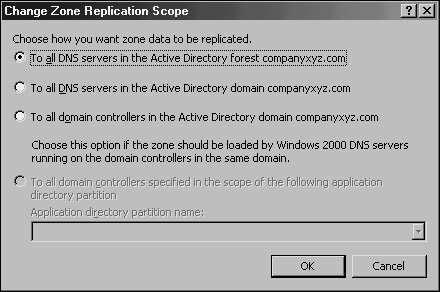
Note The decision to raise the forest or domain functional levels is final. Be sure that any Windows 2000 domain controllers do not need to be added anywhere in the forest before performing this procedure. When the forest is Windows Server 2003 functional, this also includes being unable to add any Windows 2000 Active Directory subdomains. After each domain functional level is raised, as well as the forest functional level, the Active Directory environment is completely upgraded and fully compliant with all the AD improvements made in Windows Server 2003. Functionality on this level opens the environment to features such as schema deactivation, domain rename, domain controller rename, and cross-forest trusts. Moving AD-Integrated DNS Zones to Application PartitionThe final step in a Windows Server 2003 Active Directory upgrade is to move any AD-integrated DNS zones into the newly created application partitions that Windows Server 2003 uses to store DNS information. To accomplish this, follow these steps:
|


EAN: 2147483647
Pages: 499