Routing Your Inputs to Recording Tracks
| < Day Day Up > |
| Now it's time to get your inputs routed to recording tracks. This is done in the Input Mixer. To bring up the Input Mixer, press the FADER/EDIT button repeatedly until the button is orange.
The Input MixerThink of the Input Mixer as a mixing console that sits between your physical inputs and the hard disk recorder. In most cases, you will use the Input Mixer to do one simple task: route a physical input to a recording track. Since the Input Mixer is placed before the hard disk recorder, all the track faders and the Master fader should be set to 0dB, or unity gain, in this mixer. If you adjust the faders , you are directly affecting the amount of signal recorded on the hard disk. Instead, you should control the amount of signal coming into the VS via the Input knob that corresponds to the physical input. When you route a physical input to a recording track in the Input Mixer, you don't have to worry about adjusting the Pan knob. In fact, changing the panning in the Input Mixer can cause problems when recording stereo tracks, so it's best to leave the panning alone.
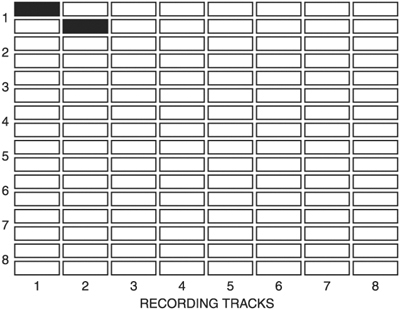
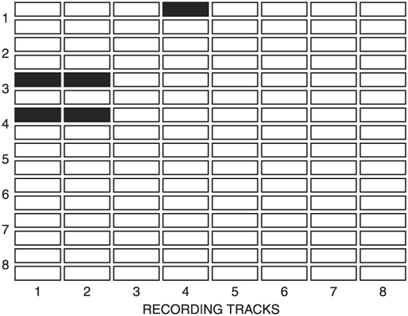
If you change any of the track parameters within the Input Mixer, such as EQ settings, you will be changing the signal that gets recorded. In other words, any signal-processing adjustments you make in the Input Mixer will be reflected in what actually gets recorded. Most people like to record "dry," meaning they don't make any changes to the signal in the Input Mixer. We'll look at recording wet and dry a bit later on. The important thing to understand when using the Input Mixer is that the track faders and track parameters correspond to the physical inputs. If you plug something into physical Input 1 and want to alter the signal that gets recorded, you would use track 1's faders and track parameters, independent of which track the signal will be recorded on. The Concept of RoutingWhen you create a new song, the VS defaults to having Input 1 recorded on track 1, Input 2 recorded on track 2, and so on. This default routing makes it easy to get started, but to exploit the flexibility of the VS, you need to know how to change the routing to suit your needs. The concept behind routing is that you are always routing a signal "from" somewhere "to" somewhere else. On the VS workstations, the "to" is always a recording track. Regardless of what mixer mode you are in, the goal in routing within that mixer mode is to get a signal "to" a recording track. Now, that signal could be a physical input such as a mic, guitar, or a synth; it could be an existing recording track; or it could be the output of one of the internal effect processors. It doesn't matter what that signal is or where it comes from; what does matter is that the destination in routing is always a recording track. When routing signals on the VS, you'll always begin with the recording track, and then you'll route signals to it. The Routing DisplayTo see the Routing display, make sure you are in the Play Condition and then hold down the STATUS button on any track. The display will flash *** Assign *** at the top, and the rest of the display will show a matrix of which signals are routed to which recording tracks. This display isn't the most intuitive, so let's take a detailed look at it. Figure 4.1 shows an example of the Routing display. The vertical bar in the middle of the Routing display divides the display into two sections: the Input Mixer and Track Mixer matrix and the Effects Return Mixer matrix. Figure 4.1. The Routing display on the VS-880EX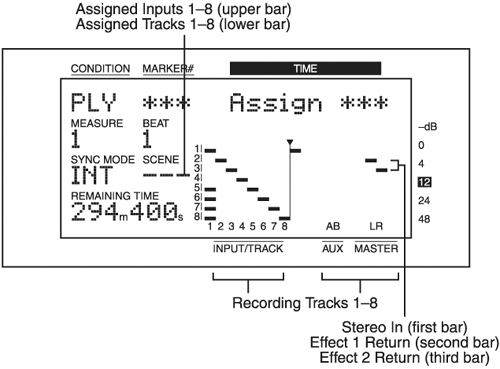 To the left of the vertical bar, all Input Mixer and Track Mixer routings are displayed. The numbers at the bottom refer to the recording track, and the numbers along the left-hand side refer to both the physical input jack and the existing recorded tracks. The display has room to show two bars for each number along the left-hand side; the top bar indicates a physical input, and the bottom bar indicates an existing recorded track. In other words, the top bar indicates a physical input has been routed to a recording track in the Input Mixer, and the bottom bar indicates an existing track has been routed to a recording track in the Track Mixer. Figure 4.2 shows the default routing for a new song. Notice that the physical inputs are automatically routed to their corresponding recording tracks. Figure 4.3 shows that recording track 1 is the destination for physical Input 1 (assigned in the Input Mixer) and recording track 2 is the destination for recording track 1 (assigned in the Track Mixer). Figure 4.2. After a new song is created, each physical input defaults to being routed to its corresponding recording track Figure 4.3. Input 1 is routed to recording track 1, and recording track 1 is routed to recording track 2
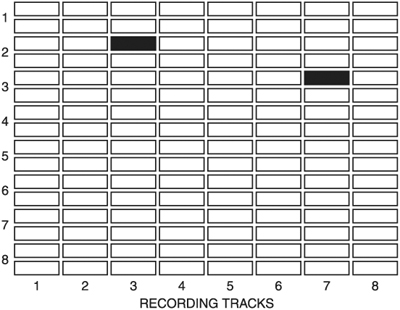
Now let's look at the other half of the Routing display in Figure 4.1, which is to the right of the vertical bar. This part of the Routing display shows the routings for the Effects Return Mixer. There are three routings that can be shown in this part of the display: the Stereo Input routing, the Effect 1 Return routing, and the Effect 2 Return routing. Here's where the display needs a bit of interpretation. The bottom of this part of the display doesn't have any numbers, but the positions of any bars in this display directly correspond to recording tracks. In other words, a bar directly right of the vertical line represents something being routed to recording track 1. The Stereo In routing, Effect 1 Return routing, and the Effect 2 Return routing will correlate to the numbers 1, 2, and 3 on the far left of the routing screen. Figure 4.4 shows that recording track 3 is the destination for the Effect 1 Return, and recording track 7 is the destination for the Effect 2 Return. Figure 4.4. The Effect 1 Return is routed to recording track 3, and the Effect 2 Return is routed to recording track 7 Now let's go back and look at all the routing shown in Figure 4.1. The left side of the display shows that Inputs 1 “8 are routed to their corresponding recording tracks 1 “8, and recording tracks 5 “8 are routed to recording track 1. The right side of the display shows that the Stereo Input is routed to recording track 1, the Effect 1 Return is routed to recording track 6, and the Effect 2 Return is routed to recording track 7. Creating Your RoutingsNow that we've seen the Routing display in all its glory , let's get on to the task of setting up our routing to record. Let's start with a simple example: We want to record a guitar track. We'll need to plug our guitar into one of the analog input jacks on the back of the VS. Which input jack? It doesn't matter, since we'll route that input to a particular recording track. For our example, let's plug the guitar into the Input 1 analog jack, with the intent to record the guitar to recording track 4. Because we are routing a physical input to a recording track, we have to be in the Input Mixer. Since we want this input to end up on recording track 4, we hold down the STATUS button above track 4, and the display shows the Routing display. While continuing to hold down the STATUS button above track 4, press the SELECT button above track 1. You have told the VS to record on recording track 4 and indicated that the source will be coming from Input 1. When you do this, the SELECT button above track 1 will flash, and the appropriate bar in the Routing display will flash as well. Release both buttons , and pat yourself on the back ”you've just performed your first routing within the VS. You can unassign routings in the same way. Hold down the appropriate track's STATUS button, and press any SELECT buttons that are flashing. This will cause the SELECT buttons to stop flashing, meaning that you've cleared that particular routing. Figure 4.5 shows a complete picture of what we've done. When you record the track, Input 1 is controlled by the fader for track 1 in the Input Mixer, and when you play back the track, recording track 4 is controlled by the fader for track 4 in the Track Mixer. Figure 4.5. Using the Input Mixer and Track Mixer to route Input 1 to recording track 4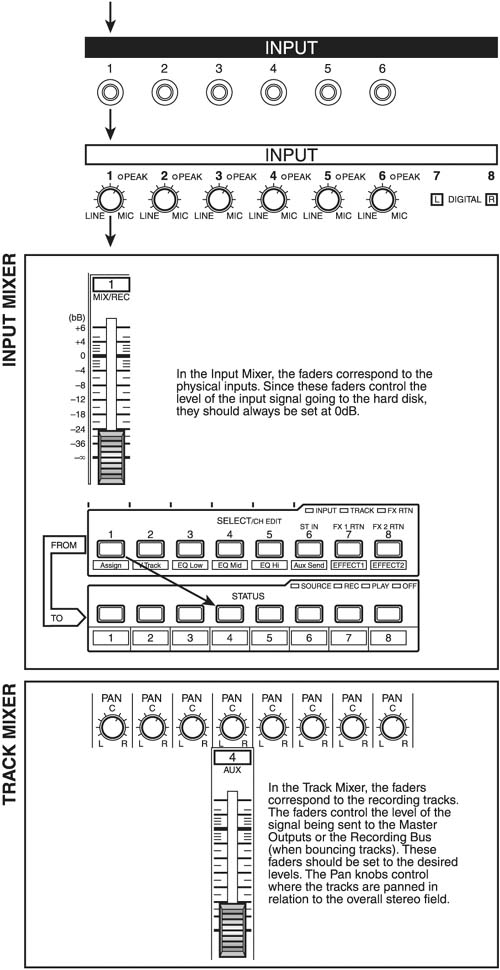
Routing Stereo TracksWhen we routed our guitar track, we routed a mono signal. Now let's also set up our routing to record a keyboard part along with the guitar part. Our keyboard has both left and right outputs, which send a stereo signal across these outputs, so we'll want to record two tracks for the keyboard. We could record each keyboard output to a separate track, resulting in two mono signals that we'd probably pan hard left and hard right when we mix. This will certainly work, but if we want to apply EQ or effects to the keyboard tracks, we'd have to make sure we applied the same settings to both mono tracks. The VS provides a way to work with true stereo tracks via the Channel Link parameter. You may link adjacent odd and even numbered inputs and/or tracks, as in 1-2, 3-4, 5-6, and 7-8. When you link tracks, the VS refers to them as tracks a, b, c, and d, respectively. When you link inputs, they become Inputs a, b, c, and d. Figure 4.6 shows how the Channel Link parameter affects whether tracks are mono or stereo. We'll look at more details about Channel Link when we cover mixing, so for now let's get our stereo keyboard tracks recorded. Figure 4.6. The Channel Link parameter determines whether tracks are mono or stereo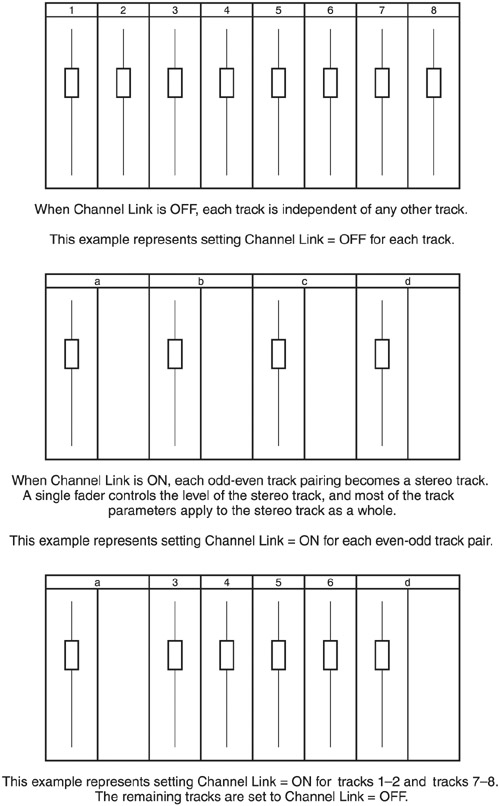 We routed the guitar to record on recording track 4, so now we'll route the keyboard to record on recording tracks 1 and 2. Since the guitar is plugged into physical Input 1, let's plug the keyboard into physical Inputs 3 and 4. To simplify our routing, let's link Inputs 3 and 4 together in the Input Mixer. To do this, make sure you are in the Input Mixer and in the Play Condition and then press the SELECT button above track 3. Now use the Figure 4.7. Input 1 is routed to recording track 4, and Stereo Inputs 3 “4 are routed to Stereo recording tracks 1 “2
|
 Track Mixer mode. When it comes to routing, the concepts discussed in the following sections are applicable to the VS-880, but the actual routing techniques may be different, depending on the mixer mode being used.
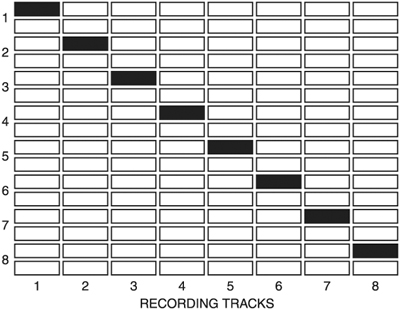

| < Day Day Up > |