Installing WebLogic Server
| In previous versions of WebLogic Server, you were required to download a Package installer program from the BEA Web site, a standalone installation program that contained all of the WebLogic Server software components (server and server samples). This method of downloading and installing the WebLogic Server product still exists, now includes WebLogic Workshop, and is approximately 150MB in size. To comply with a uniform and flexible installation procedure for the WebLogic Platform, BEA now also offers the Net Installer download and installation option. This option funnels the installation process for WebLogic Server (WLS), WebLogic Integration (WLI), WebLogic Portal (WLP), and WebLogic Workshop products through a single, lighter setup program, as opposed to disparate heavyweight installer programs for each of the WebLogic products. The following sections provide a step-by-step guide to the installation and configuration of WebLogic Server on a Windows 2000 system using the new Net Installer option. Step 1: Download and Execute the Net Installer ProgramBecause the Net Installer is an executable file (approximately 20MB), you need to download the executable to a selected installation area on your hard drive from the BEA Download Center at the following URL: http://commerce.bea.com/downloads/weblogic_platform.jsp Caution You should ensure you have a high speed Internet connection for the entire installation process using the Net Installer option. Before you can download any product from BEA Systems, you will first be asked to log in or register. The registration process requires you to complete a user profile about yourself. After the Net Installer has been downloaded, execute the program. In the displayed Welcome screen, click Next and then in the BEA License Agreement screen, accept the terms of the license, and click Next to start the installation process. Step 2: Select the BEA Home DirectoryIn the Choose BEA Home Directory screen shown in Figure 10.1, select an existing directory or create a new BEA Home directory, which will form the root or central support directory for common files that are used by the WebLogic Platform products installed on your system. Figure 10.1. Select your BEA Home directory. In most cases, the default name of "BEA" should suffice. However, you can enter any name for the BEA Home directory that is compliant with your internal naming standards for software directories. After you have entered your BEA Home directory, click Next to continue. The BEA Home directory is discussed in detail later in this chapter. Step 3: Select the Installation TypeYou have the following two options for installing the WebLogic Platform:
Because this chapter addresses the installation of WebLogic Server only, select Custom Installation and click Next to continue. Step 4: Select the WebLogic Platform Products and ComponentsThe Choose Components screen, as shown in Figure 10.2, enables you to select the software components you need to install from the WebLogic Platform. Figure 10.2. Select the WebLogic Server software components to install. You can see a brief description of each WebLogic Platform product and its respective components by selecting it in the tree view. Because the objective is to install WebLogic Server, select the WebLogic Server Product from the tree view, which should also automatically select the Server, Workshop, and Server Examples components. If you are new to J2EE and WebLogic Server, it is a good idea to install the Server Examples as they provide working examples of J2EE components and services in the context of WebLogic Server. After you have selected the components to install, click Next to continue. Step 5: Select the Download OptionFrom the Specify Download Options dialog screen shown in Figure 10.3, you can specify your preferences for downloading the WebLogic Server software as follows : Figure 10.3. Specify your download preferences.
Enter the information that pertains to your environment and click Next to begin the download process of the WebLogic Server installation files to your temporary storage directory. Step 6: The Auto Installation OptionThe Download Status screen shown in Figure 10.4 gives you the option to automatically start the installation and configuration of WebLogic Server after the download is complete. Select this option. Figure 10.4. Choose to automatically begin the installation after the download is complete. If you do not select this option, to follow the subsequent installation steps you will need to launch the installation of the WebLogic Server manually by executing the WebLogic Server setup executable file, which can be found in your respective download directory. Step 7: Select the WebLogic Server Product DirectoryEnter the directory within which the WebLogic Server software will be installed as shown in Figure 10.5. By default, a product directory within your BEA Home will be suggested, which is the recommended BEA directory structure for the WebLogic Platform and WebLogic Server software respectively. Figure 10.5. Select your WebLogic Home directory. Keep the recommended directory for the installation of your WebLogic Server software and click Next. A screen displays the progress of the WebLogic Server installation process. Step 8: The Domain Configuration WizardAfter the WebLogic Server software files have been installed on your machine, the new WebLogic Domain Configuration Wizard will automatically be launched to assist you in creating your WebLogic domain. Select Yes and click Next to continue. Step 9: Create Your WebLogic DomainBecause all WebLogic Servers exist in the context of a domain , which is an interrelated set of managed WebLogic Server resources, your next step is to define the type of domain you want to create and name it appropriately. As shown in Figure 10.6, your WebLogic Server will run in a domain based on a template you select from the following list: Figure 10.6. Select your WebLogic Server domain template.
Templates provide you with an option to create a WebLogic Server with an existing application deployed to it or not. Because you have already selected the Server Examples component, as shown in Figure 10.6, the WebLogic Server examples and Pet Store applications are automatically installed with the WebLogic Server installation. For this reason, unless you want to test or tune your newly created WebLogic Server with a fully operational application, you should select the WLS Domain template, which gives you the opportunity to learn about the WebLogic Server environment from the ground up. The domain name is how you will uniquely identify the WebLogic environment you are creating. You can assign any alphanumeric name to your WebLogic domain, but it should be meaningful. For example, the domain name could represent the business function or application WebLogic Server is supporting. For the purposes of following this installation, select the WLS Domain as your template and keep the default domain name "myDomain". Click Next to continue. Step 10: Select the WebLogic Server TypeYour next task is to select the type of WebLogic Server you want to create in the domain you have selected. As shown in Figure 10.7, you have the following options: Figure 10.7. Select your WebLogic Server type.
Because the Single Server option creates a standalone WebLogic Server, this configuration is mostly recommended for WebLogic development environments. For this reason, select the Single Server option and click Next to continue. Step 11: Select Your Domain Container DirectoryAs shown in Figure 10.8, specify the top-level directory where your myDomain domain will be created. The default is the user_projects directory underneath the BEA HOME. The user_projects directory is also known as the Domain Container directory because it can be used to maintain a separate location for your WebLogic Server domains and hence avoids burying them within the WebLogic Server product folder directory. Figure 10.8. Select your Domain Container directory. Keep the suggested default directory and click Next to continue. Step 12: Configure Your Single ServerBecause you have selected to create a standalone WebLogic Server (single server), the Configuration Wizard needs the following configuration information to set up the WebLogic Server accordingly (see Figure 10.9): Figure 10.9. Configure WebLogic Server.
Enter the information for these settings and click Next to continue. Step 13: Create Your System User Name and PasswordTo start WebLogic Server, you will need to be an admin-level user. In the Create System User Name and Password screen, shown in Figure 10.10, enter a suitable username and associated password for your WebLogic Server administrator. Click Next to continue. Figure 10.10. Specify your Admin-Level username and password. Step 14: Create the WebLogic Server As a Windows ServiceWhen you create your WebLogic Server, you have the option to install it as a Window Service, as shown in Figure 10.11. Figure 10.11. Create your WebLogic Server as a Windows Service. Selecting the Yes option enables your WebLogic Server to be automatically started with the Windows system. If you are using WebLogic Server as a learning experience, it is best not to install WebLogic Server as a Windows service because you will need to maintain administration credentials between WebLogic Server and service. After you have selected which option meets your needs, click Next to continue. Step 14: Create a Start Menu Entry for Your WebLogic ServerThe Create Start Menu Entry for Server screen gives you the option to create a Windows start menu for starting your standalone WebLogic Server. Because most administrators prefer to control the startup of their WebLogic Servers, this installation will opt not to create one. Step 15: Review and Create Your Specified WebLogic Server ConfigurationNow that you have specified your WebLogic Server configuration settings, you can review them, as shown in Figure 10.12. Figure 10.12. Review your configuration settings at the Configuration Summary screen. If you are satisfied with these configuration settings, click Create, which will install the necessary files in your domain directory to setup and start WebLogic Server as specified by the WLS Domain template. After WebLogic Server is installed, you will see the Configuration Wizard Complete screen, as shown in Figure 10.13. Figure 10.13. The Configuration Wizard Complete screen. If you want to install additional WebLogic Servers using the WLS Petstore and WLS Examples domain templates, select the Run Configuration Wizard Again option and follow steps 10 “15 to create the additional WebLogic Server domains. Otherwise, click Next and complete the configuration of your domains. Alternatively, you can create additional domains by launching the Configuration Wizard independently by choosing Start, Programs, BEA WebLogic Platform 7.0, Configuration Wizard. Validate Your CLASSPATH and PATH Environmental VariablesAfter you have installed WebLogic Server it is important you check the values of your system PATH and CLASSPATH environmental variables. The PATH variable provides your system with a list of directories that will be searched to invoke executable programs. Because the JVM is an executable program, you should ensure the installed JDK directory is included in the PATH variable. The CLASSPATH variable is a list of directories and explicit Java class locations used by the JVM to locate any dependent Java class files it needs to load into memory and execute. At a minimum, the CLASSPATH variable should include the WL_HOME/server/lib directory, which contains the weblogic.jar file, which is the primary distribution file for WebLogic Server, and any service packs ( weblogic_sp#.jar ). Both the PATH and CLASSPATH variables can be set at the system level or through a script file, which will be described later in the section "The startWebLogic Script File." |

 To learn more about WebLogic domains,
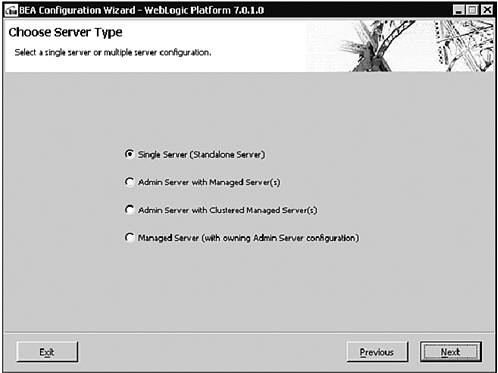

EAN: 2147483647
Pages: 360