Writing Message Handlers
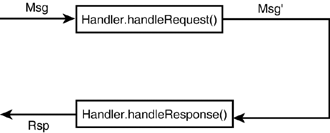
| A SOAP message handler provides a mechanism for intercepting SOAP message requests (before passing on to any back-end component) and responses (before sending back to the service client). The infrastructure of handlers and handler chains is part of JAX-RPC 1.0, implemented faithfully in WebLogic Server 7.0. – For information on when handlers get invoked during a SOAP call, see SOAP Handlers, p. 1076. HandlersA handler is simply a Java class that implements the javax.xml.rpc.handler.Handler interface, possessing methods (among others) that can preprocess or process a SOAP request ( handleRequest() ), SOAP response ( handleResponse() ), or SOAP fault or exception ( handleFault() ). All methods in a handler are callbacks; the Web service container will call these methods at the appropriate times. You should not invoke any of these methods from within the Handler class. Figure 30.13 shows how server-side handlers work. Figure 30.13. Server-side handler data flow with a back-end component. Note that the ensuing discussion pertains to server-side handlers only. Client-side handlers are not as commonly used and therefore not discussed, but they will have a different execution flow from what is shown here. When handleRequest() is called, it has access to a SOAP request Msg that comes from the Web service client (unless it is part of a chain, discussed later). The handleRequest() method edits the SOAP message. When the method completes execution, the container then proceeds to invoke the back-end component, passing to it the possibly revised SOAP message Msg' . When the back-end component is complete, the container converts the result into a SOAP response Rsp and then invokes the handleResponse() method of the same handler instance. The XML SOAP response is accessible via the SOAPMessage and can be edited by handleResponse() . The possibly modified SOAP response Rsp' is then sent back to the client. In the case of a Web service that consists exclusively of handlers and no back-end component, handleRequest() fulfills the request itself, and the response handler (not the container) must create the SOAP response, as shown in Figure 30.14. Figure 30.14. Handler data flow without a back-end component. To see a running example of this use case, see the example referenced by The GenericHandler Class section later in this chapter. The Handler interface has the methods shown in Listing 30.12. Listing 30.12 The Handler Interface Methods// life cycle methods void init(HandlerInfo config); void destroy(); // work methods boolean handleRequest(MessageContext context); boolean handleResponse(MessageContext context); boolean handleFault(MessageContext context); Qname[] getHeaders(); The methods are as follows :
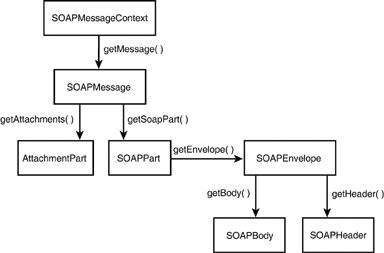
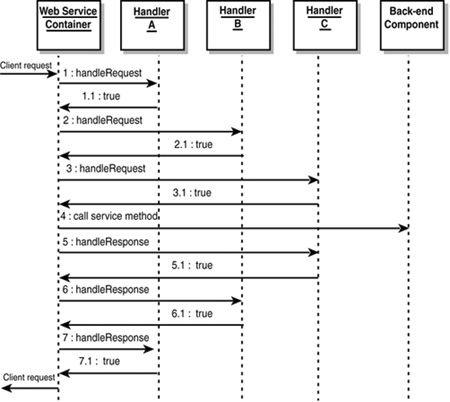
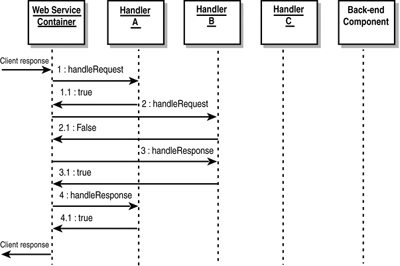
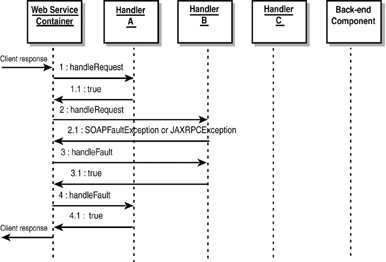
MessageContext , which is actually a SOAPMessageContext object, contains a collection of messages of type SOAPMessage , from which you can retrieve the XML SOAP message parts that you can read or edit. Figure 30.15 illustrates the relationship of these objects. Figure 30.15. Relationship of handler objects. MyHandler is the custom Handler class that implements the javax.xml.rpc. handler.Handler interface. From SOAPMessageContext , you can make a series of calls to access any part of the SOAP message, both requests and responses, as shown in Figure 30.16. Figure 30.16. Methods map for accessing SOAP message elements. The SOAP message classes shown in Figure 30.16 are all in package javax.xml.soap and are documented in the SOAP with Attachments API for Java (SAAJ) specifications (formerly part of Java API for XML Messaging, or JAXM), accessible from http://java.sun.com/xml/saaj. Listing 30.13 shows a simple Handler class example. This sample is actually shipped as part of the examples bundle in WebLogic Server 7.0, in < wl_home >\weblogic700\samples\server\src\examples\ webservices \handler\log where wl_home is the base install directory for WebLogic Platform. The handler prints out the SOAP request and response messages, but it does not alter them in any way. Listing 30.13 A Sample Handler Class Implementation package examples.webservices.handler.log; import java.util.Map; import javax.xml.rpc.handler.Handler; import javax.xml.rpc.handler.HandlerInfo; import javax.xml.rpc.handler.MessageContext; import javax.xml.rpc.handler.soap.SOAPMessageContext; import javax.xml.rpc.JAXRPCException; import javax.xml.namespace.QName; import weblogic.logging.NonCatalogLogger; public final class LogHandler implements Handler { private HandlerInfo handlerInfo; public void init(HandlerInfo hi) { handlerInfo = hi; } public void destroy() {} public QName[] getHeaders() { return handlerInfo.getHeaders(); } public boolean handleRequest(MessageContext mc) { SOAPMessageContext messageContext = (SOAPMessageContext) mc; System.out.println("** Request:" + messageContext.getMessage().toString()); return true; } public boolean handleResponse(MessageContext mc) { SOAPMessageContext messageContext = (SOAPMessageContext) mc; System.out.println("** Response: " + messageContext.getMessage().toString()); return true; } public boolean handleFault(MessageContext mc) { SOAPMessageContext messageContext = (SOAPMessageContext) mc; System.out.println("** Fault: " + messageContext.getMessage().toString()); return true; } } This code should be self-explanatory. The passed-in MessageContext parameter in the handler XXX methods is actually a SOAPMessageContext object and needs to be typecast . The GenericHandler ClassGenericHandler is a convenience class offered by WebLogic Server to implement the Holder interface. It contains default implementations of many required housekeeping methods so that your custom Handler class needs to override only the handle XXX methods. To use GenericHandler , extend it as shown in Listing 30.14. Listing 30.14 Using the Convenience GenericHandler Class Public myHandler extends GenericHandler { Public Boolean handleRequest(..) { /* process the request */ } public Boolean handleResponse(..) { /* process the response */ } public Boolean handleFault(..) { /* process the fault */ } } You can build and run a WebLogic Server example that uses the GenericHandler class; this example uses SOAP handlers exclusively with no back-end component. Handler ChainsFor finer control and more effective error handling, you can actually delegate the SOAP processing task to multiple Handler classes in a chain. You not only define what particular Handler classes constitute a chain but also the order in which each handler is invoked. Figure 30.17 shows a chain made up of three Handler classes HandlerA , HandlerB , and HandlerC , defined in that orderand a back-end component, which together work in concert to fulfill a service request. Figure 30.17. The order of invocation in a handler chain. Note The handlers are invoked in definition order during a request and in the reverse definition order during a response. Also, a handler gets the modified SOAP message from its predecessor handler. Flow of ControlYou can dynamically change the control flow among handlers in a chain. That is, you are not bound to always execute every handler in a chain, every time. For instance, in Figure 30.17, HandlerB might decide at execution time to entirely fulfill the request itself or determine that it should not proceed for some reason, such as an exception occurring. Figure 30.18 shows the typical flow of control in a handler chain. All handlers normally return true . Figure 30.18. Typical handler chain execution. Between steps 4 and 5 the container would have created an XML SOAP response from the back-end components resultset. So, how can the chain be blocked at will? The answer lies in the following three rules:
In this case, who initially creates a SOAP response? The answer is either in step 2 ( HandlerB.handleRequest ) or step 3 ( HandlerB.handleResponse) , whichever is more appropriate. The two methods can either use private variables to collaborate or use a shared context, discussed later. In general, if a handler in a chain can potentially alter control flow, that handler should be able to create a specific SOAP response for that blocking situation. Figure 30.20 illustrates the case of Rule 3. Figure 30.20. How an exception-blocking handler changes control flow. If any exception is thrown in a handler, the container will invoke that handlers handleFault() method. In this case, the container will create the SOAP response in the shared context. If, in step 3, HandlerB.handleFault() returned false , it would block fault chain processing, and henceforth no other handleFault() methods would be called. Shared ContextHandlers in a chain can communicate with each other through the SOAPMessageContext parameter. We have described SOAPMessageContext only as a way to retrieve the SOAP message, but it is also a place where arbitrary key-value pairs, or properties, can be stored and retrieved. That is, it can be used by handlers in a chain to share processing- related state. The property set methods (inherited from MessageContext ) are available for this purpose, as shown in Listing 30.15. Listing 30.15 MessageContext Property Set Methods package javax.xml.rpc.handler; public interface MessageContext { void setProperty(String name, Object value); Object getProperty(String name); void removeProperty(String name); boolean containsProperty(String name ); java.util.Iterator getPropertyNames(); } HandlerA can invoke msgContext.setProperty(" user ", "John Doe") and HandlerB can retrieve that information by invoking msgContext.getProperty("user") . Configuring Handlers into web-services.xmlTo instruct your Web service to utilize your Handler classes, you need to perform the following two steps:
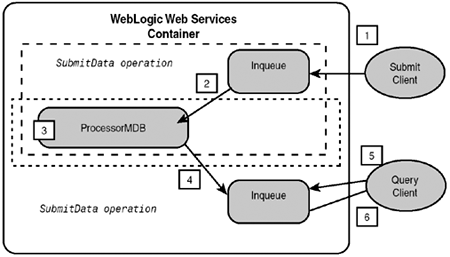
Defining Your Handlers and Handler ChainsAs Figure 30.11 shows, the handler chains section of the web-services.xml file comes just before the Web service section. A typical handler chain specification is shown in Listing 30.16. Listing 30.16 A Sample Handler Chain Definition in web-services.xml<handler-chains> <handler-chain name="myChain"> <handler class-name="myHandlers.HandlerA" > <init-params> <init-param name="debug" value="on" /> </init-params> </handler> <handler class-name="myHandlers.HandlerB" /> <handler class-name="myHandlers.HandlerC" /> </handler-chain> </handler-chains> The statements in Listing 30.16 define only one handler chain, but multiple chains can be defined with repeating <handler-chain> elements. Each <handler> subelement declares a Handler class via the fully qualified Handler class name in the attribute class-name . The <init-params> subelement defines parameters for configuring HandlerA ; this information is available to the Handler class at initialization time via the init() method argument HandlerInfo . The order of the <handler> subelements determines the order of handler execution. Specifying Handler UseWhen you define a Web service operation and specify its back-end component, you can also specify the use of handlers. Listing 30.17 shows a typical operation definition but with reference to the use of the myChain handler declared earlier. Listing 30.17 Specifying the Use of Handlers in an Operation Definition<operations> <operation name="getQuote" method="getQuote" component="myEJB" handler-chain="myChain" /> </operations> The statement in Listing 30.17 specifies that when operation getQuote is invoked, the handler chain myChain should first be executed prior to invoking the getQuote method of the myEJB back-end component (defined in the Components section of web-services.xml , not shown). To define a handler chainonly service with no back end component, simply omit the component and method attributes in operation . Understanding Exception HandlingWhat if business logic in the back-end component throws an exception? How does the container handle such exceptions? First, it is recommended that your Web services external exceptions be mapped to unique SOAP fault codes. External exceptions are those that can be thrown back to the client when an exposed service operation is invoked. Exceptions that may be thrown internally to the service logic do not need to be mapped, just the external ones. Then you should strive to throw SOAPFaultException only from your Web service methods, containing the unique fault code, instead of any user-defined or built-in exceptions. In the SOAPFaultException , a constructor looks like this: public SOAPFaultException (javax.xml.namespace.QName faultcode, String faultstring, String faultfactor, javax.xml.soap.Detail detail); The faultcode parameter is the fault code you created to represent a particular business exception. Fault codes, by SOAP specifications, are two-part strings of "SOAP-fault-code.user-code" . Because this input fault code string will become part of an XML SOAP message, it may need to be namespace-qualified; hence, it is of type QName . The other parameters help expound on the fault code, as described in the SOAP 1.2 specifications. The following statement throws a new instance of SOAPFaultException , with a fault code of "Client.InvalidID" in namespace www.bea.com/ws (two arguments to the QName constructor): throw new SOAPFaultException (new QName(www.bea.com/ws, "Client.InvalidID"), "Employee ID must be numeric", "urn:UserManagement", null); The WebLogic Web service container takes a SOAPFaultException thrown by a back end component and serializes it into the SOAP response message. On the client side, the <fault> element is deserialized back into a SOAPFaultException . It actually throws a JAXRPCException to the client, with the SOAPFaultException embedded in it. One distinct advantage of using SOAPFaultException (or one that extends it) exclusively is that your list of possible fault codes for each service method can be documented in the service WDSL file. That way, a client has a more complete description of the service and can program more effective error reporting or recovery mechanisms. If your back-end component throws any other exception, the WebLogic container will attempt to map it to a SOAPFaultException as best it can. It cannot, however, embed your exception into a JAXRPCException and throw it on the client side because your client may not have access to your exception class definition. SOAPFaultException , on the other hand, is always available to a WebLogic Web service client. Writing Asynchronous Web ServicesAs Figure 29.15 in Chapter 29 shows, you can create asynchronous Web services by using JMS destinations (queues) as back-end components. These queues act as temporary buckets for holding messages, be it input data or a return value. An object that puts a message on a queue is called a producer , and one that receives a message is called a consumer . Although a JMS destination is considered as a back-end component for a Web service, these destinations cannot execute business logic. A listener object such as a message-driven bean (MDB) or a Java class that listens and posts to these queues is needed to house business logic to process service requests. This section assumes that you are generally familiar with Java Messaging Service and message-driven bean concepts. – For more information on these topics, see Part V, Developing Business LogicEnterprise JavaBeans, p. 607. JMS and Message-Driven Beans ExampleThe two types of JMS destinations are queues and topics. Because the use of JMS topics is deprecated in WLS 7.0, we will discuss only queues. A JMS queue implements point-to-point messaging, where a message is guaranteed to be delivered to only one consumer. The producer places a message in a queue, and a consumer who is subscribed to the queue (also called a listener ) retrieves it. Perhaps these concepts are best explained in the context of an example that is provided on our Web site. Figure 30.21 shows the components in this example. Figure 30.21. Players in a JMS-implemented Web service. In this sample, the client is split into two separate programs:
As you can see, the JMS producer for destination inqueue is actually the SOAP servlet for the submitData operation. The JMS consumer for inqueue is the listener ProcessorMDB , a message-driven bean that is invoked to process the service data. ProcessorMDB then places its processing results in outqueue , the requestData operations JMS queue. That is, ProcessorMDB is both a consumer (of inqueue ) and a producer (to outqueue ). Like any message-driven bean, ProcessorMDB must implement an onMessage() method and subscribe to inqueue as a listener. When a message is produced in inqueue , the container automatically makes available an instance of ProcessorMDB (it instantiates one or gets one from the pool) and invokes its onMessage() method. The business logic for processing the input data to the submitData operation is embodied in the onMessage() method of ProcessorMDB . This sample incorporates a very simple use case:
The ProcessorMDB BeanNow look at the onMessage() method of this bean, shown in Listing 30.18. Listing 30.18 Business Logic in the onMessage Method public void onMessage(Message msg) { // WebLogic JMS- backed service always uses ObjectMessage 2 ObjectMessage om = (ObjectMessage) msg; try { String text = (String) om.getObject(); // Get connection & start it 8 Context ctx = getInitialContext(); QueueConnectionFactory factory = (QueueConnectionFactory) ctx.lookup("weblogic.jms.ConnectionFactory1"); Queue queue = (Queue) ctx.lookup("weblogic.jms.outqueue"); 13 QueueConnection connect = factory.createQueueConnection(); QueueSession session = connect.createQueueSession(false, Session.AUTO_ACKNOWLEDGE); 17 QueueSender sender = session.createSender(queue); 19 connect.start(); // Post the revised message in outqueue ObjectMessage outMsg = session.createObjectMessage(); 23 outMsg.setObject(text + " stays mainly in the Plain."); sender.send(outMsg); connect.close(); } catch(JMSException ex) { ex.printStackTrace(); } catch (NamingException ne) { ne.printStackTrace(); } } Lines 8 to 19 are necessary steps for creating a connection to outqueue (line 13) and for configuring this bean to be a producer to outqueue (line 17). Line 23 simulates business logic processing of the input message by merely appending "stays mainly in the Plain" to the presumed input string of "The Rain in Spain" to complete the adage: The Rain in Spain stays mainly in the Plain. Note in line 2 that the JMS message type used here is ObjectMessage (as opposed to TextMessage or MapMessage ), which is required in a WebLogic JMS-backed Web service. If you want to tell the WebLogic container that this bean is to be a consumer or listener to inqueue , you do so in the beans deployment descriptor. Listing 30.19 shows the ejb-jar.xml file for ProcessorMDB . Listing 30.19 Deployment Descriptor ( ejb-jar.xml ) for ProcessorMDB <ejb-jar> <enterprise-beans> <message-driven> <ejb-name>exampleMessageDriven1</ejb-name> <ejb-class>examples.webservices.message.ProcessorMDB</ejb-class> <transaction-type>Container</transaction-type> <message-driven-destination> 8 <destination-type>javax.jms.Queue</destination-type> </message-driven-destination> </message-driven> </enterprise-beans> </ejb-jar> Line 8 declares that this bean will be a listener (consumer) for a JMS destination of type javax.jms.Queue . But this is not enough because the container still does not know exactly which queue instance it is to listen on. So, in the WebLogic-specific deployment descriptor file weblogic-ejb-jar.xml shown in Listing 30.20, you must specify a particular queue instance. Listing 30.20 WebLogic-Specific Deployment Descriptor ( weblogic-ejb-jar.xml ) for ProcessorMDB <weblogic-ejb-jar> <weblogic-enterprise-bean> <ejb-name>exampleMessageDriven1</ejb-name> <message-driven-descriptor> <pool> <max-beans-in-free-pool>200</max-beans-in-free-pool> <initial-beans-in-free-pool>20</initial-beans-in-free-pool> </pool> 9 <destination-jndi-name>weblogic.jms.inqueue</destination-jndi-name> </message-driven-descriptor> <jndi-name>examplesMessageDriven1</jndi-name> </weblogic-enterprise-bean> </weblogic-ejb-jar> Line 9 specifies the JNDI name of the inqueue destination to listen on. Before you can deploy this Web service, you must configure a few objects in the Examples server, described next. Setting Up JMS Factory and DestinationsBoth JMS destinations inqueue and outqueue need to be defined in the server instance where this asynchronous Web service is deployed. In addition, a JMS connection factory needs to be defined. Follow the steps in the following lists to perform these tasks in the WebLogic Administration Console (for example, go to http://localhost:7001/console ). Define the JMS connection factory by following these steps:
Define a JMS destination (queue) by following these steps:
Running the Asynchronous Web Service SampleYou are now ready to build and run this asynchronous Web service example:
Examining How the Asynchronous Sample Is BuiltIf you look at the Ant build file ws-async\build.xml , you can see that the WebLogic Ant task ServiceGen is used to assemble the asynchronous Web service. The invocation is shown in Listing 30.21. Listing 30.21 ServiceGen Invocation to Assemble an Asynchronous Web Service1 <servicegen destEar="${source}\jms_send_queue" contextURI="WebServices" > <!-- PRODUCER WEB SERVICE DEFINITION --> 4 <service JMSDestination="weblogic.jms.inqueue" JMSAction="send" JMSDestinationType="queue" JMSConnectionFactory="weblogic.jms.ConnectionFactory1" JMSOperationName="submit" JMSMessageType="java.lang.String" generateTypes="True" targetNamespace="http://tempuri.org" serviceName="SubmitService" serviceURI="/SubmitService" expandMethods="True"> <client packageName="examples.message" useServerTypes="true" /> </service> <!-- CONSUMER WEB SERVICE DEFINITION NOT SHOWN --> </servicegen> Line 1 invokes servicegen , specifying that the Web service be built into an enterprise application folder (as opposed to an EAR file) called jms_send_queue . Line 4 defines a new Web service. Because JMS attributes are specified in this <service> element, it will be built as a JMS-backed Web service. JMSDestination specifies the JNDI name of the JMS queue or topic to which this service is either a consumer (if JMSAction is receive ) or producer (if JMSAction is send ). JMSDestinationType tells ServiceGen whether the back-end JMS destination is a queue or topic. For the container to connect to the back-end JMS destination, a connection factory must be used. Therefore, JMSConnectionFactory points to the JNDI name of this factory. When you build a JMS-backed Web service using ServiceGen , only one operation is allowed. JMSOperationName specifies the name of this lone operation, which takes only one parameter, of type JMSMessageType . This parameter specifies the data type of the message that is being placed into the JMS destination. In the case of an asynchronous, receive type of Web service (if JMSAction is receive ), the lone operation is assumed to take no parameters, and its return type is determined by the value of JMSMessageType . Notice that nowhere do you specify the message-driven bean to ServiceGen . Remember that this is a JMS-backed Web service, so ServiceGen is oblivious to any processing that happens beyond the JMS messaging activities. In other words, as far as the container is concerned , the Web service is fulfilled after the message is placed in its appropriate JMS destination. Unfortunately, this fact has some implications:
You deploy your MDB component as you would do any other J2EE enterprise applicationin the application.xml file, as shown in the following code: <application> ... <module> <ejb>myMDB.jar</ejb> </module> ... </application> You can place both a send and receive operation into one asynchronous Web service, but you must then build the Web service manually. The ServiceGen task syntax does not allow you to specify more than one operation in a JMS-backed Web service. The next section shows you how to create an asynchronous Web service with multiple operations. Using the Asynchronous Web Service with Multiple OperationsThe most expedient way to create an asynchronous Web service is to use ServiceGen to generate an enterprise application in expanded form (as opposed to an EAR file), by specifying a folder name in the destEar attribute rather than an EAR file, as in Line 1 of Listing 30.21. This produces a web-services.xml file inside the embedded WAR file (see Figure 30.6). You can then unjar the Web service WAR file to edit the web-services.xml file, and add more <operation> elements and their JMS <components> . Listing 30.22 shows an abbreviated web-services.xml file that defines two JMS-backed operations. Listing 30.22 A Sample Web Service Definition with Multiple JMS-Backed Operations<web-services> <web-service ..> <components> <jms-send-destination name="inqueue" connection-factory="weblogic.jms.ConnectionFactory"> </jms-send-destination> <jms-receive-queue> connection-factory="weblogic.jms.ConnectionFactory"> </jms-receive-queue> </components> <operations ..> <operation invocation-style="one-way" name="submit" component="inqueue" > </operation> <operation invocation-style=" request-response " name="query" component="outqueue" > </operation> </operations> </web-service> </web-services> After editing the web-services.xml file, you need to jar it up again in the Web services WAR file. Any new EJB JAR files need to be added into the enterprise application top-level or root directory (the same level as the Web services WAR file). Securing Your Web ServicesThere are several ways of protecting your WebLogic Web services:
You can choose to implement any or all of these techniques, and in any combination. You can set authorization for WebLogic Web services in varying degrees; they are listed here in order from most restrictive to least restrictive :
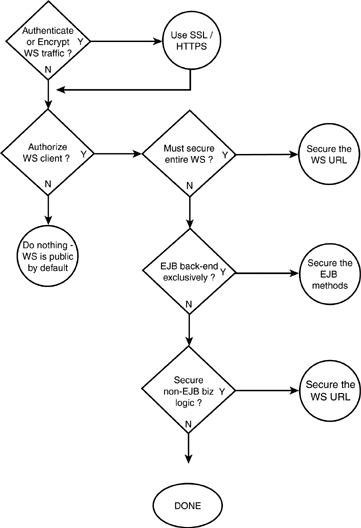
Figure 30.22 attempts to guide you through the process of deciding what security measures to implement for your Web service. Figure 30.22. Deciding which Web service security features should be used. The following sections explain each task shown in Figure 30.22. Using SSLWhen using SSL, the client may need to send credentials to authenticate itself to the server. Before a Java client can invoke such a secure Web service, it must configure the following items:
These tasks may be accomplished programmatically or through JVM arguments (system properties). A sample Java client startup command is shown here, for a Java program named TraderClient , using system properties, to invoke an SSL-secured Web service: java -Dweblogic.webservice.client.ssl.trustedcerts=c:\democert.pem -Dbea.home=c:\bea -Djava.protocol.handler.pkgs=weblogic.webservice.client TraderClient Restricting Your Web Service to Use HTTPSBy default, all WebLogic Web services are accessible through either HTTP or HTTPS (if your WebLogic Server is configured for SSL). To preclude the use of HTTP (that is, force all service calls to use HTTPS), specify the following attribute in the ServiceGen Ant task (the line shown in bold): <servicegen ... > <service ejbJar="traderBean.jar" protocol="https" serviceName="TraderService" ... </service> </servicegen> Or in the web-services.xml file (only if you are manually building the Web service), specify the following attribute (the line shown in bold): <web-service name="Trader" targetNamespace="www.bea.com/ Trader "; protocol="https" uri="/TraderWS" ... > ... </web-service> Remember though that using HTTPS will slow down the Web service communication layer considerably due to the added steps of encrypting and decrypting the SOAP messages. Securing Your Web Service URLYou can protect your entire Web service (home page, WSDL file, service invocations) by securing the service URL. ServiceGen cannot do this for you, so you must secure it manually after the EAR folder is generated. You need to edit your Web service Web application file, web.xml , located in the Web application WAR file <ear-root>\<war-name> . war , where < ear-root> is the top-level directory of the EAR folder, and < war-name> is the WAR filename you specified when you invoked ServiceGen (attribute warName; otherwise, it defaults to filename web-services.war) . First, you need to extract the file < war-root >\WEB-INF\web.xml from the WAR file (see Figure 30.6 earlier in this chapter). Then you add a security constraints section, as shown in Listing 30.23. Listing 30.23 Securing a Web Service URL<web-app> ... <security-constraint> <web-resource-collection> <web-resource-name>TraderService</web-resource-name> <description>The Trader Web Service</description> <url-pattern>/TraderService</url-pattern> <http-method>GET</http-method> <http-method>POST</http-method> </web-resource-collection> </security-constraint> ... </web-app> Notice the URL pattern being protected; this is the Web application URI specified in the serviceURI attribute of the ServiceGen <service> element (not the contextURI attribute of the <servicegen> element). When the URL is protected, a username and password will be required to access the service. If you try to access the Web service home page, a login dialog box will be displayed. To access the Web service programmatically from a Java client, you must include the following statements (static client style) in the client code. These statements define credentials to be passed along with the service request, as shown in the following code: TraderService_Impl ts = new TraderService_Impl(); TraderServicePort trader = ts.getTraderServicePort(";UserName";, "Password"); trader.buy("BEAS"); Securing Your EJB Back-End ComponentThe unique characteristic of this security measure is that your potential service clients can still read about your Web service (home page or WSDL file), although they may not be able to invoke any operation that is backed by an EJB method. Because security is affected at the method level, you can be selective and restrict, for example, only methods that have side effects or that update functionality. An EJB is secured via its deployment descriptor, both in the ejb-jar.xml and weblogic-ejb-jar.xml files. ejb-jar.xmlIn the < assembly-descriptor > element of the ejb-jar.xml file, you can list the security roles that can access this EJB, and in particular, the methods that can be invoked by each security role, as shown in Listing 30.24. Listing 30.24 Specifying What Security Roles Can Access What EJB Methods<ejb-jar> ... <assembly-descriptor> ... <security-role> <description>Gold Member Clients</description> <role-name>GoldStatusRole</role-name> </security-role> <method-permission> <description>Gold members can buy & sell</description> <role-name>GoldStatusRole</role-name> <method> <ejb-name>TraderBean</ejb-name> <method-name>buy</method-name> <method-name>sell</method-name> </method> </method-permission> ... </assembly-descriptor> ... </ejb-jar> weblogic-ejb-jar.xmlThe <security-role-assignment> element of the weblogic-ejb-jar.xml file can then be used to assign the roles just specified to specific users defined in WebLogic, as shown in Listing 30.25. Listing 30.25 Specifying What Users Belong to What Security Role<weblogic-ejb-jar> ... <security-role-assignment> <role-name>GoldStatusRole</role-name> <principal-name>gold_customer</principal-name> </security-role-assignment> ... </weblogic-ejb-jar> |
EAN: 2147483647
Pages: 360
- ERP Systems Impact on Organizations
- Enterprise Application Integration: New Solutions for a Solved Problem or a Challenging Research Field?
- The Effects of an Enterprise Resource Planning System (ERP) Implementation on Job Characteristics – A Study using the Hackman and Oldham Job Characteristics Model
- Context Management of ERP Processes in Virtual Communities
- Distributed Data Warehouse for Geo-spatial Services
- The Four Keys to Lean Six Sigma
- Key #1: Delight Your Customers with Speed and Quality
- Making Improvements That Last: An Illustrated Guide to DMAIC and the Lean Six Sigma Toolkit
- The Experience of Making Improvements: What Its Like to Work on Lean Six Sigma Projects
- Six Things Managers Must Do: How to Support Lean Six Sigma

