Developing a Simple Message-Driven Bean Example
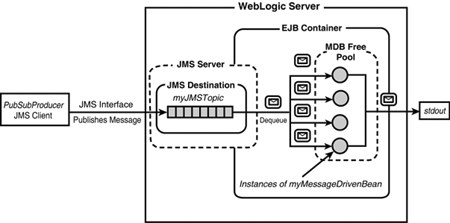
| The series of steps in the following sections guide you through implementing and deploying a simple MDB ( myMessageDrivenBean ) that consumes a text message from a JMS topic and prints the message to your WebLogic Server's standard out ( stdout ). An overview of this MDB example is shown in Figure 22.6. Figure 22.6. An overview of the MDB example. Step 1: Writing the Message-Driven Bean CodeBecause MDBs have only four methods where you can implement code, they are quite easy to develop. The code for myMessageDrivenBean is shown in Listing 22.2. Listing 22.2 The myMessageDrivenBean MDB Code package MDBExample; import javax.ejb.EJBException; import javax.ejb.CreateException; import javax.ejb.MessageDrivenBean; import javax.ejb.MessageDrivenContext; import javax.jms.JMSException; import javax.jms.Message; import javax.jms.MessageListener; import javax.jms.TextMessage; public class myMessageDrivenBean implements MessageDrivenBean, MessageListener { private MessageDrivenContext mdbContext; // A simple logging mechanism private void log(String s) { if (true) System.out.println(s); } // container callback methods public void ejbRemove() throws EJBException { log("ejbRemove called"); } public void setMessageDrivenContext(MessageDrivenContext ctx) { mdbContext = ctx; log("context set"); } public void ejbCreate () throws CreateException { log("ejbCreate called"); } // The implementation of the onMessage method public void onMessage(Message msg) { TextMessage tm = (TextMessage) msg; try { log("onMessage called"); String text = tm.getText(); System.out.println("[myMessageDrivenBean] Received message: " + text ); } catch(JMSException ex) { System.out.println("Caught JMSException: " + ex ); } } } Note To show you when the WebLogic EJB container calls an MDB's method, simple logging to WebLogic Server's stdout has been provided for each method in Listing 22.2. After you have created this code using a Java IDE or text editor, follow these steps:
Step 2: Writing the Associated Deployment DescriptorsFor this example, you need to create the following deployment descriptors with a text or XML editor and place them in the META-INF subdirectory within your staging directory. The ejb-jar.xml Deployment DescriptorThis deployment descriptor describes an EJB's structure and declares its internal dependences. You can also include the bean's application assembly information, which describes how the bean in the ejb-jar.xml file is assembled into an application deployment unit. The complete ejb-jar.xml deployment descriptor for myMessageDrivenBean is shown in Listing 22.3. Listing 22.3 The ejb-jar.xml Deployment Descriptor for myMessageDrivenBean<!DOCTYPE ejb-jar PUBLIC '-//Sun Microsystems, Inc.//DTD Enterprise JavaBeans 2.0//EN' 'http://java.sun.com/dtd/ejb-jar_2_0.dtd'> <!-- Generated XML! --> <ejb-jar> <enterprise-beans> <message-driven> <ejb-name>myMDB</ejb- name > <ejb-class>MDBExample.myMessageDrivenBean</ejb-class> <transaction-type>Container</transaction-type> <acknowledge-mode>Auto-acknowledge</ acknowledge -mode> <message-driven-destination> <destination-type>javax.jms.Topic</destination-type> <subscription-durability>NonDurable</subscription-durability> </message-driven-destination> </message-driven> </enterprise-beans> <assembly-descriptor> <container-transaction> <method> <ejb-name>myMDB</ejb-name> <method-name>onMessage</method-name> </method> <trans-attribute>NotSupported</trans-attribute> </container-transaction> </ assembly-descriptor > </ejb-jar> Table 22.2 explains the deployment descriptor elements that pertain to MDBs in the ejb-jar.xml file. Table 22.2. A Description of Elements in the ejb-jar.xml File
Optionally, you can also use the <message-selector> element to specify a valid JMS message selector query used to restrict the message type an MDB consumes, as shown here: <message-selector>company_name='objectmind'</message-selector> Note The message selector is a conditional expression that follows the ANSI-92 SQL syntax for a WHERE clause in a standard SQL statement. The weblogic-ejb-jar.xml Deployment DescriptorThis deployment descriptor contains deployment information for a bean that is WebLogic specific, such as the initial and maximum number of MDBs in the free pool and mappings to WebLogic resources. The complete weblogic-ejb-jar.xml deployment descriptor for myMessageDrivenBean is shown in Listing 22.4. Listing 22.4 The weblogic-ejb-jar.xml Deployment Descriptor for myMessageDrivenBean<!DOCTYPE weblogic-ejb-jar PUBLIC '-//BEA Systems, Inc.//DTD WebLogic 7.0.0 EJB//EN' 'http://www.bea.com/servers/wls700/dtd/weblogic-ejb-jar.dtd'> <!-- Generated XML! --> <weblogic-ejb-jar> <weblogic-enterprise-bean> <ejb-name>myMDB</ejb-name> <message-driven-descriptor> <pool> <max-beans-in-free-pool>15</max-beans-in-free-pool> <initial-beans-in-free-pool>5</initial-beans-in-free-pool> </pool> <destination-jndi-name>myJMSTopic</destination-jndi-name> <jms-polling-interval-seconds>10</jms-polling-interval-seconds> </message-driven-descriptor> <transaction-descriptor> </transaction-descriptor> <jndi-name>myMDB</jndi-name> </weblogic-enterprise-bean> </weblogic-ejb-jar> Table 22.3 explains the deployment descriptor elements that pertain to MDBs in the weblogic-ejb-jar.xml file. Table 22.3. A Description of Elements in the weblogic-ejb-jar.xml File
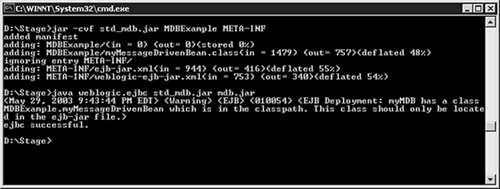
By default, WebLogic Server uses the standard JMS connection factory ( weblogic.jms.MessageDrivenBeanConnectionFactory ) to enable an MDB to gain connections to its JMS destination. However, if you have created your own JMS connection factory, you need to specify its JNDI name via the <connection-factory-jndi-name> element in the weblogic-ejb-jar.xml file: <message-driven-descriptor> <connection-factory-jndi-name>myJMSConnectionFactory</connection-factory-jndi-name> </message-driven-descriptor> Note If the <connection-factory-jndi-name> element is not specified, weblogic.jms.MessageDrivenBeanConnectionFactory is used by default. Step 3: Building Your MDB ExampleAfter the MDB class and its associated deployment descriptors are in their respective locations in the staging directory, the next step is packaging these files into a deployment unitthe EJB JAR file. To do this, issue the following jar command from within your staging directory after ensuring that you have set up your Java environment: jar cvf std_mdb.jar MDBExample META_INF Issuing this command creates the std_mdb.jar file (the deployment unit). To generate container classes for this deployment unit, which the WebLogic EJB container uses to access the MDB, you need to use the WebLogic ejbc utility. The ejbc compiler generates container classes according to the deployment elements you have specified in the weblogic-ejb.jar.xml deployment descriptor file. This is the ejbc command for generating container classes for the std_mdb.jar deployment unit: java weblogic.ejbc std_mdb.jar mdb.jar Note The ejbc utility accepts both JAR files and exploded directories as input. If you specify an output JAR file, ejbc places all generated files in the JAR file. This command creates a new JAR file ( mdb.jar ) with the original EJB classes, interfaces, and XML deployment files in the JAR as well as the new container classes that ejbc generates. You will deploy mdb.jar to WebLogic Server later in this chapter. Note If you use the ejbc utility to output to a JAR file, the output JAR name must be different from the input JAR name. Figure 22.7 shows issuing the jar and ejbc commands through a batch file named build.cmd . Figure 22.7. Packaging the MDB example for deployment. Step 4: Configuring the JMS Destination for the MDB ExampleBefore you can deploy your MDB to WebLogic Server, you must ensure that the JMS destination associated with the bean has been configured in the target WebLogic Server and, most important, that the topic is active. The JNDI name for the JMS topic associated with this example is myJMSTopic , which is specified via the <destination-jndi-name> weblogic-ejb-jar.xml element. Step 5: Deploying the MDB Example to Your WebLogic ServerTo deploy the mdb.jar deployment unit to your target WebLogic Server, follow these steps:
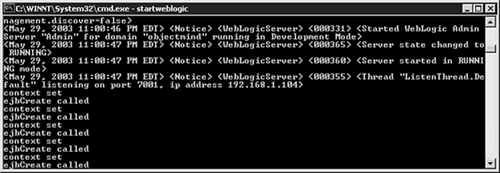
After your MDB has been deployed to WebLogic Server, the EJB container creates five instances of the bean in the free pool, as specified by the <initial-beans-in-free-pool> element in weblogic-ejb-jar.xml . Because logging was enabled in each method of myMessageDrivenBean (refer to Listing 22.2), the methods called to instantiate the been in the free pool are displayed in WebLogic Server's stdout , as shown in Figure 22.9. Figure 22.9. Use stdout to view the methods called to instantiate the MDB in the free pool. After the MDB has been successfully deployed, using these steps to monitor the bean from the Administration Console is a good idea:
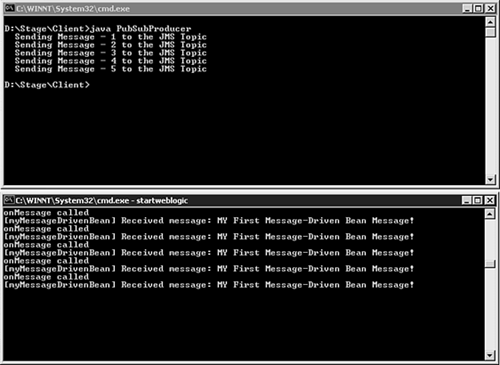
In the Deploy tab, shown in Figure 22.10, you can easily verify how many bean instances have been created and placed in the free pool and ensure that the bean is listening on an active JMS destination. Figure 22.10. Monitoring your deployed MDB. Step 6: Testing Your Message-Driven BeanTo test your MDB, you need to write a JMS client that sends a text message to the bean's associated JMS topic ( myJMSTopic ). After the message is sent to the JMS topic, the EJB container calls the bean's onMessage() method for message consumption and processing. Listing 22.5 provides the code for a JMS client ( PubSubProducer ) that sends five text messages to myJMSTopic . Note In Listing 22.5, you have to modify the context.PROVIDER_URL value accordingly to match your WebLogic Server host and port number. Listing 22.5 The PubSubProducer JMS Client import javax.naming.*; import javax.jms.*; import java.util.*; public class PubSubProducer { private final static String NAMING_FACTORY= "weblogic.jndi.WLInitialContextFactory"; private final static String TCON_FACTORY="javax.jms.TopicConnectionFactory"; private final static String MESSAGE_TOPIC="myJMSTopic"; public static void main ( String[] argv ){ try { // Create a JNDI initial context Properties props = new Properties() ; props.put( Context.INITIAL_CONTEXT_FACTORY, NAMING_FACTORY); props.put( Context.PROVIDER_URL, "t3:// einstein :7001"); InitialContext ic = new InitialContext(props); // Look up a connection factory in JNDI TopicConnectionFactory tCF = (TopicConnectionFactory)ic.lookup(TCON_FACTORY); // Create a connection TopicConnection tCon = tCF.createTopicConnection(); // Create a session TopicSession tSession = tCon.createTopicSession(false,Session.AUTO_ACKNOWLEDGE); // Look up the topic Topic topic = (Topic)ic.lookup(MESSAGE_TOPIC); // Create a TopicPublisher bound to the topic TopicPublisher tPublisher = tSession.createPublisher(topic); // Create a TextMessage TextMessage mes = tSession.createTextMessage("My First Message-Driven Bean Message!"); // Start the topic, send the message, and close the topic tCon.start() ; for(int i = 0; i<5; i++ ) { tPublisher.publish(mes); System.out.println(" Sending Message - " + (i+1) + " to the JMS Topic"); } tCon.close() ; } catch ( NamingException e1 ) { System.out.println(e1); } catch ( JMSException e2 ) { System.out.println(e2); } } } To test your MDB, first compile the JMS client code ( PubSubProducer.java ) using the javac utility from a command shell. Then run the JMS client from the command shell by using the following command: Java PubSubProducer As shown in Figure 22.11, the JMS client sends five messages to the JMS topic, and the onMessage() method is called five times to process each message. Figure 22.11. Testing your MDB with a JMS client. |
 To learn how to configure a JMS destination in WebLogic Server,

EAN: 2147483647
Pages: 360