| The basic configuration of WebLogic JMS involves using the Administration Console to perform the following tasks : -
Configure a JMS store for the persistent storage of messages. (This step is only required if you need to support durable subscribers or enable JMS Paging feature.) -
Configure a JMS server, the WebLogic messaging service. -
Configure one or more destinations (Queues and Topics) for your JMS server. -
Configure ConnectionFactories to enable your JMS clients to create connections to your JMS server. The following sections will describe each of these tasks using an operational WebLogic Server instance, which you must be able to access to via the Administration Console. Configuring Persistent Messaging If your WebLogic JMS server will be supporting durable subscriptions by using the JMS Paging feature to free memory or you want in-flight messages to persist across server restarts, messages stored in memory must be written out to persistent storage. To enable persistent messaging you will need to perform the following tasks: -
Create and configure a JMS store that can be used for persistent messaging. The JMS store can physically exist as a file or JDBC database. -
Configure ConnectionFactories and destinations to persist to your configured stores. However, before configuring JMS stores, it is important you take the following into consideration: -
No two JMS stores should be allowed to use the same database tables or files as this will result in data corruption. -
If you intend to use a database store, it is recommended that you use a separate and empty database set up for high availability. -
JMS persistent stores can increase the amount of memory required during the initialization (startup) of a WebLogic Server instance if there is a large number of stored messages increase. If initialization fails due to insufficient memory, increase the heap size of the Java Virtual Machine (JVM) proportionally to the number of messages that are currently stored in the JMS persistent store. -
File persistence is much faster than JDBC because of the transactional overhead incurred by the database for read and write operations. -
You can ensure your JDBC connection pools automatically reconnect to failed databases after they come back online by enabling the TestConnectionsOnReserve attribute of the connection pool. For storing persistent messages in a disk-based file, you must create a JMS file store by following these steps: -
Create a directory on the file system of WebLogic Server where the JMS file store will be kept. -
From the Administration Console, expand the JMS node. -
Expand the Stores node. The JMS stores table displays in the right pane showing all the configured JMS stores. -
Click the Create a New JMSFile Store link. -
In the displayed Configuration tab, shown in Figure 15.6, enter values for the following attributes: Figure 15.6. Configuring a JMS file store using the Administration Console.  -
Name : The name of the JMS file store. -
Synchronous Write Policy: Select how the file store writes data to disk. The options are as follows : Disabled File store writes are allowed to use both the operating system's cache as well as the file system's on-disk cache. This policy is the fastest , but the least reliable because power outages or operating system failures can cause lost or duplicate messages. Cache-Flush Transactions cannot complete until all of their writes have been flushed down to disk. This policy is reliable and scales well as the number of simultaneous users increases . Direct-Write File store writes are written directly to disk. This policy's reliability and performance depend on operating system and hardware support of on-disk caches. Note The synchronous write policy is ignored if the file store is used exclusively for paging non-persistent messages to disk. -
Directory: The directory on the local file system where the file-based persistent store exists. -
Click Create to create a file store instance. The new instance is added under the Stores node in the left pane. If you intend to leverage the JMS Paging feature, you must also repeat the above steps to configure an additional "paging" JMS file store for temporarily swapping message bodies out to disk when WebLogic Server's memory allocation is exhausted. Hence, you could configure two file stores such as JMSFileStore and JMSPagingStore to take into account message persistence as well as paging. WebLogic Server creates the JMS file store files in their specified directories once the file store has been assigned to an active JMS server that has queues or topics assigned to it receiving messages from a message producer. For storing persistent messages in a JDBC-accessible database, you must create a JMS JDBC store using the following steps: -
Expand the JMS node. -
Expand the Stores node and click the Configure a New JMSJDBCStore text link. -
In the displayed Configuration tab, shown in Figure 15.7, enter values for the following attributes: Figure 15.7. Configuring a JMS JDBC Store using the Administration Console.  -
Name: The name of the JMS JDBC store. -
Connection Pool: Select an existing JDBC Connection Pool that will be used to provide a connection to your target database.  To learn how to configure JDBC connection pools and Data Sources, see "Accessing Data Repositories Using JDBC," p. 403 . To learn how to configure JDBC connection pools and Data Sources, see "Accessing Data Repositories Using JDBC," p. 403 .
Caution You cannot configure a transaction (XA) connection pool to be used with a JDBC database store. JMS must use a JDBC connection pool that uses a non-XAResource driver because JMS performs the XA support over the JDBC driver. -
Prefix Name: Enter a name that will serve as a prefix to easily identify the JMS tables created in your database. The default names for the JMS tables that will be created are JMSSTATE and JMSSTORE. For example, you can use "WebLogic_" as a prefix. Tip Specifying unique prefixes enables multiple JMS JDBC stores to exist in the same database. -
Click Create to create your JDBC store instance. The new instance is added under the Stores node in the left pane. WebLogic Server will automatically create the JMS tables in the target database after the JMS JDBC Store has been assigned to a JMS server and WebLogic Server rebooted. During WebLogic Server's initialization process, WebLogic Server uses the assigned connection pool to connect to the target database and create the JMSSTATE and JMSSTORE tables with the appropriate prefixes in the default schema defined for the connecting user . After you have created your JMS stores, you can view them by clicking the Stores node in the Administration Console. Figure 15.8 shows three stores JMSFileStore , JMSPagingStore , and JMSJDBCStore . Figure 15.8. Viewing your JMS stores using the Administration Console. 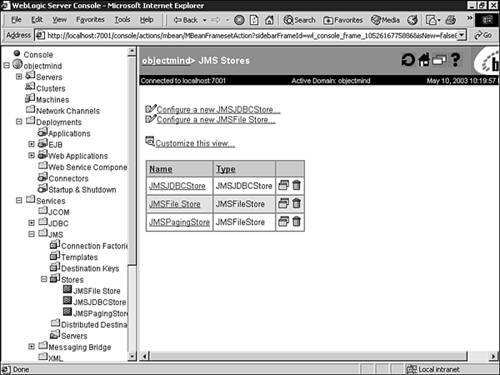 Configuring a JMS Server A WebLogic JMS server manages connections and message requests on behalf of JMS clients (JMS Producers and Consumers). Before you can configure any JMS Destinations (Queues or Topics), you must first configure a JMS server. To create a JMS server using the Administration Console, follow these steps: -
Expand the JMS Node in the left pane of the Administration Console and select Servers. -
In the right pane, click the Configure a New JMSServer link. -
In the displayed Configuration-General tab, enter values for the following attributes: -
Name: Enter a unique name for the JMS server. -
Store: Select the backing store used by the JMS server's destinations. A value of none implies that destinations on this server will not support persistent messaging. -
Paging Store: The name of the persistent store where non-persistent messages are paged for this JMS server. This store cannot be the same store used for persistent messages. -
Temporary Template: Specifies the template that will be used to drive the attributes for all temporary destinations assigned to this JMS server. JMS store attributes are not inherited from JMS templates as temporary destinations do not support persistent messaging. Figure 15.9 shows a sample configuration for a JMS server using existing JMS file and paging stores. Figure 15.9. Configuring a JMS server using the Administration Console. 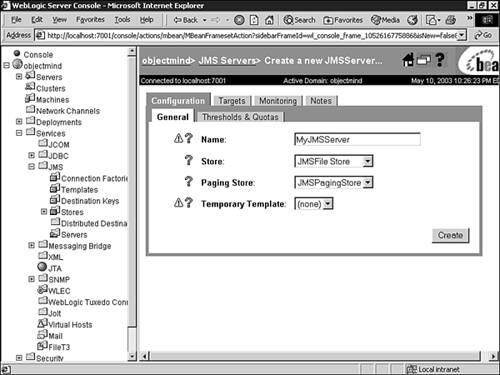 -
Click Create to create your JMS server. -
Click the Targets Tab and select the target WebLogic Server to deploy the JMS server as follows: -
If you select a WebLogic Server via the Servers tab, then when the target WebLogic Server boots, the JMS server boots as well. If no target WebLogic Server is specified, the JMS server will not boot. -
If you select a WebLogic Server via the Migratable Targets tab, you are defining a user-preferred WebLogic Server instance in a WebLogic cluster that will boot the JMS server. However, if that server incurs a failure, the JMS server and all of its destinations will migrate to another WebLogic Server within the cluster to ensure messaging continuity. -
Click Apply to save your changes. Your new JMS server will be added to the JMS servers node under the JMS node in the left pane of the Administration Console. By default, WebLogic Server also creates a Destination and Session Pool node under your new JMS server to enable you to configure associated Queues, Topics, and Session Pools, as shown in Figure 15.10. Figure 15.10. Reviewing your configured JMS servers using the Administration Console.  Creating a JMS DestinationQueue or a Topic After defining a JMS server, you must configure one or more destinations for your JMS server. The steps to create a JMS queue or topic associated with your JMS server are very similar using the Administration Console, as follows: -
Click the Destinations node under your JMS server instance node in the left pane of the Administration Console. -
Click the Configure a new JMSQueue... text link to create a queue or click the Configure a new JMSTopic text link to create a topic. -
In the displayed Configuration-General tab, enter the values for the following attributes: -
Name: The name of the destination. -
JNDIName: Enter the name used by clients to look up the destination in the JNDI namespace. If not specified, the destination name is not advertised through the JNDI namespace and cannot be looked up and used. -
Enable Store: Flag specifying whether the destination uses the persistent store specified by the JMS server. If this flag is enabled (true), but no persistent store is defined for the JMS server, the configuration fails and WebLogic JMS does not boot. If this flag is disabled (false), the destination does not support persistent messages. If this flag is set to "default," the destination uses the persistent store, if one is defined for the JMS server, and hence supports persistent messaging. -
Template: The JMS template from which the destination is derived. -
Destination Keys: These enable you to select destination keys that a topic or queue can use. Figure 15.11 and Figure 15.12 show the JMS topic and queue configurations for the JMS application examples used later in this chapter. Figure 15.11. A sample configuration for a JMS topic. 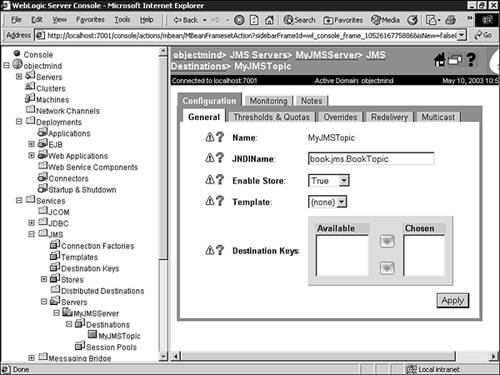 Figure 15.12. A sample configuration for a JMS queue.  -
Click Create to create your queue or topic instance for your JMS server. You will need to reboot your WebLogic Server once you have configured your JMS server's destinations. Using JMS Templates If you will be creating many JMS destinations, it is a good idea to create a JMS template using the Administration Console. A JMS Template provides an efficient means of defining multiple destinations with similar attribute settings, enabling you to modify shared attribute settings dynamically simply by modifying the template. These configuration attributes are inherited by the destinations that use them, with the following exceptions: -
If the destination that is using a JMS template specifies an override value for an attribute, the override value is used. -
If the destination that is using a JMS template specifies a message redelivery value for an attribute, that redelivery value is used. -
The Name attribute is not inherited by the destination as you must explicitly define a unique name for all destinations. -
The JNDI Name, Enable Store, and Template attributes are not defined for JMS templates. -
The Multicast attributes are not defined for JMS templates because they apply only to topics. Any attributes that are not explicitly defined for a destination are assigned default values. If no default value exists, you must specify a value within the JMS template or as a destination attribute override; otherwise the configuration information will remain incomplete and the WebLogic JMS server will not start. You can define JMS templates for destinations from the Templates node in the Administration Console. Configuring JMS Server and Destination Thresholds After you have created a JMS server and an associated destination object, you can specify thresholds and quotas to control the size and number of messages stored in the JMS server and destination objects, respectively. You can use quotas to limit the number of messages or the size of all messages that can be stored. Messages sent after a quota has been exceeded are rejected and the sender is notified through an exception. Quotas can be used to control individual applications from consuming all resources within WebLogic JMS. Thresholds are used to signal high or low load congestion periods based upon the number or size of the messages stored in the JMS server or destination. Upon exceeding an upper or lower threshold, triggered events are launched; for example messages are logged on the WebLogic Server indicating the respective threshold condition being exceeded. To configure the thresholds and quotas for your JMS server or destination, select your JMS server or Destination node in the Administration Console, and then select the Threshold & Quotas tab. As shown in Figure 15.13, there are threshold and quota attributes related to the number of messages and size of messages. Figure 15.13. Configuring the threshold and quota attributes for your JMS topics and queues. 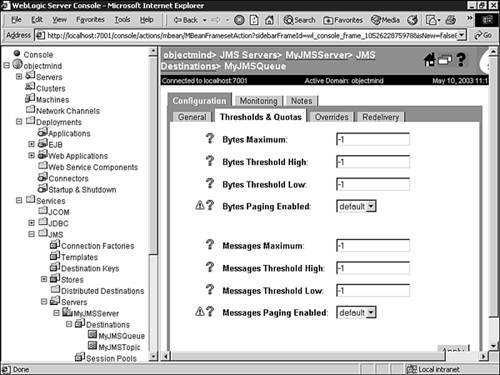 The default values, which are set to 1, imply there is no limit to the size or number of messages in your JMS server or destination object. You should understand the messaging behavior of your JMS application and the performance of your WebLogic Server under expected normal, off-peak, and peak operational conditions before you modify these default settings. To learn how to performance test your WebLogic Server, see "Performance Tuning the WebLogic Server," p. 1011 .
Implementing Messaging Service Continuity with Distributed Destinations In the event of a WebLogic Server instance failure within a WebLogic cluster, you can ensure JMS service continuity through the configuration of multiple physical destinations (queues and topics) as members of a single Distributed Destination set. Once configured, your producers and consumers look up the destination as a normal JNDI lookup and send/receive messages through what appears to be a single destination. Behind the scenes, WebLogic JMS distributes the messaging load across all the available destination members (Queues or Topics) within the distributed destination. In the event that a member (queue or topic) becomes unavailable due to a server failure, messaging traffic is redirected to the other available destination members in the destination set. The following steps will describe how to create a JMS distributed topic: Note The configuration of a distributed queue follows similar steps.
-
Expand the JMS node and click the Distributed Destinations node. -
In the right pane, click the Configure a New Distributed Topic link. -
In the displayed Configuration-General tab, enter values for the following attributes: -
Name: Uniquely identify the distributed topic within a WebLogic Server domain. -
JNDI Name: Enter the name used to bind the distributed topic into the JNDI namespace. -
Load Balancing Policy: Select how producers will distribute their messages across the members of a distributed topic. The valid values are Round-Robin and Random. Figure 15.14 shows an example configuration for a distributed topic. Figure 15.14. A sample configuration for a distributed topic.  -
Click Create to create the distributed topic. -
Click the Thresholds & Quotas tab and define the following attributes for all of the distributed topic members: -
Click Apply to store the new attribute values. -
Click the Auto Deploy tab and click the Create Members on the Selected Servers (and JMS servers) link. An auto deploy dialog box prompts you to select one of the following options: -
Select a cluster to target the distributed topic, and then click Next. -
Accept the None option to bypass this dialog box so you can select an individual server. Select a WebLogic cluster or None to proceed and select the target server(s) for the destination topic. All JMS servers that are deployed on the selected WebLogic Server instances, and that are not already hosting a distributed topic, will be listed and selected by default, as shown in Figure 15.5. Figure 15.15. Selecting a Target WebLogic Server for the distributed destination set.  To exclude a JMS server from hosting the distributed topic member, clear the corresponding check box. If there are no existing distributed topic members on the selected JMS servers, one new JMS topic will be created on each JMS server and added as a member of the distributed topic. -
Click Next to proceed to the final Auto Deploy dialog and click Apply to commit the changes. -
Click the Configuration-Members tab to view the topic members that were automatically created for the new distributed topic, as shown in Figure 15.16. Figure 15.16. Viewing the automatically created destinations for a distributed destination. 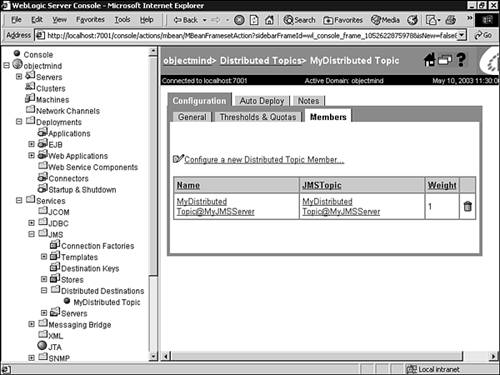 If, after you have created a distributed destination set, a requirement arises to add a previously configured destination, you can manually add your existing physical queues or topics as members to that set. The following steps describe how to add an additional member to a distributed topic set: -
Expand the JMS node and the Distributed Destinations node to display your configured distributed destinations. -
Select the distributed topic set to which you want to add a destination. -
Click the Configure a new Distributed Topic Member in the right pane. -
In the displayed Configuration tab, enter values for the following attributes: -
Name: Enter a logical name for the topic in the destination set. -
JMS Topic: Select the underlying topic that is associated with the distributed topic member. -
Weight: Define the topic's capability to handle message load with respect to other topic members in the distributed destination. Note The random distribution load-balancing algorithm uses the weight assigned to the physical destinations to compute a weighted distribution for the set of physical destinations. Figure 15.17 depicts adding the JMS topic named "MyJMSTopic" to an existing distributed topic set. Figure 15.17. Adding a topic member to a distributed topic set. 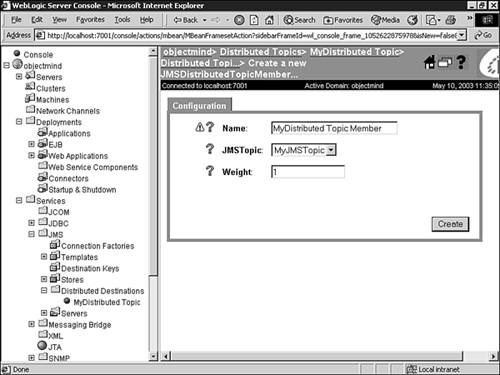 -
Click Create to create the new distributed topic member. The new member is added to the Distributed topic table. If necessary, repeat steps 14 to continue adding topic members to the distributed topic set. Configuring Connection Factories You can define and configure one or more uniquely named connection factories to create JMS connections with predefined attributes. Once created, WebLogic Server adds the connection factories to the JNDI namespace during startup, which JMS clients can retrieve using WebLogic JNDI. By default WebLogic JMS defines one connection factory, weblogic.jms.ConnectionFactory . However, all configuration attributes are set to their default values for this default connection factory, preventing you from having any control over the JMS server on which the connection factory may be deployed. For this reason, if you would like to target a connection factory to a particular JMS server, you must create a new connection factory and specify the appropriate JMS server target(s). To create a new JMS connection factory, follow these steps: -
Expand the JMS node. -
Click the Connection Factories node. -
In the right pane click the Configure a New JMS Connection Factory link. -
On the Configuration-General tab, shown in Figure 15.18, enter values in the following attribute fields: Figure 15.18. Configuring a JMS connection factory. 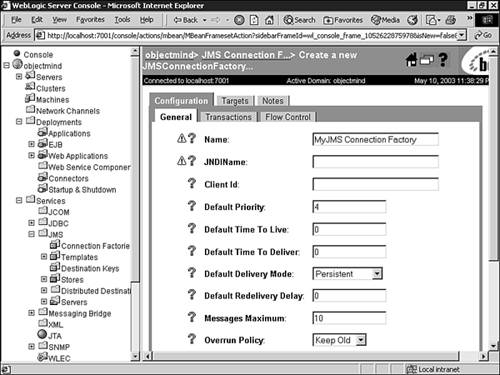 -
Name: The name of the connection factory. -
JNDIName: The JNDI name of the JMS connection factory, which is assigned to and used to look up the connection factory within the JNDI namespace. -
Client ID: The client ID for a durable subscriber that uses this connection factory. -
Default Priority: The priority for all messages for which a priority is not explicitly defined. All messages produced on a connection created with this connection factory will receive this value. -
Default Time to Live: The default maximum length of time, in milliseconds , that a message will exist. A value of 0 indicates that the message has an infinite amount time to live. This attribute is primarily used for messages for which a priority was not explicitly defined. -
Default Time to Deliver: Defines the delay, in milliseconds, between when a message is produced and when it is made visible on its destination. -
Default Delivery Mode: A default persistent or non-persistent delivery mode used for messages for which a delivery mode is not explicitly defined. -
Default Redelivery Delay: Defines the delay, in milliseconds, before rolled back or recovered messages are redelivered. -
Messages Maximum: The maximum number of messages that may exist for an asynchronous session and that have not yet been passed to the message listener. A value of 1 indicates that there is no limit on the number of messages; however, the limit is set to the amount of remaining virtual memory. -
Overrun Policy: When the number of outstanding messages reaches this attribute value, messages are discarded based on the specified policy. If set to Keep New, the most recent messages are given priority over the oldest messages, and the oldest messages are discarded, as needed. If set to Keep Old, the oldest messages are given priority over the most recent messages, and the most recent messages are discarded, as needed. Message age is defined by the order of receipt. -
Allow Close In On Message: Indicates whether a connection factory creates message consumers that enable a close() method to be issued within its onMessage() method call. -
Acknowledge Policy: Applies to implementations that use the CLIENT_ACKNOWLEDGE acknowledge mode for a non-transacted session. An acknowledge policy of Previous acknowledges all messages up to and including the message being acknowledged. An acknowledge policy of All ensures all messages received by the given session are acknowledged regardless of which message is being used to affect the acknowledge. -
Load Balancing Enabled: Specifies whether non-anonymous producers created through a connection factory are load balanced within a distributed destination on a per-call basis. -
Server Affinity Enabled: Specifies whether a WebLogic Server that is load balancing consumers or producers across multiple physical destinations in a distributed destination set will first attempt to load balance across any other physical destinations that are also running on the same WebLogic Server. -
Click Create to create a new instance of a connection factory instance. The new instance is added under the JMS Connection Factories node in the left pane. -
Click the Transactions tab and enter attribute values for transaction time-out, whether Java Transaction API (JTA) user transactions are allowed, and whether a transaction (XA) queue or XA topic connection factory is returned. -
Click Apply to save your changes. -
Click the Flow Control tab and enter attribute values that will enable a message producer to adjust its message flow. -
Click Apply to save your changes. -
Click the Targets tab and assign the connection factory to a WebLogic Server instance or a server cluster. -
Click Apply to save your changes. You will now need to reboot WebLogic Server to bind the JNDI name for this newly created JMS connection factory to WebLogic JNDI in order for message producers and consumers to gain a connection to your JMS server. Monitoring Your JMS Server Once you have configured your JMS server, you can monitor run-time statistics related to your JMS server and all its associated destinations and session pools using the following steps: -
Expand the JMS node in the left pane. -
Click the JMS server node that you want to monitor. -
In the right pane, select the Monitoring tab, as shown in Figure 15.19, to display the following text monitoring links: Figure 15.19. The Monitoring Options for your JMS server.  -
Monitor all Active JMS servers -
Monitor all Active JMS destinations -
Monitor all Active JMS session pool runtimes -
Click the appropriate text link to view monitoring data for that JMS object. JMS statistics continue to increment as long as the server is running. Statistics are only reset when WebLogic Server is rebooted. You can also monitor durable subscribers to the destinations associated with your JMS server using the following steps: -
Expand the JMS node in the left pane. -
Click the JMS server node that you want to monitor. -
Click the Monitoring tab to display the monitoring data. -
Click the Monitor All Active JMS Destinations link. A table displays in the right pane showing all active JMS destinations for the current domain, similar to Figure 15.20. Figure 15.20. Monitoring all the active destinations for your JMS server. 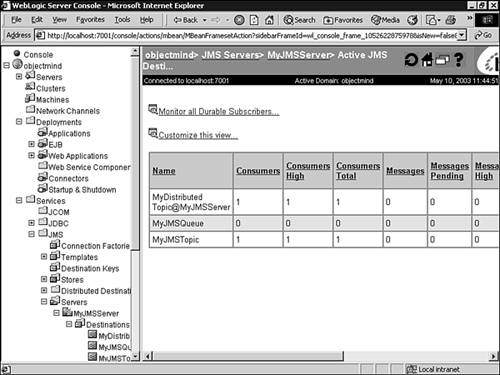 -
Click the Monitor All Durable Subscribers text link. Durable Subscribers information is displayed in a table in the right pane for all durable subscribers running (if any) for the destination topics listed in the table. -
To view durable subscriber information for a specific topic, click the icon (or actual number) in the Durable Subscribers column for the desired topic. Tip You can also monitor WebLogic JMS at the server level by clicking your WebLogic Server node in the left pane and selecting the Monitoring-JMS tab.
|