|
Adobe GoLive CS2 Tips and Tricks The 250 Best Authors: Pratt A., Grillo L. Published year: 2005 Pages: 223-225/301 |
TIP 207: Finding Site Assets
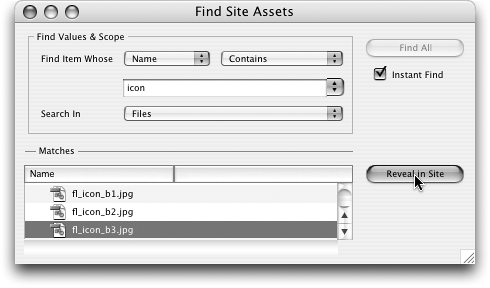
Let's say you know you have a certain file somewhere in your site, but you couldn't find it for a million bucks. Instead of wading through all the folders and subfolders in your site, choose Edit > Find > Find Site Assets. Type your search criteria in the Find Site Assets dialog and choose what part of the site you want to search in Figure 207 . Searching for assets in the Files tab is the most common use, but you can also search in the Collections, Colors, Errors, External, Extras, and Font Sets tabs of the Site window. Figure 207. Enter your search criteria and click Find All to quickly locate site assets.
After you get the search results, you can select any file in the list of matches at the bottom and click the Reveal in Site button. Now that the file is selected in the Site window, you can open the In & Out Links palette (see Tip 201) to see what files, if any, are referencing the found file.
Bonus Tip See Tip 28 to learn about using Quicksearch to locate files directly from the Site window. |
TIP 208:Finding File DifferencesWhether you're troubleshooting an obscure coding problem, experimenting with different solutions to a CSS problem, or just looking for text changes, the ability to compare the source code of two files side by side can be very helpful. GoLive has a file-differencing command that is activated by selecting Edit > Find > Find Differences. Use the Point and Shoot tools in the Find Differences dialog to select the two files to compare and click OK ( Figure 208a ). Figure 208a. Select Edit > Find > Find Differences and choose two files to compare.
The next dialog shows a side-by-side code view of the two files and highlights any differences for you ( Figure 208b ). To make sure the two files scroll together, leave the Synchronize Scrolling option enabled. All the differences between the two files are listed at the bottom of the dialog where you can click on an entry to jump to the correct line of the pages. Figure 208b. The Find Differences dialog lets you navigate and compare and code differences between two files.
|
TIP 209: Running Site Reports with Queries
GoLive CS2 has a powerful search feature called queries , which give you the ability to search through your site for files based on a variety of criteria. A query can be run on a whole site, on selected files in a site, or on the results of another query. You define queries in the Query Editor. To get to the Query Editor, first select Edit > Queries ( Figure 209a ). Click the New Query button to define a brand new query or select an existing query in the list and click the Edit Query button. Either way, the Query Editor will open ( Figure 209b ). Figure 209a. Choosing Run Query from the Edit menu opens the Query dialog.
Figure 209b. Choosing New Query or Edit Query opens the Query Editor.
Click the double-
facing
arrow
To add additional criteria, click the small round button containing an arrow
When your query is ready to go, click the Test Query button to see how the Query works. After the query is complete, you can save the results as a collection or use the results as the basis of another query, syntax check, or find operation. When you close the Query Editor, you'll be asked if you'd like to save your query. If you do, then go ahead and name and save it into your Site folder. |
|
Adobe GoLive CS2 Tips and Tricks The 250 Best Authors: Pratt A., Grillo L. Published year: 2005 Pages: 223-225/301 |