Working with Tables
| For years, writers have used tabs to add consistent formatting to structured text such as schedules, financial data, and product specifications. Tabs work, but they can be difficult to understand and format. InCopy supports tabs if you want use that option, but consider using tables instead because they are much easier to create, format, and update. Tables work like a spreadsheet application, meaning they function as a grid of horizontal rows and vertical columns that are easy to edit, resize, and format. Tip If you have a good reason to use tabs instead of tables, you can read more about them in Chapter 3. InCopy has fantastic table support, but we should note from the beginning that tables can only be seen and edited when working in the Layout view. When you look at a table in the Galley or Story view, you only see a table placeholder icon Creating TablesCreating tables in InCopy is as easy as placing Microsoft Excel files or Word documents that contain tables. Just choose File > Place, select the Excel (.xls) or Word (.doc) file, enable Show Import Options (Figure 6.12), and click Open. Figure 6.12. Enable the Import Options or hold down Shift when you click Open so you can customize the table formatting options.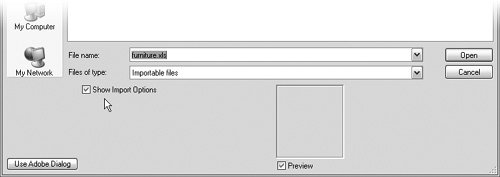 When you enable the Show Import Options setting in the Place dialog, you can customize the formatting of the placed table by choosing among three options (Figure 6.13):
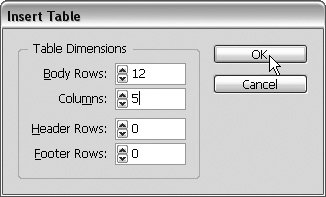
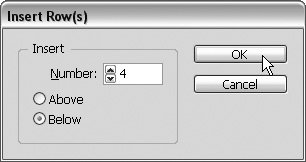
Figure 6.13. You'll probably ignore all the settings in this dialog except for the table formatting options.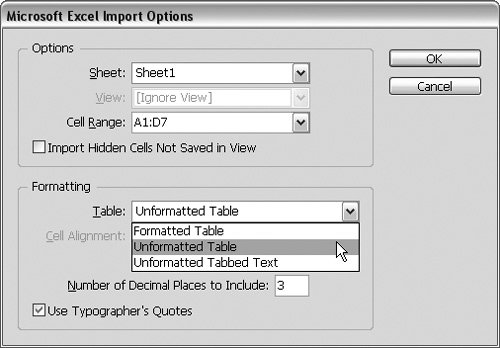 A lot of tabular data begins as an Excel spreadsheet, but that's not the only possible source. It's very common for tab and comma delimited text to come from other sources, such as a plain text file or an export from a database. You can place these text files in InCopy, select the text, and choose Table > Convert Text to Table. In the Convert Text to Table dialog, choose a Column Separator (almost always a tab or a comma) and a Row Separator (almost always a paragraph break) and click OK (Figure 6.14). Whether you place, paste, or type text directly in InCopy, it's easy to convert tabbed text into a table with this menu command. Figure 6.14. If your documents have tabbed text, you can convert it into easy-to-use tables. Tip All the commands in the Table menu only work in the Layout view. A third option for creating tables is to create the table structure first and then type the text content later. To create a new table from scratch, choose Table > Insert Table, enter the number of horizontal rows and vertical columns you need, and click OK (Figure 6.15). InCopy creates a basic table according to your settings and places the cursor in the first cell (top left), ready for you to type. You can add or delete rows and columns later, so don't fret about getting the table perfect on the first try. Figure 6.15. You can also create tables from scratch in InCopy. Tip You can even create tables inside tables, but don't go too crazy! As far as cell navigation is concerned, InCopy offers basically the same experience as Microsoft Excel does. To move from one cell to another you can click with your cursor, but navigating table cells with the keyboard is easier. The logical sequence of table cells is left to right, then top to bottom, so press the Tab key to jump to the next cell and press Shift-Tab to jump to the previous cell. You can also navigate up, down, left, and right between cells by using the arrow keys on your keyboard. Inserting and Deleting New CellsWhen you need to add additional rows to an existing table, choose Table > Insert > Row (Command/Control-9). Use the Insert Row(s) dialog to enter the number of rows to add, choose whether they should be added above or below the current row, and click OK (Figure 6.16). You can add columns to an existing table in the same fashion with the Table > Insert > Column (Option-Command/Alt-Control-9) command. Figure 6.16. Add new rows and columns to the existing table with the Table > Insert commands. To create new rows and columns in a more freeform way, just click on a row or column divider, start dragging, and then press the Option/Alt key. InCopy creates more rows and columns until you release the cursor (Figure 6.17). Figure 6.17. Hold down Option/Alt as you drag the edge of a table to create new rows or columns quickly. Tip Insert your cursor in the last (bottom right) cell of a table and press the Tab key to create a new row. It's just as easy to delete cells as it is to create new ones. Insert your cursor in a table cell and choose Table > Delete > Row (Command/Control-Delete) to delete the current row or Table > Delete > Column (Shift-Delete) to delete the current column. To delete the entire table, insert your cursor in any cell and choose Table > Delete > Table. There's no confirmation dialog for deleting a table, but you can choose Edit > Undo to restore the table if you change your mind or make a mistake. Selecting Tables and CellsThe Table > Select submenu has commands for selecting the different components of a table, but it's more practical to take a quick swipe with your mouse to select the parts of a table you need. For example, click and drag over a range of cells to select them. To select a column, hover your cursor near the top edge of a table until the cursor changes to a down arrow and then click (Figure 6.18). You can click and drag left or right with the down arrow cursor to select multiple columns. Figure 6.18. Hover your cursor near the top of a column until it changes to a down arrow and then click to select the entire column. Select horizontal rows in a similar way by hovering the cursor on the left edge of a table until the cursor changes to a right-facing arrow Selecting tables and table cells is pretty straightforward, but it can be tricky to distinguish between selecting a cell and selecting its contents. An easy shortcut is to insert your cursor anywhere in a table cell and press the Escape key to select the cell. Press Escape again to select its contents. Resizing Cells, Rows, and ColumnsTo resize a cell, place the cursor over the cell edge until it becomes a two-headed arrow and then click and drag the divider line. This gesture resizes the cell and also affects the dimensions of the entire table (Figure 6.19). Figure 6.19. Drag a row or column divider with the double-arrow cursor to resize the cells and change the size of the entire table. If you hold down the Shift key as you resize a cell, it resizes that cell and the adjacent row or column, but retains the overall dimensions of the table (Figure 6.20). If you hold down Shift and resize the table from the bottom or right edge, all the cells are scaled proportionally. Figure 6.20. Hold down Shift when you drag a row or column divider with the double-arrow cursor to resize the cells but keep the dimensions of the table the same.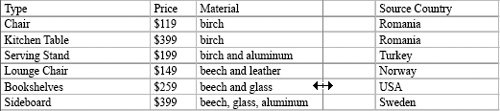 Merging and Splitting CellsAlthough most tables work effectively as simple grids of cells, there are times when irregular cell configurations are required. For example, you might want to merge the entire first row of a table into one cell and use it as a label (Figure 6.21). To alter the arrangement of the cells in your table, select the cells you want to change and choose the appropriate Merge Cells, Unmerge Cells, or Split Cells command in the Table menu. Figure 6.21. Merge and split cells to create more complicated table designs. Creating Running Header and Footer RowsIf you create content for financial publications, annual reports, or textbooks, you're probably all too familiar with really long tables. Sometimes tables seem to go on forever, and when they jump from frame to frame or page to page, you're faced with an interesting dilemma. Imagine you have a table that contains profit and loss information for a company, and the table jumps from one page to the next. When readers sees the table on the second page, how are they supposed to know which column shows profits and which column shows losses? This is a perfect example of why you would want to use header rows to label the content of the body rows in the table consistently. When you have a table that jumps from frame to frame or page to page, you should select the row or rows at the top of the table that you want in every instance of the threaded table and choose Table > Convert Rows > To Header. Now those selected rows are at the top of every instance of that table, even if it's threaded across multiple frames and pages. Footer rows work the same way except they appear at the bottom of each table in the text thread. Legal disclaimers, copyright statements, and technical explanations are all great candidates for a footer row. There are also contextual menu commands for Convert to Header Rows and Convert to Footer Rows. Select the rows you want to convert, Control/right-click, and InCopy is smart enough to make the appropriate command available based on your selection. If you select rows at the top of the table, the Convert to Header Rows command is available in the contextual menu; if you select bottom rows, the Convert to Footer Rows command appears (Figure 6.22). Figure 6.22. Convert top rows to header rows and bottom rows to footer rows so they appear in every instance of a threaded table. After you've created running headers and footers, you might need to edit the contents of these special rows. The utter coolness of running headers and footers becomes obvious when you realize that you can edit a header or footer row one time and it updates every instance of that table, no matter how many other frames or pages it extends to. If you try to edit a header or footer row, you might notice your cursor changes to a padlock icon Creating Evenly Distributed TablesAfter you've created a table, added content and resized a few rows, your table design can be a real mess. To tidy things up, select the rows or columns you want to clean up and choose Table > Distribute Rows Evenly or Table > Distribute Columns Evenly. These commands evenly distribute the selected rows and columns within the current dimensions of the table. Evenly spaced table cells aren't always necessary, but in many cases they can improve the readability of a table. Customizing Table and Cell OptionsIn addition to all the other ways to format and customize tables in InCopy, several menu commands in the Table > Table Options and Table > Cell Options submenus also affect tables. Choose Table > Table Options > Table Setup to control various table attributes, including table borders, spacing, alternating row strokes, alternating column strokes, alternating fills, and header and footer rows (Figure 6.23). Figure 6.23. Use the Table Options dialog to control row strokes, column strokes, alternating fills, and headers and footers.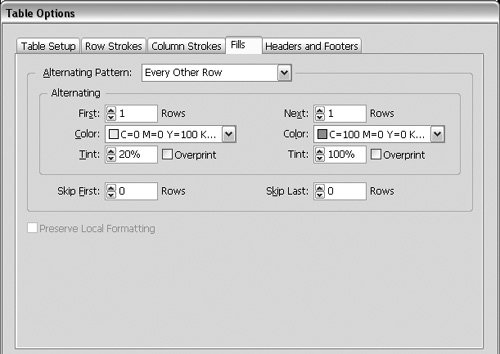 Similarly, you can choose any of the commands under Table > Cell Options to customize text placement, cell stroke and fill, cell size, and diagonal lines in table cells (Figure 6.24). You can apply these cell options one at a time or select a range of cells before you open the Cell Options dialog to change all selected cells at once. Figure 6.24. To control the design of selected cells instead of the entire table, use the Cell Options dialog. |


EAN: 2147483647
Pages: 122