Editing Text
| InCopy's truly fantastic word-processing tools help writers, editors, and proofreaders work more seamlessly with their designer counterparts than they ever thought possible. This smooth integration is possible because InCopy and InDesign share a lot of common technologies, including the same text-composition engine, the same font support, common file formats, and the same character and paragraph styles features. All this means that you can work together and learn from each other like never before. Pasting Text from Other SourcesIf you've made it this far into a book about writing with a computer, we assume you know how to type. However, your writing might include ideas or quotes from another text file, word-processing document, or Web page. There are two Paste commands in the Edit menu that you need to know about:
Tip If you copy formatted text from one InCopy document and paste it without formatting into another InCopy document, the result is plain text, but character and paragraph styles from the source text are still added to the target document. You can also copy text from other sources such as Microsoft Word, a Web browser, or your email and paste it into an InCopy document. By default, InCopy pastes plain text (without formatting) from other applications. This is usually a good thing because it helps avoid situations in which you paste formatted text that doesn't rely on InCopy's Character and Paragraph styles. It also reduces the chances of inadvertently adding lots of RGB color swatches (see "Introducing the Swatches Palette" later in this chapter) to your InCopy document, which can happen when copying and pasting text from a Web browser. If you have a good reason to change the default pasting behavior, choose InCopy > Preferences > Type on Mac or Edit > Preferences > Type on Windows. At the bottom of the dialog, change the setting from Text Only to All Information. Now when you paste text from other applications all the source formatting, for better or worse, is retained. Tip If you change the preferences to paste All Information from other applications, you can still override the setting case by case by choosing Edit > Paste without Formatting. Dragging and Dropping TextCopying and pasting text works just fine, but it has an '80s retro feel when compared with the new drag and drop text features available in InCopy CS2 and InDesign CS2. Drag and drop is enabled by default in Galley and Story views (you can enable it in Layout View in the Type pane of the application preferences) and should be familiar to anybody who has used Microsoft Word before. Just select any text (letters, words, sentences, or paragraphs), move your cursor over the text until the cursor changes ( If you hold down Option/Alt as you drag, the selection is copied and pasted, which is especially handy when you have multiple stories from one layout and you want to use the same text in more than one location. For example, say the spread you're working on includes a story and several pullquote stories. You can Option/Alt-drag an interesting quote from the body of the story into the pullquote story and then edit it for copyfit. Tip If you prefer copy and paste, you can disable drag and drop in the Type pane of the application preferences. You can also drag and drop text from other applications such as your Web browser, email application, or another text editor. You get the same results with copy and paste, but it's sometimes easier to drag and drop. When you drag and drop text from other applications, InCopy respects the preferences for copy and paste from other applications as described earlier in this chapter. Adjusting Space Between WordsThe helpful "Adjust Spacing Automatically When Cutting and Pasting Words" feature (Figure 3.1) is enabled by default. When you are copying and pasting or dragging and dropping text, InCopy automatically adds or removes spaces before and after words as necessary. This makes things easier when you're moving a text selection because you don't have to worry about selecting the correct number of spaces before and after the edited text. The feature is even smart enough to know when you're dragging and dropping text to the end of a sentence and it won't add a space before the period, question mark, or exclamation mark. Figure 3.1. Automatic spacing adjustment is enabled by default and affects copy and paste as well as drag and drop text editing.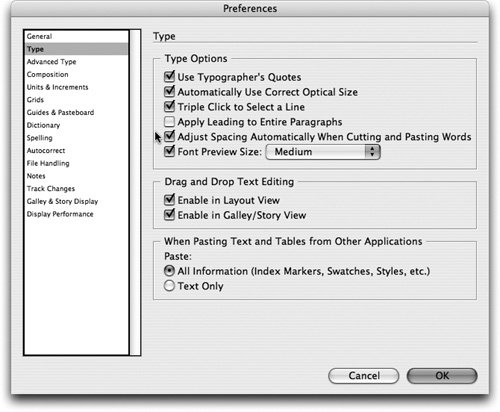 Changing CaseDepending on your writing habits and your source notes, you might have to clean up the case of the letters in your writing. The Type > Change Case submenu has four commands that are pretty self explanatory:
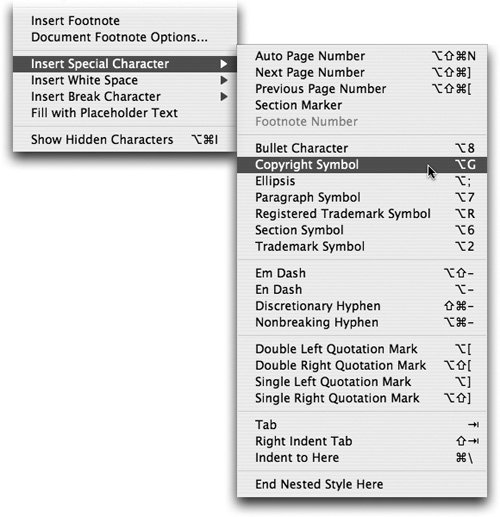
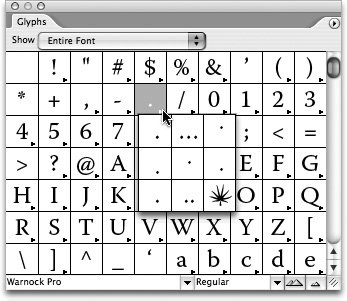
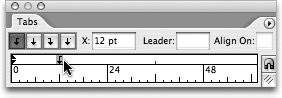
Select the text you want to change, select one of the change case commands, and watch InCopy reformat your text for you in an instant. With text selected, these commands are also in the contextual menu (Control-click on Mac or right-click on Windows) for easy access. If you use these commands frequently, you should considered creating custom keyboard shortcuts for them (see Chapter 1). Inserting Special CharactersAre you tired of trying to remember arcane keyboard shortcuts for obscure characters? Do you still ask your coworkers how to type trademark and copyright symbols? If so, you can throw away your secret decoder ring and start using the Type > Insert commands instead. The Type > Insert Special Character menu lets you add a wide variety of characters, including trademark and copyright symbols, dashes, and other punctuation (Figure 3.2). The Type > Insert White Space menu lets you insert more kinds of spaces than you even knew existed, including em spaces and en spaces. There's also the Type > Insert Break Character menu that lets you insert every kind of break character you can imagine, including frame breaks and forced line breaks. If you ever need some lorem ipsum, just choose Type > Fill with Placeholder Text. Figure 3.2. The Insert Special Character menu is full of shortcuts to useful special characters that might otherwise be hard to remember. Tip To customize the placeholder text in InCopy, write your new placeholder text and save it as a plain text file called placeholder.txt in the InCopy application folder. The next time you choose Type > Fill with Placeholder Text, you'll get your own flavor of lorem ipsum. Tip The Insert commands are so helpful, they're in the contextual menus as well as the menu bar. Control-click (Mac) or right-click (Windows) in your text to open a contextual menu and choose the appropriate insert command. Using the Glyphs PaletteIf you're looking for other obscure characters or advanced typographic features such as ligatures, fractions, or dingbats, then the Glyphs palette is your friend. Choose Type > Glyphs, and the font for the active text is displayed by default (Figure 3.3). Use the pulldown menus at the bottom of the palette to change the font family and font face. If you want to see larger or smaller previews of the glyphs, click the large or small mountain icons If you're using an OpenType font with an advanced set of characters, you might have some options in the Show menu at the top of the Glyphs palette. The Show menu lets you browse just a subset of the selected font instead of forcing you to wade through every letter, number, fraction, dingbat, and punctuation. Double-click a glyph in the Glyphs palette to insert it in your active story at the current cursor location. In some cases you'll notice a small black triangle next to a glyph in the Glyphs palette. Click and hold on any glyph with this flyout option and you can choose an alternate for the selected glyph. Figure 3.3. Use the Glyphs palette to find and insert obscure characters and special typographical elements. Tip The Glyphs palette renders your fonts accurately even when you're working in the Galley or Story view. As you become comfortable with the Glyphs palette, you'll probably use it more and more often. Glyph sets are an easy way to organize special glyphs that you use on a regular basis. To start a new glyph set, select a glyph in the Glyphs palette, choose New Glyph Set from the palette menu, and give the set a name. To add more glyphs to a glyph set, select the glyphs in the Glyphs palette and add them one at a time by choosing Add to Glyph Set > [Set name] in the palette menu (Figure 3.4). After you've created some useful custom glyph sets, you can easily access them by choosing View Glyph Set > [Set name] from the palette menu. If you need to organize your sets a little more effectively you can also edit and delete glyph sets with the corresponding palette menu commands in the Glyphs palette. Figure 3.4. Create custom glyph sets for easy access to obscure characters, fractions, alternates, and dingbats.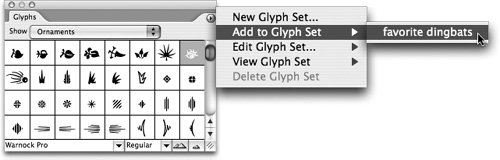 Tip A single glyph set can include characters from multiple font families and faces. Showing Hidden CharactersThe ability to see hidden characters such as spaces, tabs, and paragraph breaks can be a helpful editing and troubleshooting tool (Figure 3.5). You can toggle the visibility of hidden characters by choosing Type > Show/Hide Hidden Characters or clicking the Show/Hide Hidden Characters button Figure 3.5. The same story with and without hidden characters visible. Transposing CharactersThe new auto-correction feature (see Chapter 4) should fix many of your common typing errors, but InCopy also has a Transpose feature to fix little mistakes. If you accidentally jumble two adjacent characters as you type, you can easily fix your mistake by inserting your cursor between the two characters and choosing Edit > Transpose. For example, if you type $136, you can insert the cursor between the "3" and the "6" and change the figure to $163 with one command. Tip The Transpose command does not work with space characters. Using TabsFor many years, people have used tabs to align text at the same horizontal point or create the look of a table. Because InCopy and InDesign can create tables (see Chapter 6) natively and can even place tables from Excel and Word documents, many of the old uses for tabs can be eliminated. That said, there are still situations where tabs can be helpful, and here we give a brief overview of how InCopy handles them. Start by choosing Type > Tabs to open the Tabs palette (Figure 3.6), switch your document to Layout view so you can see an accurate preview of the results, and insert your text cursor in the paragraph you want to format. Tabs are rendered in Galley and Story views, but they are all the same generic width and only function as placeholders. Figure 3.6. Use the Tabs palette to create and edit tabs for a paragraph. There are four styles of tabs you can create in InCopy, and each is represented by a unique icon in the top left corner of the Tabs palette.
To create a tab, click the button for the tab style you want and then click just above the tab ruler. To adjust the precise position (X value) of a tab after it's created, click and drag it and watch the black vertical line that indicates the results on the text. You can also select the tab and enter an X value in the tab position field. Regardless of the unit of measurement you have selected in your application preferences under Units & Increments, you can enter any unit of measurement here. For example, if your application preferences are set to measure everything in points, and you know you want a tab stop at 0.5 inches, just type 0.5 in in the Position field, and InCopy does the unit conversion for you and positions the tab in the correct location. Tip To match up the Tabs palette to your actual Layout view, scroll the document so you can see the top of the frame that contains the paragraph you're formatting and click the magnet icon To change the alignment of a tab, select it above the tab ruler and click a different tab style icon. You can also Option/Alt-click on an existing tab to cycle through the four different tab style options. To delete a tab, select it and drag it away from the tab ruler. If you've created lots of tabs and want to start over, use the Clear All command in the Tabs palette menu. Tip You can repeat a selected tab with the Repeat Tab command in the palette menu, but if that's what you're doing you should consider using a table instead (see Chapter 6). When you use tabs with the default options, the space between the tabbed text is just empty space. However, sometimes you want a tab leader, such as a string of periods, to fill the gap between the text and the next tab. Select the tab you want a leader for and insert a character (or up to eight characters) such as a period, dash, or bullet in the Leader field in the Tabs palette. Now your tab leader character will fill the gap between the text and the tab instead of empty white space. This can be especially helpful with financial data or a table of contents when tabs are set very wide. The last feature you should know about in the Tabs palette is the ability to create tabs that align on a special character such as a decimal point, dollar sign, or hyphen. Create a decimal tab Figure 3.7. Here's an example of a paragraph that uses all four tab styles, a tab leader, and a custom alignment character (decimal).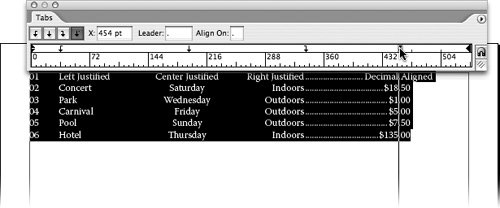 |

EAN: 2147483647
Pages: 122
- Assessing Business-IT Alignment Maturity
- Linking the IT Balanced Scorecard to the Business Objectives at a Major Canadian Financial Group
- Measuring and Managing E-Business Initiatives Through the Balanced Scorecard
- Measuring ROI in E-Commerce Applications: Analysis to Action
- The Evolution of IT Governance at NB Power