Preparing the Migration
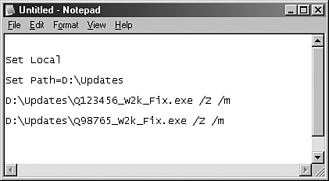
| As organizations plan and prepare to migrate to Windows Server 2003, one important consideration is the proactive tasks that can be completed prior to a migration to avoid issues when executing the migration task and concerns that might arise after the migration is complete. To begin planning a migration, one of the first areas you can consider is planning and creating a maintenance schedule which will allow you to review each task and proactively identify concerns and address areas that can affect a migration and server upgrade to Windows 2003. Review server roles, existing hardware, and the state of the Active Directory environment and adjust the migration strategy based on these findings. This ensures a successful migration and healthy Active Directory environment after the migration is complete. The following section provides insight to addressing these areas. Utilities and tips for using them to prepare you and the Windows 2000 environment for a successful migration to Windows Server 2003. Preparing Windows 2000 Servers to Be MigratedBegin by preparing the existing Windows 2000 servers and evaluating the readiness of the Windows 2000 environment. Create a server inventory and evaluate the existing Active Directory so your organization can plan server roles such as domain controllers and application servers based on the existing hardware being migrated. You can also determine upgrade paths and hardware replacement needs, which can then be incorporated into the migration plan. Scripts to Inventory HardwareBegin understanding your migration hardware needs by creating a detailed inventory of the existing Windows 2000 server hardware. Create a detailed inventory of the server hardware by manually inspecting servers, exporting hardware information using Microsoft Systems Management Server, and by using Microsoft Scripts which will query servers and report installed hardware. Gather More Hardware Information... You can download and use Windows scripts to collect, inventory, and enumerate hardware components such as memory and plug and play devices on servers belonging to the Windows 2000 domain. Go to the Microsoft scripting center at http://www.microsoft.com/technet/treeview/default.asp?url=/technet/scriptcenter/Default.asp. By creating and using a documented list of server components, you can determine which servers will be incorporated into the new Windows 2003 environment and which servers require upgrades to meet the minimum hardware requirements recommended by Microsoft for installing Windows Server 2003. Checking Hardware CompatibilityTo determine hardware compatibility, you can use the Compatibility Check Tool available from Microsoft. Located on the Windows Server 2003 installation CD-ROM, this tool can be run directly from the Windows 2003 CD-ROM. The inventory tool can be accessed through the Windows setup screen when installing Windows Server. Use the compatibility check tool to identify noncompatible hardware and conflicts that might exist on servers to be upgraded when migrating. Compatibility Check Tool Using the Compatibility Check Tool does not require you to perform the installation of Windows Server 2003 when running. To use the Compatibility Check Tool, run the tool on the server to be evaluated. To run this tool from a command prompt, insert the Windows 2003 installation CD-ROM. From the Run Command dialog box, use the following command to run the Compatibility Check Tool: D:\setup /checkupgradeonly (where D: represents the drive of the local server CD-ROM). Evaluating Server Hardware Life ExpectancyAnother key consideration when evaluating hardware is server hardware life expectancy and the life cycle of the hardware components installed. The hardware life cycle is the total amount of time you can expect server hardware to remain in production before performance, capacity, or failure can become a concern. Evaluate All Server Components Along with the server drive, it is a good practice to evaluate all server components to determine risks related to hardware failures. Review server history and identify existing servers that have failed in the past. Evaluate those servers that might pose any risk in the future once migrated to Windows 2003 before considering them as part of the migration. Often you can continue the hardware life cycle by adding memory and extending the total amount of drive space on a server. In addition to supplying additional memory and hardware drive space, often the replacement of older server drives can help avoid drive failures and lengthy recovery processes caused by server hard drive failures. Service Packs and System Bios UpdatesOne of the final considerations is Microsoft Windows service packs and server hardware BIOS revision updates. As a best practice before migrating, it is always a good idea to install the latest Windows 2000 service packs and hardware BIOS updates to ensure compatibility and avoid complications when upgrading servers to Windows 2003. In Windows 2003 mixed-mode environment scenarios, you should also address installing the latest Microsoft service packs, updates, and hot fixes on each Windows 2000 server you plan to keep in a mixed-mode environment after the migration of the domain is complete. To install Windows critical updates and hot fixes without requiring multiple reboots during the installation, use the QCHAIN utility available from Microsoft for download. This utility is included with Windows 2000 service pack 4 and all post service pack 4 hot fixes. You can install multiple hot fixes using the QChain utility built into post SP3 hot fixes and updates. To install multiple hot fixes and updates using the QChain utility, follow the example in Figure 15.1. In this example, three hot fixes will be installed from a folder called D:\Updates. To install multiple updates and fixes, begin by downloading the updates and placing them into a folder from where the fixes will be installed. Create a batch file using the following commands to install the updates using QChain as shown in Figure 15.1. Figure 15.1. QChain update batch file. Use the /z command switch so the server does not restart after the update has been installed. Use the command line switch /m to perform the installation in unattended mode. Additional information on using the QChain utility commands can be found at http://www.microsoft.com/downloads. In addition to service packs and updates, it is good practice to apply any server BIOS updates and firmware updates for devices such as array controllers and systems boards to leverage functionality and ensure compatibility with the Windows Server 2003 family of products. To find system BIOS updates and firmware updates for server hardware, see the server manufacturers Web site support section. Before Applying BIOS and Firmware Updates Before applying BIOS and firmware updates, it is a good practice to back up server data to avoid any possible loss of information. When applying updates, read and follow installation instructions carefully . Calculating Active Directory Hardware RequirementAs server hardware and compatibility requirements become clearer, additional considerations can be made to validate domain controller performance and hardware requirements when considering support for Microsoft's Active Directory. Using the ADSIZER tool from Microsoft, you can input information to identify additional Active Directoryrelated hardware requirements to provide adequate Active Directory performance and support the future plans of the Windows 2003 Active Directory Environment. Leveraging information included in the Active Directory, such as the total amount of users in and the directory site topology, the Active Directory Sizer Tool will validate the server hardware needs and total amount of server required to support a planned Active Directory design. Areas tested using the tool include hardware drive performance and server memory and total amount processors as well as areas regarding the total amount of domain controllers needed to support the future Active Directory infrastructure according to Microsoft standards. The ADSIZER tool and additional information on this utility can be accessed on the Windows 2003 resource kit and by downloading the utility from the Microsoft Web site at http://www.microsoft.com/downloads. Determining Active Directory Health StateOne of the last considerations to review before deciding which migration path to implement is to determine the overall state and health of the Active Directory environment. To do this, use common administrative tasks and tools available from Microsoft such as DCDiag.exe to maintain Active Directory. To begin, review each domain controller's event viewer system and application logs, identify common replication issues and event errors related to Active Directory and domain controller replication. Also, installing additional utilities like Netdiag and DCDiag from the Windows 2000 support tools and resource kit as well as leveraging built-in utilities will enable you to perform additional tests on the Windows 2000 Active Directory environment to ensure system state health before migrating. Before Performing Any of the Tasks Listed in the Following Section Back up all system state data before performing any of the tasks listed in the following section. Failure to back up information might result in the loss of Active Directory information. Also, included in the preparation tasks should be the review and maintenance of the existing Windows 2000 Domain Name System (DNS). Because Active Directory is heavily dependent on DNS, you should review the state of DNS and perform any maintenance required before migrating to Windows Server 2003. Using Netdiag.exeOften errors with replication and domain controller communication are not present in the domain controller server event logs; in this section you will apply the DCDiag and Netdiag utilities to identify Active Directory communication issues and issues related to replication. Use the following commands, to run the Netdiag utility and parse information to a log for review: To begin using the Netdiag utility, complete the steps listed here:
For Additional Information and Netdiag Commands Additional information and Netdiag commands can be found by reviewing the Netdiag_d.htm files located in the resource kit installation path directory. Using Replmon to Validate ReplicationThe replication monitor, installed with the Windows 2000 support tools, is a helpful GUI interface tool to assist in identifying and manually controlling replication of Active Directory. To use the replication monitor, install the Windows support tools. It is best to install and run the replication monitor from a domain controller in the Forest Root Domain. To install the Replication Monitor Utility and test Domain Controller replication, complete the following steps:
Performing Offline Defrag of Active DirectoryOne task that can greatly improve Active Directory performance and prepare Active Directory to be migrated to Windows 2003 is performing an offline defragmentation of the Ntds.dit file. Performing a defrag of the Ntds.dit file can reduce the overall size of the file by up to 40 percent. To defrag a database offline, perform the following steps:
Verifying Domain Name System FunctionalityAnother area to validate when reviewing Active Directory health and functionality is the current Domain Name System or DNS services in the domain. You can check DNS consistency and functionality using tools in the Windows resource kit. To check the consistency of the existing DNS and validate DNS functionality, use the DNSLint.exe utility from the Windows support tools located on the Windows installation CD-ROM. To test the Active Directory DNS, use the DNSLint.exe utility located in the C:\Program File\Support Tools directory to test the server DNS. Use the /ad switch to query DNS and test the record used by Active Directory to replicate information in the domain. Planning the Type of UpgradeNow that the hardware requirements have been determined, you can focus on which migration path scenario and approach best fits your specific migration needs. With server hardware identified and capacity of future requirements being considered , review the following bullets to determine the most effective migration path for your organization.
|
EAN: 2147483647
Pages: 325