Creating a Visual Studio Wizard
| Visual Studio makes heavy use of wizards to help guide developers through various tasks. The Add-in Wizard that we discussed in the previous sections is one such example of a New Project Wizard (it is launched when you try to create a new add-in project). There are also wizards for adding new items to projects. You can modify the existing Project/Add New Item Wizards or create your own wizard complete with its own user interface. In the following sections, we will focus on understanding the wizard landscape and creating a custom Add New Item Wizard. Examining the Wizard StructureEach wizard consists of two major components: a class that contains the code (and user interface) for the wizard and a .vsz file that provides information about the wizard to Visual Studio. The IDTWizard InterfaceTo hook into Visual Studio's wizard engine, your Wizard class must implement the EnvDTE.IDTWizard interface. The IDTWizard defines a single method, Execute, that is called by Visual Studio whenever the wizard is launched. Here is the prototype for the IDTWizard.Execute method (in C#): void Execute ( [InAttribute] Object Application, [InAttribute] int hwndOwner, [InAttribute] ref Object[] ContextParams, [InAttribute] ref Object[] CustomParams, [InAttribute] out wizardResult retval ) The arguments passed to the Execute method are used to link the wizard to the Visual Studio environment and to pass relevant data to the wizard:
The ContextParams parameter's content will vary depending on the type of wizard. For instance, for a New Project Wizard, the third value in the ContextParams array represents the location where the project file is stored (called the LocalDirectory). But for an Add Item Wizard, the third value in the array is a pointer to a ProjectItems collection. Table 11.6 maps the various array elements to the three different wizard types.
To determine the results of the wizard, you look at the value placed in the wizardResult parameter. Table 11.7 lists the wizardResult enum values.
The core content of the Execute method is entirely up to you. Within the body of the Execute method, you will need to implement all of the code necessary to do the work of the wizard and display its UI to the user. Note Although you probably think of wizards as a series of pages accessed by Next and Back navigation, a wizard in Visual Studio's terms is nothing more than a COM object that implements IDTWizard. In fact, a wizard doesn't need to display a user interface at all. It could, for instance, merely use the parameters passed to it to do some work and then quit. The .vsz and .vsdir FilesIf you recall from our discussion of add-ins, every add-in uses an .addin file to register the add-in with Visual Studio. The .vsz files are the equivalent for wizards; they make Visual Studio aware of the wizard and its implementing class. Here is a complete, sample .vsz file: VSWizard 8.0 Wizard=ContosoWizard.AddNewClassWizard Param= The VSWizard line in this file identifies the version information for the wizard. The number 8.0 equates to Visual Studio 2005, while prior version numbers map to prior Visual Studio releases. Next, a class ID is provided for the wizard. And finally, there are one or more (optional) Param lines. These lines define any custom parameters that you want sent to the wizard. Any parameters defined here will come across in the CustomParams parameter in the Execute method. Visual Studio has a specific folder hierarchy that it uses for storing wizard .vsz files; the folder where you place the .vsz file will dictate exactly where the option to launch the wizard will appear. As an example, if you wanted to create an Add Item Wizard for both Visual Basic and Visual C#, you would need to place a copy of the .vsz file into both the Visual Basic and the C# folders. If Visual Studio 2005 was installed in its default location, that would mean placing the wizard files here: C:\Program Files\Microsoft Visual Studio 8\VC#\CSharpProjectItems C:\Program Files\Microsoft Visual Studio8\VB\VBProjectItems If you were creating a New Project Wizard, the files would be placed in the VC#\CSharpProjects and the VB\VBProjects folders. Wizard folders may also contain a .vsdir file. This file is used to provide Visual Studio with icon and other resource information about a particular wizard. The .vsdir file is also a plain-text file. Each line in the file represents a specific .vsz file/wizard and provides multiple fields (separated by the pipe character, |) with optional information about the wizard. Table 11.8 documents the valid fields for each .vsdir line, in order of their appearance. The optional fields are noted.
Here is a simple .vsdir file example with one wizard record:
Note The .vsdir record provides a way to associate an icon resource to the wizard by allowing you to specify a DLL path and an icon resource ID. There is also a simpler way to accomplish this: Just create an .ico file, give it the same name as the wizard's .vsz file, and place it in the same directory. Creating an Add New Item WizardHere are the basic steps for creating a wizard:
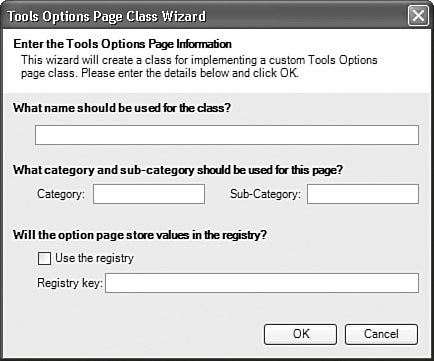
To solidify these concepts, let's look at them in action. We'll follow the development of a wizard from start to finish. In this case, the wizard will be a C# Add Item Wizard. Its purpose will be to collect some basic data from the user and then create a Tools Options page class (much like you manually did earlier in the chapter) that has been customized in accordance with the user's input into the wizard dialog box. Implementing the Execute MethodThe Execute method needs to do two things: It will display a Windows Forms dialog box to capture preferences such as class name; and it will process those preferences, generate a class that implements a Tools Options page, and add that class to the current project. Creating the Dialog BoxFirst, the dialog box: It should look roughly like the dialog box in Figure 11.26 (there is nothing special about the implementation of this form, so we won't bother to detail all of its code here). Figure 11.26. The wizard form. When the user clicks on the OK button, you should set several properties on the form that mirror the selections made on the dialog box. For instance, if you implement this form as a class called WizardDialog, you will want a WizardDialog.ClassName property, a WizardDialog.Category property, and so on. The last thing to do when the OK button is clicked is to set the form's DialogResult property. The Execute method on the wizard (which we will examine in a moment) will query the DialogResult property to determine if the user has committed the wizard or canceled it. Here is a look at the OK and Cancel button click event handlers: private void buttonOK_Click(object sender, EventArgs e) { // assign screen control values to our public // fields this.ClassName = this.textBoxClassName.Text; this.Category = this.textBoxCategory.Text; this.SubCategory = this.textBoxSubCategory.Text; this.UseRegistry = this.checkBoxUseRegistry.Checked; this.RegKey = this.textBoxRegKey.Text; // indicate dialog was accepted this.DialogResult = DialogResult.OK; } private void buttonCancel_Click(object sender, EventArgs e) { // indicate dialog was cancelled this.DialogResult = DialogResult.Cancel; }Using a Template FileThere are two approaches here to creating the Tools Options page class: You could generate every line of code using either the Code DOM API or by brute-force string creation/concatenation, or you could use a template file. The template file approach is a bit simpler and probably more efficient as well, so that is the approach we describe here. The class template is a file that looks just like any other user control. Using the standard code created for a user control class, you substitute key areas with string placeholders. For instance, the class name is specified within the wizard, and thus something you will want to replace in the template class: public class %TemplateClassName% : UserControl, IDTToolsOptionsPage { ... }You will also want the IDTToolsOptionsPage memberssuch as OnAfterCreated, OnOK, and so onrepresented in the class. For most of these methods, you will leave a simple System.NotImplementedException call to remind the user to fill in code as necessary. For OnAfterCreated and OnOK, however, you want the option of including a line of code to open the indicated Registry key: public void OnAfterCreated(DTE DTEObject) { // read our current value from registry // TODO: Include code to read from registry here %StartRegistryCode% RegistryKey regKey = Registry.CurrentUser.OpenSubKey(@"%TemplateRegKey%"); %EndRegistryCode% } public void OnOK() { //TODO: include code to save options // update the registry with the new setting %StartRegistryCode% RegistryKey regKey = Registry.CurrentUser.OpenSubKey(@"%TemplateRegKey%"); %EndRegistryCode% }Again, you use placeholders here: The %StartRegistryCode% and %EndRegistryCode% delimits the OpenSubKey line of code. If the user unchecks the User Registry check box in the wizard, you will eliminate everything between these two placeholders (including the placeholders themselves). The %TemplateRegKey% is used as a token for the Registry key value; this is something else that you collect from the user in the wizard's dialog box. Executing the WizardThe Execute method will open the wizard form and, if the user has not canceled the dialog box, will use the form's properties to call into a few internal routines responsible for generating the output class: public void Execute(object Application, int hwndOwner, ref object[] ContextParams, ref object[] CustomParams, ref wizardResult retval) { // instance the dialog for the wizard WizardDialog dlg = new WizardDialog(); // show the dialog dlg.Show(); // process the wizard results if (dlg.DialogResult == DialogResult.OK) { // Load template file, replace tokens, return content // as string string classContent = ReplaceTokens(dlg.ClassName, dlg.Category, dlg.SubCategory, dlg.UseRegistry, dlg.RegKey); // Put the returned string content into a file and // add the file to the current project // (3rd element of ContextParams is the current project's // items collection) ProjectItems projItems = (ProjectItems)ContextParams[2]; AddFile(classContent, projItems); retval = wizardResult.wizardResultSuccess; } // wizard was canceled; no action required else { retval = wizardResult.wizardResultCancel; } }To react to the user clicking OK, you call three separate internal routines. The first, ReplaceTokens, opens the template class file and replaces the tokens (because this is a simple string substitution process, we won't reproduce the code here). The second routine, AddFile, writes the new class content into a new file and adds it to the current project. Because this code may not be entirely obvious, here is one approach: private void AddFile(string className, string classContent, ProjectItems projItems) { // determine path to project files string fileName = Path.GetDirectoryName(projItems.ContainingProject.FileName); // use path and class name to build file name for class fileName = fileName + className + ".cs"; // save class file into project folder using (TextWriter writer = new StreamWriter(fileName, false)) { writer.Write(classContent); writer.Close(); } // add the newly created file to the current project projItems.AddFromFile(fileName); }Last, you call UpdateXML; this routine opens the .addin file and adds the appropriate <ToolsOptionsPage> node to the XML content: private void UpdateXml(ProjectItems projItems, string category, string subCategory) { // create string XML snippet string xml = ""; xml += "<ToolsOptionsPage>\r\n"; xml += " <Category Name=\"" + category + "\">\r\n"; xml += " <SubCategory Name=\"" + subCategory + "\">\r\n"; xml += " <Assembly></Assembly>\r\n"; xml += " <FullClassName></FullClassName>\r\n"; xml += " </SubCategory>\r\n"; xml += " </Category>\r\n"; xml += "</ToolsOptionsPage>\r\n"; xml += "</Extensibility>"; // iterate items in the project, looking for the // .addin file string projName = projItems.ContainingProject.FullName; foreach (ProjectItem itm in projItems) { if (itm.Name == projName + ".addin") { // open the .addin file's document object itm.Document.Activate(); TextDocument txtDoc = (TextDocument)itm.Document.Object(""); TextRanges nullObj = null; // add in the cat/sub-cat XML snippet txtDoc.ReplacePattern("</Extensibility>", xml, (int)vsFindOptions.vsFindOptionsFromStart, ref nullObj); } } }At this point, the wizard code is complete. Creating the .vsz and .vsdir FilesAll that is left is to create the .vsz file and add an entry to the .vsdir file. The .vsz file is straightforward: VSWizard 8.0 Wizard=ContosoWizards.ToolsOptionsPageWizard Param= The record you add to the .vsdir file looks like this:
With that, the wizard is fully functional and can be selected from the Add Item dialog box. |
EAN: 2147483647
Pages: 195