Installation
| The installation of Visual Studio 2005 remains similar to previous versions. The exception is the myriad of new SKUs and tools available for install. Depending on your purchase, a subset of these items will be available for your selection during install (see Chapter 1, "A Quick Tour of Visual Studio 2005"). If you are fortunate enough to own the Team Suite Edition, you'll be presented with the full set of options. Figure 2.1 shows the installation options selection dialog box for the Team Suite. Figure 2.1. Visual Studio 2005 setup options page.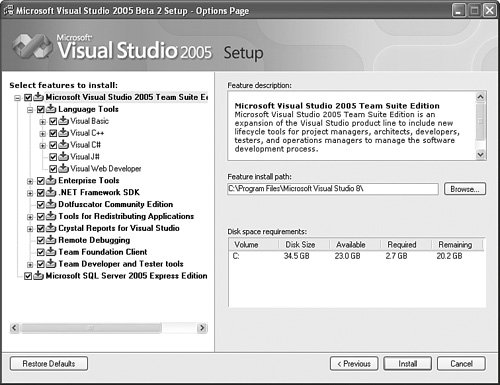 Choosing a LanguageSetting up your development machine should be relatively straightforward. We suggest the average developer keep language installs to a primary language and perhaps one backup. You might use a secondary language for viewing sample code from MSDN or similar sites. Typically, this means if your primary language is Visual Basic, you install C# as a secondary language (and vice versa). This solves the problem of finding a great bit of code you want to embed in your project only to discover it's not available in your chosen language. Additionally, Visual Studio 2005 lets you configure your primary language (see the next section). We also believe that both C++ and J# are meant as primary languages. We cannot see a major benefit to choosing them as secondary languages to either VB or C# (unless, of course, you are constantly porting Java or something similar). Finally, choosing to install many languages, most of which you do not intend to use, not only takes up hard drive space, but it can also clutter your environment with too many choices. We do, however, recommend installing the full MSDN help system. There is always a possibility of finding a solution to a problem you are having inside an item targeted at a different language. Installing Source ControlDuring install you'll need to consider your options surrounding source control and Team Foundation Server. If you are installing a development client SKU based on Team Systems, you will want to install the Team Foundation Client. This will allow you to connect to the new Team Systems Server and participate in item management, source control, reporting, and so on. If you are not working with Team Systems, we suggest you install the new version of Visual SourceSafe (VSS) 2005. This is a separate install from Visual Studio. If you are working on a team, the database will be installed on the server. The administration tools should be installed on either the administrator's box or the server. Each developer will simply install the client. If you are on your own, we still suggest that you use a local copy of VSS for managing your source code; you never know when a rollback will save the day. Figure 2.2 shows the new Visual SourceSafe tool in action. Figure 2.2. The New Visual SourceSafe 2005.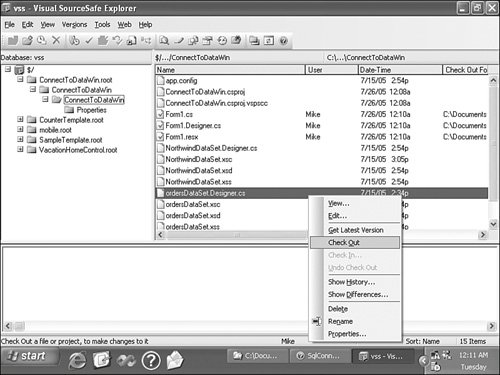 Configuring Your Development EnvironmentBooting the new IDE for the first time will result in a dialog box asking you to choose your environment settings. As Visual Studio becomes the central tool for so many developers, testers, and project managers, it's harder and harder to satisfy them all with a single tool. To aid in this dilemma, Microsoft has created an entire set of environment settings that are configured for the average developer type. For instance, if you set your environment to C#, the new project dialog box will automatically highlight C# projects above other languages. Figure 2.3 shows the configuration options available to you. Figure 2.3. The Environment Settings options dialog box. Only your first use of Visual Studio will launch the default settings dialog box. On subsequent visits you'll go straight to the tool. However, you might consider switching your environment settings if you do a lot of switching from one language to another or if you switch roles. For example, C# developers might use the C# development settings the majority of the time. They might then toggle to the Tester or Project Management Settings if they intend to do a lot of testing for the project. You manage your environment settings from the Tools menu's Import and Export Settings option. Figure 2.4 shows a screen from the resulting wizard. This screen allows you to choose settings to import. Note that there are several default setting groups, including those based on language and role (such as web developer, tester). In addition, you can browse to a custom settings file. Figure 2.4. The Import and Export Settings Wizard. Tip If you are like most developers, you are probably particular about your environment setup. There is nothing worse than having to work on a machine that has a different IDE configuration. You can be thankful that you can now use the Import and Export Settings Wizard to take your IDE settings with you. Another key screen to this wizard is the settings selection screen. On this screen you decide which options are important for import. This allows you to pick and choose imported settings. For example, you may love the way a friend has configured her code editor in terms of font and contrasting colors, but you do not want all her other settings like keyboard configurations. Figure 2.5 provides a glimpse at the granular level to which you can manage your environment settings. Figure 2.5. Choosing settings to import.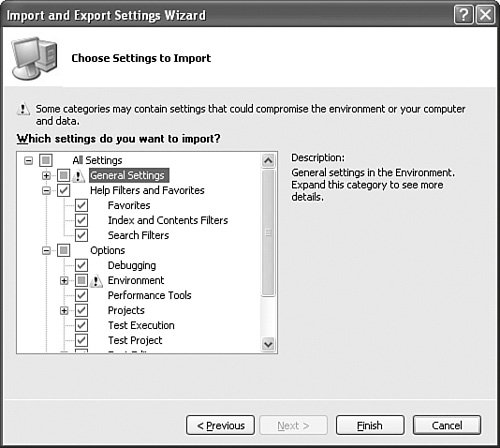 Tip A great feature of the import and export settings tool is the ability to move help favorites. These favorites are finally abstracted from your default web browser favorites. In addition, they can now travel with you from machine to machine, so you do not have to spend another hour digging through the help file for a particularly important topic. |


EAN: 2147483647
Pages: 195