Developer Testing
| Developers have always been responsible for testing their code prior to its release to the testers. In the past, this meant walking through every line of code in the debugger (including all conditions and errors). Going through all the code made for a fine goal but was not always realized (and very difficult to verify). In fact, the entire exercise was often skipped when doing code changes and updates. The result was lower-quality builds sent to the testers. Clearly, this system highlights a need to automate unit testing. As a result, unit test frameworks were developed. The first such framework for .NET was nUnit, which is an open source project that allows you to write code that tests other code. A similar framework is now built into Visual Studio 2005. With it, developers can write unit tests that call their code and test possible conditions and outcomes. The unit test framework in Visual Studio allows you to build tests as you build your application. Alternatively, if you subscribe to test-driven development, you can write your tests before you write your code. In either case, a disciplined approach to unit testing can lead toward building a full set of tests in unison with your application. This full set of tests can often represent a regression test for most components or even the entire system. The result is increased confidence in activities that were previously very high risk, such as last-minute fixes, refactoring, and late additions. When these activities occur, you can leverage your full set of unit tests to find out what, if anything, was broken as a result of the change. A Sample Unit TestBefore we go too much further, it makes sense to look at unit tests to better understand them. Remember, a unit test is simply test code you write to call your application code. This test code asserts that various conditions are either true or false as a result of the call to your application code. The test either passes or fails based on the results of these assertions. If, for example, you expect an outcome to be true and it turns out false, then a test fails. Let's look more closely at a real example. Suppose you have a web service that returns a customer's profile from the database. This web service takes the customer's ID as a parameter. You might write a simple test to call this web service and pass a known ID from the database. This test might then confirm that what is returned not only works but is also correct. Listing 22.1 shows an example of such a test. Listing 22.1. A Sample Unit Test
Notice that this code is similar to other C# code. You simply make the call to the object. If this call fails (or any exception is thrown), then the test fails. You then do an assertion in the test to make sure the object returned matches the expected results. If this assertion is false (the values are not equal), then the test fails. If it is true, the test succeeds. You might add a few more assertions to round out this test. In addition, you might create some additional tests for this method. However, you should now have an understanding of the basics of a unit test. We will dig a little deeper in a moment. Writing Effective Unit TestsThe more unit tests you write, the better you get at writing them. There are a few tenants (or best practices) to keep in mind to write effective unit tests. They include the following:
These best practices represent a few guidelines for writing effective tests. As you write more and more tests, you may come up with your own effective unit test tenets. Using Unit Test Classes and MethodsVisual Studio 2005 provides the Microsoft.VisualStudio.TestTools.UnitTesting namespace, which contains the attribute classes used to define tests. Attributes are used to decorate classes and methods for execution by the unit test framework. Table 22.2 presents a list of common attribute classes used for unit testing.
The UnitTesting namespace also includes the Assert static type. This object contains a number of methods for evaluating whether the results of a test were as expected. Table 22.3 lists some key assertion methods.
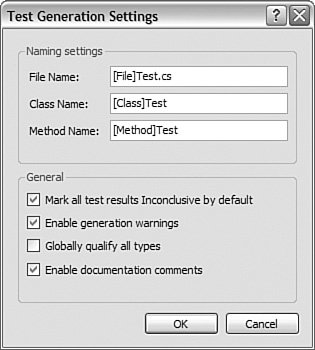
The UnitTesting namespace contains a couple of additional assertion classes. The CollectionAssert class is used to verify the contents of collections. As an example, you can call the Contains method to assert whether a given collection contains a specific element. The StringAssert class contains methods for matching strings and portions of strings. You can use the StartsWith method, for example, to assert whether a string begins with a certain set of characters. Creating Unit TestsThere are a few ways you can initiate the creation of unit tests. You can do so manually by creating a class file, adding the appropriate references, attributes, and the like. You can also add a unit test item to a test project via the Test menu or the context menu associated with a test project. These methods create blank unit tests to which you can add your code. Visual Studio also provides two means of automating the creation of unit tests. You can right-click an existing class and choose CreateUnitTests. You can also run the Unit Test Wizard from the Test Items dialog box (alternatively, you can launch this wizard from the context menu of a test project by selecting Add, Unit Test). In all cases Visual Studio will actually generate a set of unit tests based on the code in your class. What gets generated is more than just stub code. Visual Studio actually examines the methods and properties in your class and writes out real, possible tests. Of course, you have to finish adding the appropriate values and assertions, but what is generated is a nice start. Let's look at an example. Suppose you have a Customer object that contains standard properties such as Name, Address, Phone, Email, and so on, It also may contain methods such as Save, Update, and Delete. Also, suppose you choose to add a new unit test to your test project. Visual Studio will present the Create Unit Tests dialog box. Figure 22.8 shows an example. Figure 22.8. Unit Test Creation Wizard.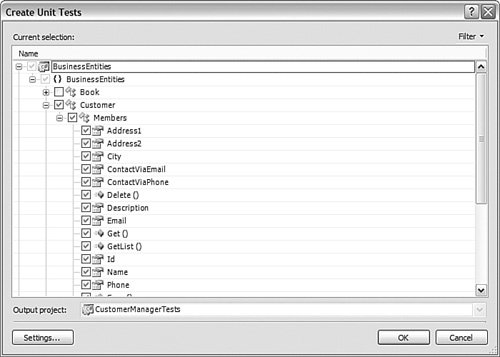 In this dialog box, you can select the members that need to have tests generated. For this example, the members of the Customer object have been selected. The Settings button opens a dialog box that allows you to indicate various settings for generating your unit tests. Figure 22.9 shows an example of this dialog box. Notice you can use the macro text [File], [Class], and [Method] to indicate that Visual Studio should use key portions of the class to name portions of the test. Figure 22.9. The Test Generation Settings dialog box. Visual Studio generates a test for every method and every property in the object. As an example, consider the Name property. Listing 22.2 shows what Visual Studio generated as a unit test for this property. Notice this test creates a new instance of the Customer object. It then attempts to set the value of the Name property. Finally, it confirms that this property set was successful via the assertion. This is a valid property test. All that is left for a developer is to put a valid value into the variable val (note the TODO) and remove the Inconclusive assertion. Listing 22.2. A Sample of an Autogenerated Unit Test
Running Unit TestsYou can run your tests from the Test Tools toolbar or the Test menu. You have a couple of options: Run with the debugger or run without. The former allows you to break into the debugger if a test fails. This capability can be useful if you are troubleshooting code through tests. The latter is a more likely scenario. You simply want to run your set of unit tests and determine their results. The Test Tools toolbar runs all tests in a given project. You will want to use the Test Manager to run a group, list, or subset of tests. For example, if you simply want to run the Customer unit tests, you can open the Test Manager. You then would apply a filter to the All Loaded Tests list. This filter would be by Class Name. You then check which tests you want to run. Finally, from the toolbar on the test manager, you can choose a Run option. Figure 22.10 shows an example. Notice the Test Manager window on top, the Run menu item, and the Test Results window below. Figure 22.10. Running tests from the Test Manager.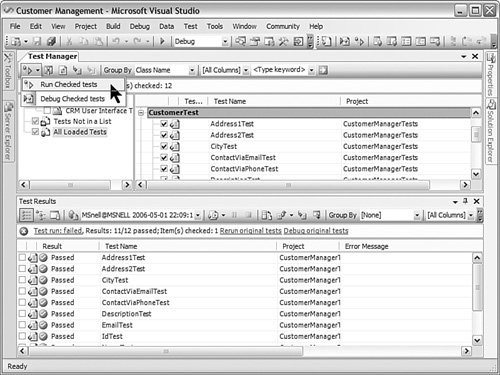 Note When you run a test project, only the test project is recompiled. If you make changes to a project you are testing, you must recompile that project. This approach is different from "running" applications with the debugger and can therefore take some time to get used to. Viewing Test ResultsThe Test Results window provides an overview of which tests passed and which failed. Figure 22.11 shows this window in action. Notice that the given test run is considered failed if one or more tests fail. In this case, 10 of 11 tests passed. However, the overall test failed due to the one test failure. Figure 22.11. Test results.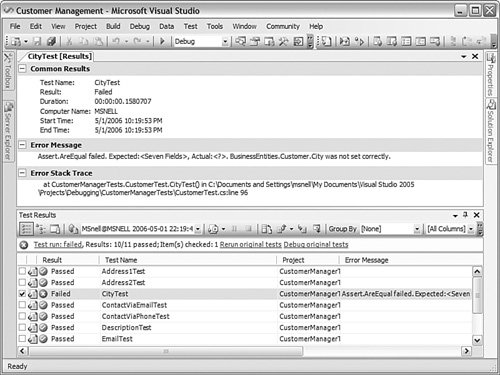 You can navigate through the results in the Test Results window. If you double-click a test, you are presented with statistics relative to the test. The top of Figure 22.11 shows the failure information for the CityTest; this includes the error message and stack trace. You can also publish the results of your testing to Team Foundation Server. Doing so provides vital statistics on the quality of a given build, including which tests were run and what the results were. In addition, you can right-click a test and generate a Team Systems work item. This capability is useful if you have a failure. You can right-click it and log it as a bug or task for someone to fix. Code Coverage AnalysisAutomated unit tests are wonderful. However, you also need some assurance that the unit tests cover all the code in the system. This is true especially for project managers and other stakeholders. To date, they have had no real measure of how much code was being tested. Instead, they had to rely on the word of the developers (who are often also unsure). To help solve this problem, Visual Studio provides code coverage analysis. This analysis matches unit tests to code and indicates what code is being covered and what code is not. The result is a shared view into the state of testing. For example, all your tests may pass; however, it makes for a different report if only 30% of your code is being called by those tests. Configuring Code CoverageLooking at code coverage can help developers write effective unit tests. It can also help to measure those tests. You configure (or turn on) code coverage for a given assembly from the .testrunconfig file. Figure 22.12 shows this file. In this example, code coverage is turned on for the BusinessEntities.dll project. Figure 22.12. Configuring code coverage.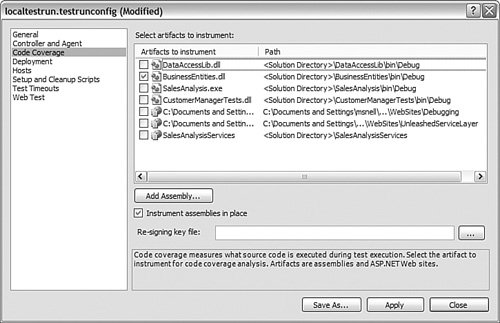 Evaluating Code CoverageThe next step is to rerun your tests. Visual Studio then captures the coverage data. This data is then presented to you in the Code Coverage Results window. You can access this window from the toolbar on the Test Results window. Figure 22.13 shows an example of these test results. Figure 22.13. Code coverage results.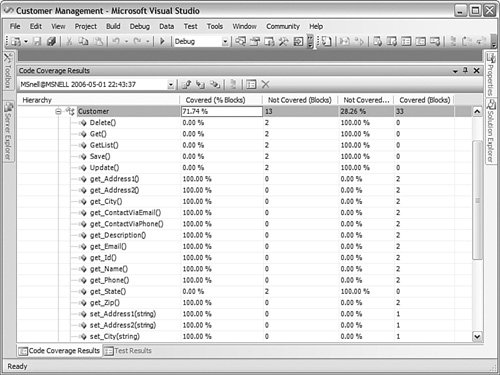 Notice that only approximately 72% of the code is covered inside the Customer class. You can navigate through this list to find gaps. Plus, you can quickly see that a number of methods do not have unit tests (0% coverage). You can navigate to this code directly from the coverage window. In fact, you can turn on code-coloring from the Coverage toolbar. Code-coloring highlights in blue the code that is being called by the test. It turns red the code that is not called. These colors give you an easy way to find dead spots in your testing. Figure 22.14 shows an example of this coloring (although the distinction is difficult to see in this black-and-white book). The Id property is covered by the executing tests, but the methods below it are not. Figure 22.14. Code coverage coloring.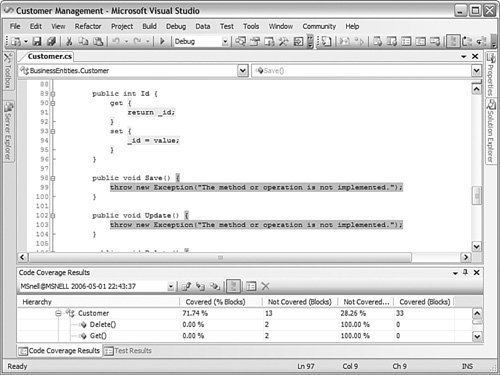 |
EAN: 2147483647
Pages: 195