Frame Layouts
| < Day Day Up > |
You can use frames to structure a page in a variety of ways. First consider that it is possible to use not only percentage values for frame sizing, but pixels and wildcard values. The rows and cols attributes also can be set to pixel values so that <frameset cols="200,400"> defines a column 200 pixels wide, followed by a column 400 pixels wide. If the screen is smaller than 600 pixels, the contents might be clipped, or excessive scrolling might be required. If the screen is much larger, there might be a great deal of empty screen space. Because it is difficult to determine the exact size of the screen, it could be dangerous to set these attributes to exact values.
In general, you want to combine absolute pixel sizes with some more flexible measurements such as percentages or wildcards. If you know that the controls frame contains graphic buttons that are 150 pixels wide, consider setting the size of the first frame to 175 pixels to fit the graphic plus some white space. If the frame were any smaller than this size, the graphic would be clipped, so using an absolute pixel value makes sense when you know the size of the contents. But what should the size of the other frame be? Use the wildcard character (*) to specify that whatever is left over after 175 pixels should be used for the other frame. The code for such a frameset is <frameset cols="175,*"> . A common design beyond the two-column frame is a three-row, header-footer frameset.
<frameset rows="100, *, 50"> <frame src="header.html" name="header" id="header" /> <frame src="display.html" name="display" id="display" /> <frame src="footer.html" name="footer" id="footer" /> </frameset>
In addition to these simple layouts, it is possible to nest framesets together to create complex layouts. Consider the example here:
<frameset cols="200, *"> <frame src="links.html" name="controls" id="controls" /> <frameset rows="100, *"> <frame src="header.html" name="header" id="header" /> <frame src="display.html" name="display" id="display" /> </frameset> </frameset>
This produces a three-frame design with the second column composed of two rows. An example rendering of such a frame layout appears in Figure 8-5 (online, see http://www.htmlref.com/examples/chapter8/nestedframes.html).
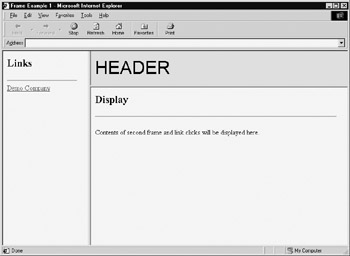
Figure 8-5: Nested frame design
This sort of layout also can be accomplished by using the <frame> tags to reference documents containing additional frameset elements, although if carried too far this can lead to overly complicated page renderings . Even more complex designs, such as a fixed framed region in the middle of the screen, are possible with nesting. Consider the markup presented here, which could produce a result similar to the one shown in Figure 8-6. It also can be viewed online at http://www.htmlref.com/examples/chapter8/fixedframes.html.
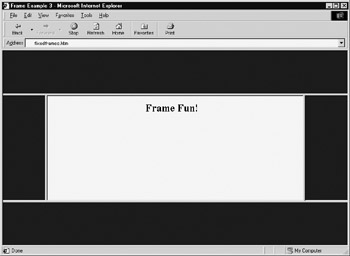
Figure 8-6: Fixed window frame design
<!DOCTYPE html PUBLIC "-//W3C//DTD XHTML 1.0 Frameset//EN" "http://www.w3.org/TR/xhtml1/DTD/xhtml1-frameset.dtd"> <html xmlns="http://www.w3.org/1999/xhtml" lang="en"> <head> <title> Frame Example 3 </title> <meta http-equiv="content-type" content="text/html; charset=ISO-8859-1" /> </head> <frameset rows="100, *, 100"> <frame src="blue.html" name="top" id="top" /> <frameset cols="100,*,100"> <frame src="blue.html" name="left" id="left" /> <frame src="center.html" name="center" id="center" /> <frame src="blue.html" name="right" id="right" /> </frameset> <frame src="blue.html" name="bottom" id="bottom" /> </frameset> </html>
The corresponding files blue.html and center.html are shown here for completeness:
File: blue.html
<!DOCTYPE html PUBLIC "-//W3C//DTD XHTML 1.0 Transitional//EN" "http://www.w3.org/TR/xhtml1/DTD/xhtml1-transitional.dtd"> <html xmlns="http://www.w3.org/1999/xhtml" lang="en"> <head> <title> Blue </title> <meta http-equiv="content-type" content="text/html; charset=ISO-8859-1" /> </head> <body bgcolor="blue"> <!-- just a blank document --> </body> </html>
File: center.html
<!DOCTYPE html PUBLIC "-//W3C//DTD XHTML 1.0 Transitional//EN" "http:// www.w3.org/TR/xhtml1/DTD/xhtml1-transitional.dtd"> <html xmlns="http://www.w3.org/1999/xhtml" lang="en"> <head> <title> Center </title> <meta http-equiv="content-type" content="text/html; charset=ISO-8859-1" /> </head> <body bgcolor="white"> <h2 align="center"> Frame Fun! </h2> </body> </html>
The main challenge when working with complex frame designs such as the previous one is to account for various rendering problems across browsers, such as dealing with scrolling.
First, consider removing the frame borders. According to specification, this is best accomplished by setting each individual frame's border using the frameborder attribute. The default value of 1 indicates a frame border should be used while a value of indicates to remove it. So <frame src="links.html" name="controls" id="controls" frameborder="0"> would turn off borders for this particular frame. The problem with the border syntax is that it is not always supported properly, particularly under older browsers. Also, most browsers support the frameborder attribute for the frameset element that should affect all enclosed frames. This isn't part of the specification, but is widely supported. Even when you are successful in removing frame borders in all situations you still might have unsightly gaps between frames. Internet Explorer has added a proprietary attribute, framespacing, to the frameset element to alleviate this. Just set it to and any gaps should be removed under this browser. The reality of the border settings is that if you want to cover all browser situations, you probably will have to overload the attributes and provide multiple ways of indicating the desired border style.
If borders are left on, you might want to turn off scrolling or even indicate that the frame should not be resized. To set scrolling on a frame, use the scrolling attribute on a <frame> tag; by default, the value of this attribute is auto , which adds scrollbars as needed. However, setting the value to yes or no will explicitly indicate the presence or lack of scrollbars regardless of the content within the frame. The presence of the noresize attribute indicates that the user cannot resize a frame. The example here shows a frame with scrolling off and no resizing:
<frame src="test.html" name="frame1" id="frame1" border="0" noresize="noresize" scrolling="no" />
| Note | Given the XHTML requirement for all attributes to have values, the noresize attribute is set to the value of noresize . |
Always remember that turning off resizing or limiting scrolling could lead to trouble if the user doesn't have a screen that fits the framed content!
The last common attributes to consider for frame layouts are marginheight and marginwidth . These attributes are used to control the distance between the frame and its contents. Very often designers will set these values to to achieve the effect of bleeding framed content right to the edge of the frame.
<frame src="blue.html" name="right" id="right" marginwidth="0" marginheight="0" />
The frame and frameset elements take a few other attributes beyond the ones previously discussed and the core attributes id , class , style , and title . Many browsers ¾ notably Internet Explorer ¾ provide numerous proprietary extensions including the use of transparency and color settings for borders. Interested readers should see Appendix A for complete syntax on these attributes. The next section discusses inline or floating frames, which would have made the previously presented nested frame example quite easy.
| < Day Day Up > |
EAN: 2147483647
Pages: 252