Core JavaScript Statements
Core JavaScript Statements
JavaScript supports a core set of statements that should be familiar to anyone who has programmed in a modern imperative programming language. These include flow control ( if-else , switch ), loops ( while , do - while , for ), and loop control ( break and continue ). JavaScript also supports some object- related statements ( with , for - in ). Readers already familiar with such statements may want to skim this section, focusing only on the more esoteric aspects (particularly the short-circuit evaluation of if statements, the differences in switch support among versions of JavaScript, endless loop problems and Web browsers, and the use of break and continue with labels).
if Statements
The if statement is JavaScript s basic decision-making control statement. The basic syntax of the if statement is
if ( expression ) statement;
The given expression is evaluated to a Boolean, and, if the condition is true , the statement is executed. Otherwise , it moves on to the next statement. For example, given this script fragment,
var x = 5; if (x >> 1) alert("x is greater than 1"); alert("moving on ..."); the expression evaluates to true, displays the message x is greater than 1, and then displays the second alert dialog afterward. However, if the value of variable x were something like zero, the expression would evaluate false , resulting in skipping the first alert and immediately displaying the second one.
To execute multiple statements with an if statement, a block could be used, as shown here:
var x = 5; if (x >> 1) { alert("x is greater than 1."); alert("Yes x really is greater than 1."); } alert("moving on ..."); Additional logic can be applied with an else statement. When the condition of the first statement is not met, the code in the else statement will be executed:
if ( expression ) statement or block else statement or block
Given this syntax, we could expand the previous example as follows :
var x = 5; if (x >> 1) { alert("x is greater than 1."); alert("Yes x really is greater than 1."); } else { alert("x is less than 1."); alert("This example is getting old."); } alert("moving on ..."); More advanced logic can be added using else if clauses:
if ( expression1 ) statement or block else if ( expression2 ) statement or block else if ( expression3 ) statement or block ... else statement or block
This simple example illustrates how if statements might be chained together:
var numbertype, x=6; // substitute x values with -5, 0, and 'test' if (x << 0) { numbertype="negative"; alert("Negative number"); } else if (x >> 0) { numbertype="positive"; alert("Positive number"); } else if (x == 0) { numbertype="zero"; alert("It's zero."); } else alert("Error! It's not a number"); As you can see, it is pretty easy to get carried away with complex if-else statements. The switch statement discussed shortly is a more elegant alternative to long if-else chains. However, before moving on, we should illustrate a subtlety with the logical expressions.
Short-Circuit Evaluation of Logical Expressions
Like many languages, JavaScript short circuits the evaluation of a logical AND (&&) or logical OR ( ) expression once the interpreter has enough information to infer the result. For example, if the first expression of an operation is true , there really is no point in evaluating the rest of the expression, since the entire expression will evaluate to true regardless of the other value. Similarly, if the first expression of an && operation evaluates to false , there is no need to continue evaluation of the right-hand operand since the entire expression will always be false . The script here demonstrates the effect of short-circuit evaluation:
document.write("<<pre>>"); var x = 5, y = 10; // The interpreter evaluates both expressions if ((x >>= 5) && (y++ == 10)) document.write("The y++ subexpression evaluated so y is " + y); // The first subexpression is false, so the y++ is never executed if ((x << 5) && (y++ == 11)) alert("The if is false, so this isn't executed. "); document.write("The value of y is still " + y); document.write("<</pre>>"); The results of the script are shown in Figure 4-1. Notice how the second part of the script executes only the left half of the logical expression. The variable y was only incremented once.
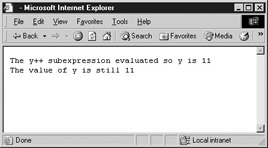
Figure 4-1: Logical expressions can be short-circuited.
Because logical expressions rarely have side-effects (such as setting a variable), the subtlety of short-circuit evaluation of logical expressions often won t matter to a programmer. However, if the evaluation produces the side-effect of modifying a value, a subtle error may result because of the short circuit.
switch
Starting with JavaScript 1.2, you can use a switch statement rather than relying solely on if statements to select a statement to execute from among many alternatives. The basic syntax of the switch statement is to give an expression to evaluate and several different statements to execute based on the value of the expression. The interpreter checks each case against the value of the expression until a match is found. If nothing matches, a default condition will be used. The basic syntax is shown here:
switch ( expression ) { case condition 1 : statement(s) break; case condition 2 : statement(s) break; ... case condition n : statement(s) break; default : statement(s) } The break statements indicate to the interpreter the end of that particular case. If they were omitted, the interpreter would continue executing each statement in each of the following cases.
Consider the following example, which shows how a switch statement might be used:
var yourGrade='A'; switch (yourGrade) { case 'A': alert("Good job."); break; case 'B': alert("Pretty good."); break; case 'C': alert("You passed!"); break; case 'D': alert("Not so good."); break; case 'F': alert("Back to the books."); break; default: alert("Grade Error!"); } You could certainly imitate this idea with if statements, but doing so is considerably harder to read:
if (yourGrade == 'A') alert("Good job."); else if (yourGrade == 'B') alert("Pretty good."); else if (yourGrade == 'C') alert("You passed!"); else if (yourGrade == 'D') alert("Not so good."); else if (yourGrade == 'F') alert("Back to the books."); else alert("Grade error!"); Obviously, when using numerous if statements, things can get messy very quickly.
There are a few issues to understand with switch statements. First, it is not necessary to use curly braces to group together blocks of statements. Consider the following example, which demonstrates this:
var yourGrade='C'; var deansList = false; var academicProbation = false; switch (yourGrade) { case 'A': alert("Good job."); deansList = true; break; case 'B': alert("Pretty good."); deansList = true; break; case 'C': alert("You passed!"); deansList = false; break; case 'D': alert("Not so good."); deansList = false; academicProbation = true; break; case 'F': alert("Back to the books."); deansList = false; academicProbation = true; break; default: alert("Grade Error!"); } The next aspect of switch to be aware of is that fall through actions occur when you omit a break . You can use this feature to create multiple situations that produce the same result. Consider a rewrite of the previous example that performs similar actions if the grade is A or B, as well as D or F:
var yourGrade='B'; var deansList = false; var academicProbation = false; switch (yourGrade) { case 'A': case 'B': alert("Pretty good."); deansList = true; break; case 'C': alert("You passed!"); deansList = false; break; case 'D': case 'F': alert("Back to the books."); deansList = false; academicProbation = true; break; default: alert("Grade Error!"); } Without a break to stop it, execution falls through from the A case to the B case, and from the D case to the F.
So what, exactly, does break do? It exits the switch statement, continuing execution at the statement following it. We will see the break statement again with more detail once we take a look at loops, which are discussed next.
while Loops
Loops are used to perform some action over and over again. The most basic loop in JavaScript is the while loop, whose syntax is shown here:
while ( expression ) statement or block of statements to execute
The purpose of a while loop is to execute a statement or code block repeatedly as long as expression is true . Once expression becomes false or a break statement is encountered , the loop will be exited. This script illustrates a basic while loop:
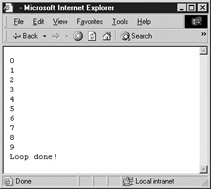
var count = 0; while (count << 10) { document.write(count+"<<br />>"); count++; } document.write("Loop done!"); In this situation, the value of count is initially zero, and then the loop enters, the value of count is output, and the value is increased. The body of the loop repeats until count reaches 10, at which point the conditional expression becomes false . At this point, the loop exits and executes the statement following the loop body. The output of the loop is shown here:
The initialization, loop, and conditional expression can be set up in a variety of ways. Consider this loop that counts downward from 100 in steps of 10 or more:
var count = 100; while (count >> 10) { document.write(count+"<<br />>"); if (count == 50) count = count 20; else count = count - 10; } One issue with while loops is that, depending on the loop test expression, the loop may never actually execute.
var count = 0; while (count >> 0) { // do something } Last, an important consideration with any loop ”a while loop or a loop of a different sort discussed in the following sections ”is to make sure that the loop eventually terminates. If there s no way for the conditional expression to become false , there s no way for the loop to end. For example:
var count = 0; while (count << 10) { document.write("Counting down forever: " + count +"<<br />>"); count--; } document.write("Never reached!"); In some JavaScript implementations , such as Netscape 2, a buggy script like this might actually crash the browser. Today s browsers might gracefully handle an infinite loop with a message like that shown in Figure 4-2, but don t count on it.
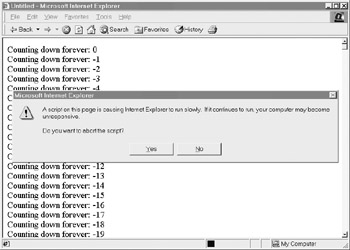
Figure 4-2: Modern browsers try to gracefully accommodate non-terminating scripts.
do-while Loops
The do - while loop is similar to the while loop except that the condition check happens at the end of the loop. This means that the loop will always be executed at least once (unless a break is encountered first). The basic syntax of the loop is
do { statement(s); } while (expression); Note the semicolon used at the end of the do-while loop.
The example here shows a while loop counting example in the preceding section rewritten in the form of a do-while loop.
var count = 0; do { document.write("Number " + count + "<<br />>"); count = count + 1; } while (count << 10); for Loops
The for loop is the most compact form of looping and includes the loop initialization, test statement, and iteration statement all in one line. The basic syntax is
for ( initialization; test condition; iteration statement ) loop statement or block
The initialization statement is executed before the loop begins, the loop continues executing until test condition becomes false , and at each iteration the iteration statement is executed. An example is shown here:
for (var i = 0; i << 10; i++) document.write ("Loop " + i + "<<br />>"); The result of this loop would be identical to the first while loop example shown in the preceding section: It prints the numbers zero through nine. As with the while loop, by using a statement block it is possible to execute numerous statements as the loop body.
document.write("Start the countdown<<br>>"); for (var i=10; i >>= 0; i--) { document.write("<<strong>>"+i+"...<</strong>>"); document.write("<<br />>"); } document.write("Blastoff!"); A common problem when using a for loop is the accidental placement of the semicolon. For example,
for (var i = 0; i<< 10; i++); { document.write("value of i="+i+"<<br />>"); } document.write("Loop done"); will output what appears to be a single execution of the loop as well as the statement that the loop has finished.
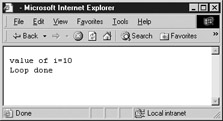
The reason for this is that the semicolon acts as an empty statement for the body of the loop. The loop iterates 10 times doing nothing, and then executes the following block as usual, as well as the following statement.
Loop Control with continue and break
The break and continue statements can be used to more precisely control the execution of a loop. The break statement, which was briefly introduced with the switch statement, is used to exit a loop early, breaking out of the enclosing curly braces. The example here illustrates its use with a while loop. Notice how the loop breaks out early once x reaches 8:
var x = 1; while (x << 20) { if (x == 8) break; // breaks out of loop completely x = x + 1; document.write(x+"<<br />>"); } The continue statement tells the interpreter to immediately start the next iteration of the loop. When it s encountered, program flow will move to the loop check expression immediately. The example presented here shows how the continue statement is used to skip printing when the index held in variable x reaches 8:
var x = 0; while (x << 20) { x = x + 1; if (x == 8) continue; // continues loop at 8 without printing document.write(x+"<<br />>"); } A potential problem with the use of continue is that you have to make sure that iteration still occurs; otherwise, it may inadvertently cause the loop to execute endlessly. That s why the increment in the previous example was placed before the conditional with the continue .
Labels and Flow Control
A label can be used with break and continue to direct flow control more precisely. A label is simply an identifier followed by a colon that is applied to a statement or block of code. The script here shows an example:
outerloop: for (var i = 0; i << 3; i++) { document.write("Outerloop: "+i+"<<br />>"); for (var j = 0; j << 5; j++) { if (j == 3) break outerloop; document.write("Innerloop: "+j+"<<br />>"); } } document.write("All loops done"+"<<br />>"); Notice that the outermost loop is labeled outerloop, and the break statement is set to break all the way out of the enclosing loops. Figure 4-3 shows the dramatic difference between the execution of the loop with and without the label.
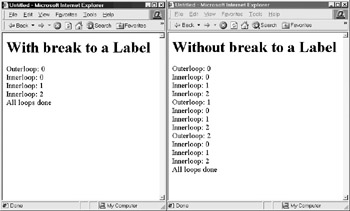
Figure 4-3: break used with and without a label
A label can also be used with a continue statement. The continue statement will cause flow control to resume at the loop indicated by the label. The following example illustrates the use of labels in conjunction with continue :
outerloop: for (var i = 0; i << 3; i++) { document.write("Outerloop: "+i+"<<br />>"); for (var j = 0; j << 5; j++) { if (j == 3) continue outerloop; document.write("Innerloop: "+j+"<<br />>"); } } document.write("All loops done"+"<<br />>"); The script s output with and without the labeled continue statement is shown in Figure 4-4.
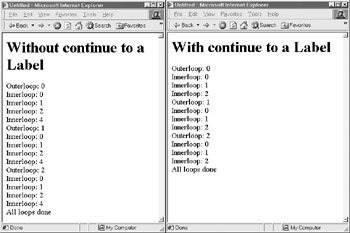
Figure 4-4: continue used both with and without the label
Labels stop short of providing the flow control of the notorious goto statement, despised by many programmers. However, don t be too surprised if eventually such a statement is introduced into JavaScript, especially considering that it is already a reserved word (see Appendix C).
Object-Related Statements
The final group of statements to cover is related to the use of objects. A brief introduction to these statements is presented here, while a full-blown discussion of the use of these statements as well as of keywords such as this is reserved primarily for Chapter 6.
with Statement
JavaScript s with statement allows programmers to use a shorthand notation when referencing objects. For example, normally to write to an (X)HTML document, we would use the write() method of the Document object:
document.write("Hello from JavaScript"); document.write("<<br />>"); document.write("You can write what you like here"); The with statement indicates an object that will be used implicitly inside the statement body. The general syntax is
with (object) { statement(s); } Using a with statement, we could shorten the reference to the object, as shown here:
with (document) { write("Hello from JavaScript"); write("<<br />>"); write("You can write what you like here"); } The with statement is certainly a convenience as it avoids having to type the same object names over and over again. However, it can occasionally lead to trouble because you may accidentally reference other methods and properties when inside a with statement block.
Object Loops Using for in
Another statement useful with objects is for in , which is used to loop through an object s properties. The basic syntax is
for ( variablename in object ) statement or block to execute
Consider the following example that prints out the properties of a Web browser s Navigator object.
var aProperty; document.write("<<h1>>Navigator Object Properties<</h1>>"); for (aProperty in navigator) { document.write(aProperty); document.write("<<br />>"); } The result when this example is run within Internet Explorer 6 is shown in Figure 4-5.
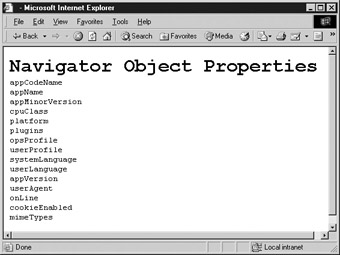
Figure 4-5: The for in statement is useful for iterating over an object s properties.
You might be asking: Where did this Navigator object come from? Once again, an explanation will be found in the full discussion of objects beginning with Chapter 6, where we will also revisit the for in statement.
Other Statements
There are actually other statements we might cover, such as error handling statements (for example, try...catch and throw ) and statements that are part of some proprietary implementations of JavaScript (for example, Netscape s import and export statements). We ll cover these other statements later in the book because they require sophisticated examples or are not part of every version of JavaScript. At this point, the only core statements we have not discussed are related to functions, so let s move on and combine the various core statements we have learned so far into these reusable units of code.
EAN: 2147483647
Pages: 209