HeaderControl
| I l @ ve RuBoard |
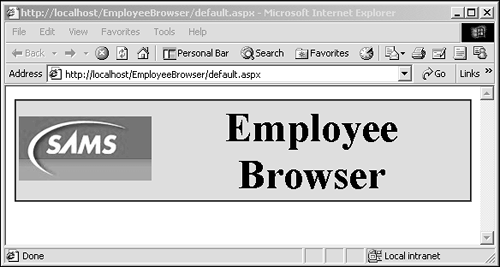
HeaderControlAs a quick entry into developing UserControls , a custom header control with two properties should suffice to get the blood rushing. The header control will be developed to allow for interaction with the ASP controls on the page. Later, a different approach will be taken, showing that there is more than one way to accomplish a task. The header control, shown in Figure 4.3.1, will be developed using the following ASP WebControls :
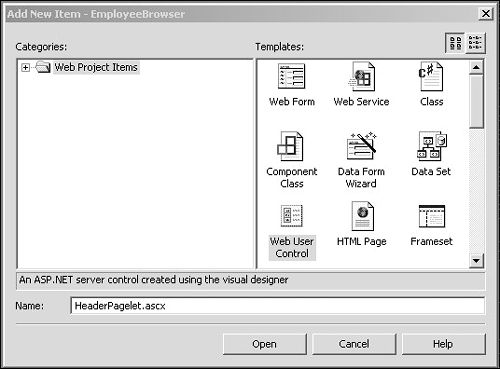
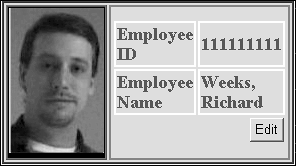
Figure 4.3.1. The header control. One of the benefits of using asp:* controls is their ability to generate HTML for the requesting client's ability. Down-leveling is a built-in feature and will no doubt save you time and effort. The header control consists of two files ” HeaderControl.aspx and HeaderControl.ascx.cs . A file with the extension of .aspx denotes a UserControl derived entity. This is one of the advantages offered by ASP.NET ”the ability to have actual program code behind a Web page or UserControl to handle tasks that require more than just simple script. To build the header control, and in fact the entire Web project about to be designed, create a new ASP.NET Web Application in VS7. The project should be named EmployeeBrowser . One of my pet peeves about Visual Studio, or any development environment for that matter, is the default choices made by the editor. I promptly delete any source files it generates, because the main page needs to be default.aspx and not WebForm1.aspx . The header control is merely a small table with two cells ”an image control and a label. The code for creating the control is rather small. First, create a folder within the EmployeeBrowser solution named Pagelets ; this will allow for some organization of the code within the project. Right-click the folder and select Add, Add Web User Control from the context menu. This will bring up the Add New Item dialog, as shown in Figure 4.3.2. Figure 4.3.2. New Item dialog. Assign the name HeaderPagelet to the new UserControl . Open the HeaderPagelet.ascx file for HTML editing and enter the code in Listing 4.3.1. Listing 4.3.1 ASPX source for the HeaderPagelet1: <%@ Control Language="c#" AutoEventWireup="false" Codebehind="HeaderPagelet.ascx.cs" Before diving into the C# code behind this ascx page, a minute to detail the markup listed is necessary. In this case, I've created all UserControl derived classes in the EmployeeBrowser.Pagelets namespace. Remember that namespaces are a useful way of organizing your source tree. By keeping all pagelets within a particular namespace, other developers using your code can quickly associate the namespace with the items contained with it. Line 1 of Listing 4.3.1, declares this is a control and specifies the C# language, the CodeBehind page, and that this control inherits from EmployeeBrowser.Pagelets.HeaderPagelet . ASP.NET uses the CodeBehind page to generate code to handle the binding of asp elements and the variables contained with the source page. The asp:table , asp:image , and asp:label tags make use of the runat="Server" property. This allows for server-side processing of the controls and data binding between the control and code. Only the asp:image and asp:label tags use the id= X , where X is the variable name defined within the CodeBehind source. Listing 4.3.2 contains the CodeBehind source for the HeaderControl . Listing 4.3.2 HeaderControl.ascx.cs 1: namespace EmployeeBrowser.Pagelets 2: { 3: using System; 4: using System.Data; 5: using System.Drawing; 6: using System.Web; 7: using System.Web.UI.WebControls; 8: using System.Web.UI.HtmlControls; 9: 10: /// <summary> 11: /// Summary description for HeaderPagelet. 12: /// </summary> 13: public abstract class HeaderPagelet : System.Web.UI.UserControl 14: { 15: protected System.Web.UI.WebControls.Table HeaderTable; 16: protected System.Web.UI.WebControls.Image HeaderImage; 17: protected System.Web.UI.WebControls.Label HeaderLabel; 18: 19: public string ImageUrl 20: { 21: set 22: { 23: HeaderImage.ImageUrl = value; 24: } 25: } 26: 27: public string Text 28: { 29: set 30: { 31: HeaderLabel.Text = value; 32: } 33: } 34: 35: 36: /// <summary> 37: public HeaderPagelet() 38: { 39: this.Init += new System.EventHandler(Page_Init); 40: } 41: 42: private void Page_Load(object sender, System.EventArgs e) 43: { 44: // Put user code to initialize the page here 45: } 46: 47: private void Page_Init(object sender, EventArgs e) 48: { 49: // 50: // CODEGEN: This call is required by the ASP.NET Web Form Designer. 51: // 52: InitializeComponent(); 53: } 54: 55: #region Web Form Designer generated code 56: /// Required method for Designer support - do not modify 57: /// the contents of this method with the code editor. 58: /// </summary> 59: private void InitializeComponent() 60: { 61: this.Load += new System.EventHandler(this.Page_Load); 62: 63: } 64: #endregion 65: } 66: } The HeaderControl code is short and sweet. Two properties are defined ” Text and ImageUrl . These properties can be manipulated within another ascx control or aspx page. In effect, our HeaderControl will appear just as if it were a part of ASP.NET. Notice that the ImageCtrl and HeaderText variables match their corresponding markup counterparts within HeaderPagelet.ascx . Again, this is necessary because ASP.NET will generate binding code the first time the page is accessed. Any UserControl derived class can respond to ASP.NET events just as aspx pages can. When the EmployeeViewPagelet is developed, we'll see this in action. To test the HeaderControl , add a new Web Form to the project with the name default.aspx . IIS looks for a starting page; in the case of ASP.NET, default.aspx fits the bill. Of course, you'll need to change the name of the class from default to MainPage because default is a C# keyword. Listing 4.3.3 contains the HTML code for the default.aspx file. Listing 4.3.3 default.aspx1: <%@ Register TagPrefix="EmployeeBrowser" 2: TagName="HeaderControl" 3: Src="Pagelets/HeaderPagelet.ascx" %> 4: 5: <%@ Page language="c#" Codebehind="default.aspx.cs" 6: AutoEventWireup="false" 7: Inherits="EmployeeBrowser.MainPage" %> 8: 9: <!DOCTYPE HTML PUBLIC "-//W3C//DTD HTML 4.0 Transitional//EN" > 10: <HTML> 11: <HEAD> 12: <meta name="GENERATOR" Content="Microsoft Visual Studio 7.0"> 13: <meta name="CODE_LANGUAGE" Content="C#"> 14: <meta name="vs_defaultClientScript" content="JavaScript (ECMAScript)"> 15: <meta name="vs_targetSchema" content="http://schemas.microsoft.com/ Line 1 introduces the concept of registering a tag. The HeaderControl can be given any TagPrefix and TagName you wish. My only suggestion would be to keep it meaningful. Finally, line 22 is the declaration of the HeaderControl . Notice that the TagPrefix:TagName combination is used to identify an instance of the header control. Doesn't this syntax look familiar ”somewhat similar to asp:label or asp:image ? Yes, asp is the TagPrefix and label or image is the TagName . EmployeeViewPagelet : A Different ApproachInstead of directly manipulating ASP controls with the CodeBehind source, the EmployeeViewPagelet will make use of server-side processing to set the various properties of the elements contained within it. Figure 4.3.3 shows what the finished EmployeeViewPagelet will look like. Figure 4.3.3. EmployeeViewPagelet control. The EmployeeViewPagelet control will be used to display an Employee's ID, name, photo, and an Edit button that will be tied to an Edit page. The HTML and ASP.NET markup is fairly simple, but there is a subtle difference between this control's implementation and that of the HeaderControl . Listing 4.3.4 shows the HTML for the EmployeeViewPagelet . Listing 4.3.4 EmployeeViewPagelet.ascx1: <%@ Control Language="c#" 2: AutoEventWireup="false" 3: Codebehind="EmployeeViewPagelet.ascx.cs" 4: Inherits="EmployeeBrowser.Pagelets.EmployeeViewPagelet"%> 5: 6: <asp:Table id="EmpViewTable" 7: runat="server" 8: BackColor="LightGray" 9: BorderColor="Purple" 10: BorderStyle="Ridge" 11: BorderWidth="2px" 12: Height="100px" 13: Width="25%"> 14: 15: <asp:TableRow> 16: <asp:TableCell BorderStyle="Ridge" 17: BorderWidth="2px" 18: VerticalAlign="Middle" 19: BackColor="Black" 20: HorizontalAlign="Center" 21: BorderColor="Gray" 22: ID="EmpPicCell"> 23: 24: <asp:Image runat="server" 25: ImageUrl='<%# "~/images/employees/" + DataBinder.Eval( this, The only lines of real interest here are lines 25, 47, 61 and 72. Notice <%# DataBinder.Eval( this, "EmployeeId" %> on line 47. This directive is similar to a script block that is denoted with <% script %> . However, this little block causes data-binding between a property EmployeeId as defined within the EmployeeView.ascx.cs . Rather than having to manipulate every aspect of a control, this type of data-binding can be used. The EmployeeView class defines several properties that can be bound to asp elements. During the loading of the page containing the EmployeeViewPagelet control, all data binding directives will be evaluated. This technique allows for easier development because it is not necessary to do all of the grunt work yourself. One of the most interesting aspects of Listing 4.3.4 is found on line 72: 72: <asp:Button onclick="OnEdit_Click" runat="Server" Text="Edit" commandargument="<%# Here, an asp:Button is declared and the onclick event is tied to OnEdit_Click method. Whenever a server-side control is activated, a PostBack event is sent to the server along with state information that is carried in hidden fields on the form. An asp:Button has a property known as commandargument that can be used to supply additional information, such as the context of how the button is being used. In this case, EmployeeId is being used as the commandargument . This will make sense in just a minute. Listing 4.3.5 contains the code for the EmployeeViewPagelet in the form of a CodeBehind page named EmployeeView.cs . Listing 4.3.5 EmployeeViewPagelet.ascx.cs 1: namespace EmployeeBrowser.Pagelets 2: { 3: using System; 4: using System.Data; 5: using System.Drawing; 6: using System.Web; 7: using System.Web.UI.WebControls; 8: using System.Web.UI.HtmlControls; 9: 10: /// <summary> 11: /// Summary description for EmployeeViewPagelet. 12: /// </summary> 13: public abstract class EmployeeViewPagelet : System.Web.UI.UserControl 14: { 15: protected System.Web.UI.WebControls.Button btnEdit; 16: 17: private string employeeId; 18: private string firstName; 19: private string lastName; 20: protected System.Web.UI.WebControls.Table EmpViewTable; 21: private Guid pictureId; 22: 23: 24: public string EmployeeId 25: { 26: get 27: { 28: return employeeId; 29: } 30: set 31: { 32: employeeId = value; 33: } 34: } 35: 36: public string FirstName 37: { 38: get 39: { 40: return firstName; 41: } 42: set 43: { 44: firstName = value; 45: } 46: } 47: 48: public string LastName 49: { 50: get 51: { 52: return lastName; 53: } 54: set 55: { 56: lastName = value; 57: } 58: } 59: 60: public string FullName 61: { 62: get 63: { 64: return string.Format("{ 0} , { 1} ", lastName, firstName ); 65: } 66: } 67: 68: public Guid PictureId 69: { 70: get 71: { 72: return pictureId; 73: } 74: set 75: { 76: pictureId = new Guid( value.ToString( ) ); 77: } 78: } 79: 80: public string ImageName 81: { 82: get 83: { 84: return string.Format("{ 0} .jpg", pictureId.ToString( ) ); 85: } 86: } 87: 88: /// <summary> 89: public EmployeeViewPagelet() 90: { 91: this.Init += new System.EventHandler(Page_Init); 92: } 93: 94: private void Page_Load(object sender, System.EventArgs e) 95: { 96: // Put user code to initialize the page here 97: } 98: 99: private void Page_Init(object sender, EventArgs e) 100: { 101: // 102: // CODEGEN: This call is required by the ASP.NET Web Form Designer. 103: // 104: InitializeComponent(); 105: } 106: 107: /// <summary> 108: /// Click Event handler for Edit Button. THis method redirects to an The EmployeeViewPagelet class is really just a collection of various properties and the event handler for the click event of the asp:Button . When the click event is raised, the EmployeeId is obtained from the CommandArgument property. Next, the Response.Redirect method is used to transfer to an Edit page and the EmployeeId is passed in typical HTTP GET fashion. So far, two controls have been created. Each control uses a different aspect of ASP.NET to implement the required functionality. |
| I l @ ve RuBoard |
EAN: 2147483647
Pages: 204
- Chapter I e-Search: A Conceptual Framework of Online Consumer Behavior
- Chapter III Two Models of Online Patronage: Why Do Consumers Shop on the Internet?
- Chapter IX Extrinsic Plus Intrinsic Human Factors Influencing the Web Usage
- Chapter XIV Product Catalog and Shopping Cart Effective Design
- Chapter XVII Internet Markets and E-Loyalty