| When installing Exchange Server 2003 for the first time in an environment, the easiest way to conduct the installation is to insert the Exchange 2003 CD and follow the step-by-step installation instructions. This section of the chapter focuses on the step-by-step installation of a basic Exchange Server 2003 server. NOTE For those who have installed previous versions of Exchange, the setup program now has a new switch that can be used during installation. Running setup with a /ChooseDC {dcname} , followed by the name of a domain controller, tells the setup program to look for a specific DC to write schema changes to or check for permissions and groups.
To install the first Exchange server in an organization using the interactive installation process of Exchange Server 2003, use the following steps: -
Insert the Exchange 2003 CD (Standard or Enterprise). -
Autorun should launch a splash screen with options for Resources and Deployment Tools. (If autorun does not work, select Start, Run. Then type CDDrive:\setup.exe and click OK.) -
Click on Exchange Deployment Tools. -
At the Deployment Tools welcome screen, click on Deploy the first Exchange 2003 Server. -
Click on New Exchange 2003 installation. -
Verify that your server has met all the operating system and Active Directory requirements. (Click on the reference link in the right column.) -
Check that your server is running NNTP, SMTP, and World Wide Web Services. If you're running Windows 2003, you also need ASP.NET. (Check the reference link to the right of the window for details.) -
Install the Windows 2003 Support Tools to use the preinstallation utilities (located on the Windows 2003 CD under \support\tools\ ). -
Run DCDiag and view the log file output. Click on the reference link to the right for details. The syntax is DCDiag /f: log file /s:domain controller -
Run NetDiag and view the log file output in netdiag.log . -
Click Run Forestprep Now. -
Click Next . -
Read the license agreement, and then click I agree if you agree with the licensing. Click Next. -
Click Next to accept the default administrator account. -
Click Finish when the forest prep is done. The next step is to run the domain prep on the domain that will hold the Exchange servers and user accounts. To prepare the domain, use the following steps: -
Click Run Domainprep Now. -
Click Next. -
After reading the license agreement, click I agree, and then click Next. -
Click Next again. -
Click Finish. After the domain has been prepared, it's time to install the Exchange messaging system: -
Run Setup Now. -
Click Next. -
Select I agree after agreeing with the licensing requirements, and then click Next. In the Component Selection window, the default will be Typical for Microsoft Exchange, Install for Microsoft Exchange Messaging and Collaboration Services, and Install for Microsoft Exchange System Management Tools. The configuration screen should look something like Figure 3.1. Figure 3.1. Component Selection screen for installation. 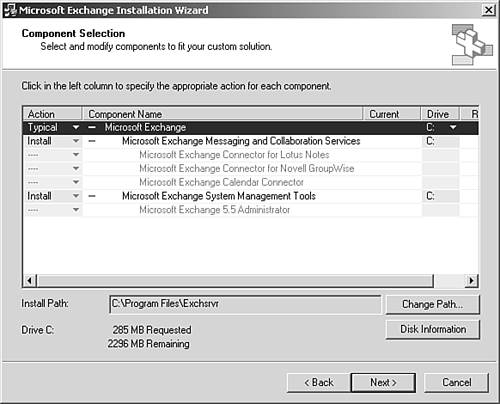 -
Click Next. -
Select Create New Exchange Organization and click Next. -
Type the Exchange organization name and click Next. -
Select I agree that I have read and will be bound by the license agreements for this product. -
Click Next. -
If you already created the admin group and routing group structure, you will be prompted to select where to install this server. Choose an administrative group and click Next. Then choose a routing group and click Next. -
Review the Installation Summary and click Next. -
If you are installing in a Mixed Mode domain, you will get a security warning. Click OK to the security group warning. -
Click on Finish. -
Click on OK if prompted to reboot. |