Outlook Web Access Front-end Server and Load Balancing Clusters
| < Day Day Up > |
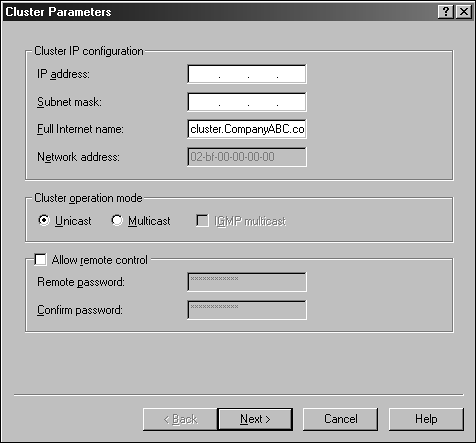
| To provide even more enhanced performance and functionality when working with Exchange Server 2003, organizations can leverage the Windows 2003 NLB options available with the Windows 2003 server platform. Windows Server 2003 NLB is a separate functionality with clusters, and works by establishing a cluster of two or more systems using a single TCP/IP address. This functionality is often effective when load-balancing front-end Exchange mail servers and Outlook Web Access with Exchange Server 2003. In this section, you explore NLB and Outlook Web Access, the steps to configure front-end Outlook Web Access servers using NLB options, and best practices. Using Network Load BalancingBecause NLB is used to distribute network connections to create fault tolerance between servers and applications, using this feature is an exceptionally effective solution to provide high-level availability and quality of service to users accessing Exchange 2003 Outlook Web Access services. To simplify the decision even more with NLB, no additional software and utilities are required other than the built-in functionality of Windows Server 2003 and the network interface cards configured in each server. After Exchange Outlook Web Access front-end servers have been configured, administrators can enable load balancing functionality through the NLB Manager available in the Windows Server 2003 administrative tools. When configuring NLB, servers are established in clusters. Other areas to consider when configuring NLB services are modes in which the NLB service will be configured and the configuration of network interface cards. NLB Modes and Port Configuration OverviewIn the Unicast mode, clients and servers maintain a one-to-one relationship when communicating. In the multicast mode, servers respond by broadcasting a single multicast address, which clients attach when accessing information such as Web sites. Another option when configuring NLB with Outlook Web Access is the ability to define the ports in which NLB cluster members will respond to client requests . This option is effective for the scenario because administrators can restrict and allow access to ports such as HTTP port 80 and Secure Socket Layer (SSL) port 443. NLB Network Card ConfigurationsOne of the first steps when configuring NLB cluster nodes is the configuration of the network interface cards in each server. A configuration of network cards can be completed using the NLB Manager and the TCP/IP properties of each node's network interface. One other option for configuring network interface cards is the command-line tool nlb.exe . This utility enables administrators to configure TCP/IP properties on NLB cluster nodes remotely and through the command line. Configuring Network Load Balancing with OWAUsing the NLB Manager is the simplest method in configuring Outlook Web Access servers into a load balanced cluster configuration. When using the Network Load Balancing Manager, all information regarding the NLB cluster and load balancing TCP/IP addresses are added dynamically to each cluster node when configured. Using the NLB Manager also simplifies the tasks of adding and removing nodes by enabling administrators to use the NetBIOS name or TCP/IP address to identify nodes. TIP To effectively manage NLB clusters on remote servers, install and configure two network interface cards on the local NLB Manager system. For more information regarding Network Load Balancing services with Windows Server 2003, go to www.microsoft.com/windowsserver2003/techinfo/overview/clustering.mspx. In the following example, NLB services will be implemented to provide support with two separate Outlook Web Access servers. This scenario assumes that each Outlook Web Access Server has already been installed and configured and is functioning. To begin, configure the network cards for each Outlook Web Access system that you plan to configure in the NLB cluster:
TIP It is a good practice to rename each network card so you can easily identify it when configuring interfaces and troubleshooting problems. After the TCP/IP properties of the network card for the two OWA servers have been configured and tested , you configure the NLB cluster through the NLB Manager. To begin, open the NLB Manager and complete the following steps:
Add the additional OWA server to the NLB cluster by repeating these steps. Validate that the state of the clustered NLB system is listed in the NLB Manager as Started and close the Manager to complete the configuration. TIP Use the NLB Manager when performing maintenance on the NLB clustered members. When maintenance is necessary, you can change the default state of a particular NLB cluster node by placing it in a Stopped or Suspended state. This enables administrators to perform maintenance, such as security updates and service pack updates, and keep the server from joining the cluster following a reboot. For more information regarding Load Balancing and Exchange 2003 go to www.microsoft.com/windowsserver2003/techinfo/overview/clustering.mspx . |
| < Day Day Up > |
EAN: 2147483647
Pages: 393