Security Enhancements in Outlook 2003
| < Day Day Up > |
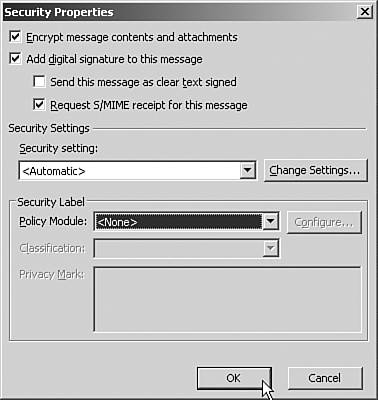
| Microsoft announced its Secure Computing initiative in 2002. For Outlook 2003, this means a great increase in the number of security and antispam features within Outlook 2003 and Exchange Server 2003. Support for Secured MessagingAs a result of Microsoft's security initiatives, as well as the standard increases in security functionality in Outlook that occur with every Outlook iteration, Outlook 2003 expanded its support for secured messaging, including S/MIME V3 and smart card support. S/Mime Support, Digital Signatures, and Email EncryptionS/MIME support has been around in Outlook 2003 for a few versions. However, with Outlook 2003, S/MIME V3 is now supported. Email messages are encrypted by the sender's public key and can be accessed, opened, and decrypted only with the recipient's private key. This private/public key exchange is critical for secure email correspondence. Use of S/MIME support requires that the user has a certificate for cryptography on the user 's computer (and is stored locally either in the Microsoft Windows Certificate Store or on a smart card), but this can be pushed through Registry settings or via Group Policy to easily implement S/MIME throughout an organization. Outlook 2003 also provides support for the X.509v3 standard, which requires third-party encryption keys, such as ones created by digital security companies such as Verisign. By using S/MIME, the sender ensures that the email is encrypted and is read only by the intended recipient. S/MIME V3 support also includes support for digital signing. Digital signing allows for security labels and signed secure message receipts. Outlook 2003 allows for enterprise-wide enforced security labels such as "For internal use only" or labeling messages to restrict the forwarding or printing of messages. Additionally, the user can now request S/MIME affirmation of receipt of a message. By requesting a receipt, the sender confirms that the recipient recognized and verified the digital signature because no receipt is received unless the recipient, who should have received the message, actually did receive the message. Only then does the sender receive the digitally signed read receipt. TIP The security features mentioned in this entire Security section can also be configured by the administrator via Group Policy, using the outlk11.adm Group Policy template. Open the Group policy that will have the template applied (usually on the domain level), import the template, and go to the following location to view the Group Policy choices for Security Settings: User Configuration\Administrative Templates\Microsoft Outlook 2003\ Tools Options\Security . Setting Email Security on a Specific MessageSecurity such as cryptography can be set for an individual email in the options of the open email message. Clicking on the Options button opens the Message Options dialog box. There, the end user clicks on Security Properties to set the security settings for the message. The user can choose to encrypt the message and/or add a digital signature, request S/MIME receipt, and configure the security settings. To do this, follow these steps:
Setting Email Security on the Entire MailboxSecurity settings can also be configured for the whole user mailbox so that they apply at all times. To do this, follow these steps:
Attaching Security LabelsSecurity labels are a feature in Outlook 2003 that are configured by the administrator and used by the users to add security messages to headings of email messages. Security labels require digital certificates. They denote the sensitivity and security of the email and can include headers such as "Do not forward outside of the company" or "Confidential." They can be configured on a message-by-message basis or for the entire mailbox. To configure a security label for a single message, follow these steps:
To configure a security label for all messages in the mailbox, follow these steps:
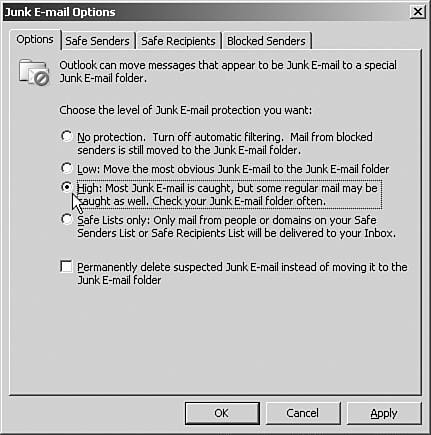
Using Junk Email FiltersImproved antispam features have now been integrated into both Outlook 2003 and Exchange Server 2003. The end user can configure the level of antispam filtering desired and control it. The Junk Email filter determines whether a message should be treated as junk or legitimate email. The filter analyzes each message to determine whether it's likely to be considered a junk email message by the end user. The default setting is Low, which catches only the most obvious junk email. However, the end user can throttle the sensitivity of the junk email feature to catch more junk email. Messages that the filter determines to be junk are moved to a Junk Email folder, where the end user can check for emails that were accidentally specified as junk. However, the user can also configure it to permanently delete junk email messages as they arrive and not move them to the folder at all. To configure junk email filtering, follow these steps:
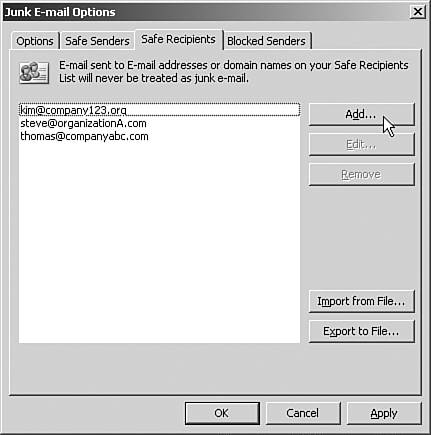
The Safe Senders ListIf the filter determines that a message is junk, the end user can add the sender's email address to the end user's Safe Senders, thereby preventing the filter from determining any later emails from that sender as junk. Both email addresses and domains can be added to the safe sender list. Entries in the end user's contacts list are automatically included in the Safe Senders list, as are any names in the GAL. Finally, for the most aggressive antispam throttling, the end user can configure mail to receive only from the safe sender list. However, this is obviously a very aggressive policy and could result in many lost emails. The Safe Recipients ListThe Safe Recipients list basically does the same thing as the Safe Sender list, but it is for email lists or groups that the end user is a member of. Any messages sent from that group automatically are considered "safe." The Blocked Senders ListThe opposite of the Safe Senders list is the Blocked Senders list. Again, domain names and specific email addresses can be entered into this list; thereby, the end user never receives email from those senders. The junk email then is handled as other junk email is handled (either deleted immediately or shunted to a junk email folder.) To add users to the Safe Senders, Safe Recipients, and Blocked Senders lists, do the following:
TIP Some third-party companies provide lists of junk senders. If your company wants to provide the end users with a list of trusted or junk senders, the end user can easily import the list by clicking on the Import from File button. Preventing Spam BeaconingJunk mail senders might send HTML messages that include inline references to external content, such as pictures or sounds. When the end user opens the message or views it in the Preview pane, his computer retrieves this external content, thus verifying the end user as a "live" address to the sender. This technique is known as a Web beacon . If left unblocked, it can make the end users more of a target for junk mail. To enable spam beacon filtering, from Outlook 2003, do the following:
|
| < Day Day Up > |
EAN: 2147483647
Pages: 393