Configuring Front-end and Back-end Servers
| < Day Day Up > |
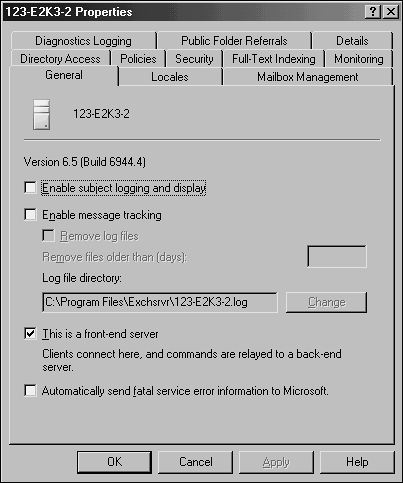
| Exchange 2000 previously required that all front-end servers run the Enterprise version of Exchange to be able to run as a front-end server. This is no longer the case in Exchange Server 2003, and the Standard version of the software will be able to run as a front-end server. To configure a front-end server, use Exchange System Manager to access the properties of the front-end server and click the check box This is a front-end server, as shown in Figure 10.4. Figure 10.4. Creating a front-end server. After the server has been made into a front-end server, the Exchange POP3, Exchange IMAP, and World Wide Web Publishing Service services must be restarted, as shown in the prompt in Figure 10.5. Figure 10.5. Finalizing front-end server creation. Unless the front-end server will be accessed by an alias name , the configuration is complete. If the server will be accessed by one or more alias names , a custom virtual server and virtual directories need to be created on the front-end server, and a corresponding HTTP virtual server and virtual directories should be created on the back-end servers. Using the Default HTTP Virtual Server for Internet ClientsMost organizations use front-end and back-end servers to support Internet clients, and this type of configuration is demonstrated in the following section. This section provides a best-practice solution to support Internet clients with the default HTTP Virtual server configuration. Much of the information in the industry regarding configuring front-end/back-end servers is conceptually crystal clear but extremely vague when it comes to the implementation. To complete the front back-end server configuration:
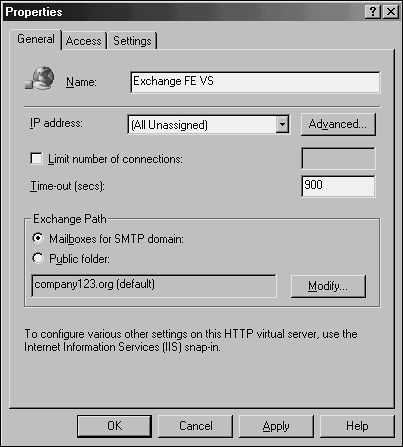
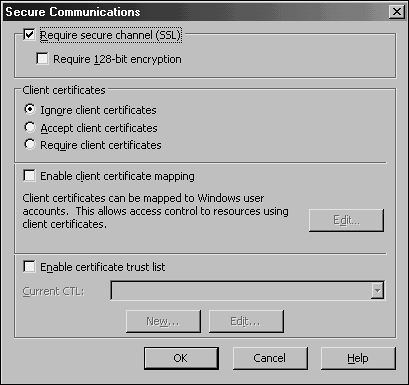
Configuring the Back-end ServerIf the organization chooses to use the default HTTP virtual server on the front-end server and internal and external HTTP clients will be serviced by the same front-end server, no configuration is necessary on the back-end server. However, if the front-end server is isolated from internal clients through a firewall, it might be necessary to have internal HTTP clients access the back-end server directly. If this is the case, it might be necessary to configure an alias name, such as webmail.companyabc.com in the internal DNS. Another option organizations may consider to support internal clients is to use the simplified URL mentioned earlier in this chapter and either SSL or Integrated Windows Authentication, the default authentication method for back-end servers. As previously mentioned, it is possible to use one HTTP virtual server for all front-end servers with either the default or custom-configured HTTP virtual servers. With custom configurations, organizations also have the choice to configure one virtual server on the back-end server per front-end server. To configure additional HTTP virtual servers to support custom configurations, right-click on the HTTP protocol folder under the back-end server in Exchange System Manager and select New Virtual Server. Figure 10.6 shows a custom virtual server being configured for all front-end servers. Figure 10.6. Configuring an HTTP virtual server. The next step is to create the virtual directories. Create the virtual directories by right-clicking the HTTP virtual server and selecting New Virtual Directory. Two virtual directories should be created, one directory for mailboxes and the other for public folders. It's best to use the names Exchange and public if the virtual directories will allow access to all public folder trees and the entire domain for mailboxes. No other settings need to be changed when creating the virtual directories unless authentication needs to be disabled on the front-end server. The next step is to create the same HTTP virtual server and directories on every back-end server that contains mailboxes that will be accessed through the front-end server. Finally, verify that the HTTP virtual server and virtual directory configuration have been created on all front-end servers. Using SSL to Secure Access to the Front-end ServerTo use SSL to secure client access to the front-end server, the server requires a certificate. Certificates can be generated through Certificate Services or by a third-party CA. After the certificate is created, it should be installed on the Exchange virtual server that was created for the front-end server. If the default Exchange virtual server is being used for the front-end server, the certificate should be added to the default Web site. NOTE Ensure that the license logging service is running on the front-end server to allow more than 10 simultaneous SSL connections to the front-end server. If you are using an HTTP virtual server other than the default on the front-end server, and if clients access the front-end server through a redirection on the default Web site, the certificate also should be installed on the default Web site. To request and install a certificate, open Internet Services Manager and access the properties of the Web site. Select the Directory Security tab and click the Server Certificate button. This accesses the Web Server Certificate Wizard, which will step you through requesting or installing the certificate. After the certificate is installed on the Web site, SSL must be enabled so that the server will accept requests only over SSL. To enable SSL, access the Web site properties through Internet Services Manager and select the Directory Security tab. Click the Edit button under Secure Communications and check the box for Require secure channel (SSL), as shown in Figure 10.7. Check the Require 128-bit encryption box only if the client's browsers support 128-bit encryption; otherwise , the client will be denied access. Figure 10.7. Enabling SSL for secure client access. NOTE Each virtual server instance that requires SSL needs to have a unique certificate associated with it, which is an important consideration when determining the number of virtual servers that will be required. |

| < Day Day Up > |
EAN: 2147483647
Pages: 393