Flylib.com

Books Software


Using Word As the Email Editor


Using Word As the Email Editor

The Word editor provides you with a full-featured word processor for composing your email. Although it might be overkill, many people spend a large part of their workday sending email and the features they've come to rely on in Word can be used in Outlook, too.

graphics/bookpencil_icon.gif

Outlook has supported the Word editor since Office 97, but it was buggy , crashed often, and was the cause of many resource leaks. In short, using Word was not a pleasant experience for many Office users. As a result, Word as an email editor has a bad reputation. Fortunately, it has improved a lot since then. If you tried the Word editor with a previous version and were disappointed, give it a second chance ”you'll be pleasantly surprised.


Word offers several advantages, beginning with spelling and grammar checking as you type. AutoCorrect works on all message formats, including HTML.

You can assign signatures by account, and choosing to send the message using a different account automatically changes the signature. You can select new signatures using a right-click in the signature block.

graphics/lightbulb_icon.gif

Create a blank signature to use when you don't want to use a signature, and then right-click on the signature block to change signatures instead of deleting the signature.


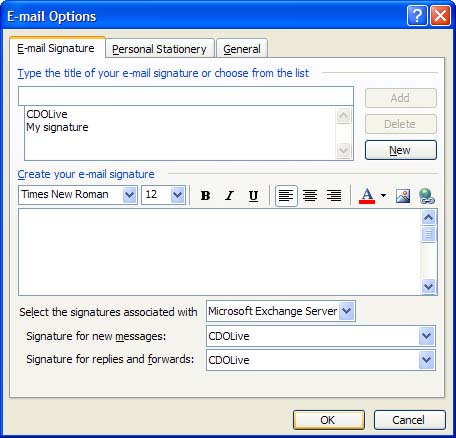
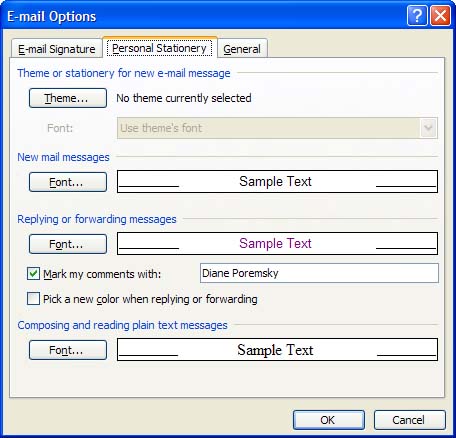
Open a new message form and choose T ools, O ptions, General and select E-m a il Options to access Signature, Stationery, and HTML options (see Figure 5.3).

Figure 5.3. Use E-mail Signature to view and change your signature settings.

graphics/05fig03.jpg

Use Personal Stationery settings to select a theme for your HTML email and to choose fonts and colors for new mail and replies (see Figure 5.4). When Word is your editor, you can let Word choose a new color for each reply, making it easier to read a long thread.

Figure 5.4. Choose Personal Stationery settings, including fonts and colors.

graphics/05fig04.jpg

graphics/bookpencil_icon.gif

Font Settings and Mark My Comments are available for both Word and Outlook editors, and are also in Outlook's Tools, Options dialog. Look for Font Settings on the Mail Format tab and Mark My Comments on the Preferences tab of the Email Options dialog.


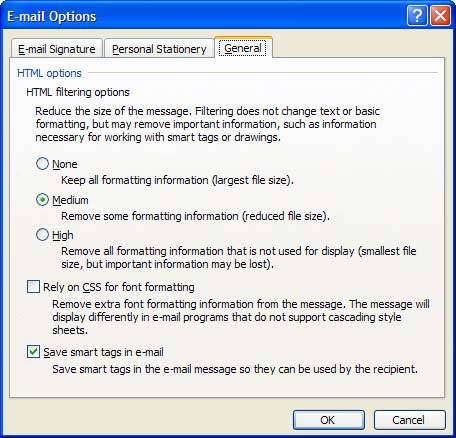
When you use Word as your editor and use HTML formatting, the messages are often much larger than they should be. Select HTML Filtering Options on the General tab. In most cases, you'll want to use Medium or High filtering to reduce the message size.

Figure 5.5. The HTML filtering options associated with the Word email editor can help you control the size of HTML email messages.

graphics/05fig05.jpg


Creating and Editing Email

Creating and editing messages is a fairly simple task with either Word or Outlook as your email editor.

  1. Open a new message form by selecting File, New Message or select a received message and choose Reply

  2. Begin typing in the message body. The Outlook editor has simple word processing features, whereas Word editor enables you to use all of Word's features.

  3. When you're finished, click the S end button or use the keyboard shortcut, Ctrl+S.

That was easy, but you'll probably want to configure spell checking, fonts, and other options.

Spelling has its own tab on the T ools, O ptions dialog (see Figure 5.6). Things to consider when enabling the spelling options include

  • Always Check Before Sending is not necessary if you use the Word editor and enable Spell Check As You Type.

  • Ignore Original Message Text in Reply or Forward fails if you reply to a plain text message and use the option to prefix the original message.

Figure 5.6. Configure your spelling and AutoCorrect options using the Tools, Options, Spell Check dialog.

graphics/05fig06.jpg

Outlook's editor supports some AutoCorrect features, but they only work for plain text and RTF messages, not HTML. Changes to the AutoCorrect settings in Outlook do not affect the AutoCorrect settings in Word, enabling you to use different configurations in each program.

graphics/lightbulb_icon.gif

Use Ctrl+Z to undo AutoCorrect's changes.


Configure the fonts used on new messages, replies, and plain text messages in T ools, O ptions, Mail F ormat, F onts (see Figure 5.7). You can configure these settings from a new message form when using Word as your editor by choosing T ools, O ptions, General, E-m a il Options.

Figure 5.7. Choose the fonts and colors used when composing and replying to messages. The plain text font also affects the font used in the Reading Pane.

graphics/05fig07.jpg

Using Stationery

If you'd like to send a graduation or birthday wish on pretty stationery instead of a drab white note, choose A ctions, New M ail Using, M ore Stationery and select from the list of installed HTML stationeries. Choosing Get M ore Stationery opens your Internet browser to the Office downloads site at Microsoft.com with the currently available stationery listed.

You aren't limited to using Microsoft stationery; in fact, many other Web sites have prettier stationery available. You can use your favorite search engine and the keywords outlook stationery to find these sites, including thundercloud.net.

graphics/lightbulb_icon.gif

Any stationery created for Outlook Express also works with Outlook.


You can save your downloaded stationery to the stationery folder, located at C:\Documents and Settings\username\Application Data\Microsoft\Stationery or save it to any folder you prefer. When it's saved to the Stationery folder, it's listed in the stationery picker. Or you can use I nsert, Fi l e to browse for the stationery and use Insert as T ext.

You can create your own stationery using any HTML editor or save existing messages as stationery using F ile, Save A s and choosing HTML.

graphics/lightbulb_icon.gif

Sending messages with stationery can result in very large email messages. Avoid using stationery when you email people who have a dial-up account.


Creating HTML Messages

Many people leave Outlook configured to send HTML email, but rarely use any special HTML formatting, even though both the Outlook editor and Word offer basic HTML editing functionality via the Formatting toolbar (see Figure 5.8).

Figure 5.8. Use the tools on the Formatting toolbar to create simple HTML messages.

graphics/05fig08.jpg

If you want to create complicated HTML messages or stationery, you'll probably want to use an HTML editor.

Using RTF Formatting

Rich text formatting should only be used in-house, where everyone uses Exchange Server and Outlook because other email clients do not support it and Outlook converts RTF to HTML when sending a message to an Internet address.

graphics/lightbulb_icon.gif

Using Outlook's editor and HTML as your default format, you first need to switch to F ormat, Plain T ext, and then select R ich Text, which is also on the F ormat menu. The Outlook editor can't switch between HTML and rich text.


RTF is required to use voting buttons , meeting or task requests , and to send hyperlinks to files using the Insert command.

As with HTML, RTF supports font formatting such as different size fonts, multiple colors of text, and background colors.

Adding Signatures to Your Email

Outlook can be configured to automatically add a block of text to your outgoing messages. Each email account in your profile can have a different block of text, or signature, and you can create one signature for new messages and a different one for replies and forwards.

Task: Create a Signature

Before Outlook can add a signature to your messages, you need to create one or more signatures and tell Outlook which signature to use and when to use it.

  1. Choose T ools, O ptions, Mail Format tab, and then click Si g natures at the bottom of the dialog to open the Create Signature dialog, as seen in Figure 5.9.

    Figure 5.9. Use the Create Signature dialog to create new signatures or edit existing signatures.

    graphics/05fig09.jpg

  2. Choose N ew and enter a name for your signature. For this task, use Start with a Blan k Signature and choose Next (see Figure 5.10).

    Figure 5.10. Create your signature using a blank signature, an existing signature as a template, or an existing file as a template.

    graphics/05fig10.jpg

  3. Enter the text you want to use as a signature in the Edit Signature dialog (see Figure 5.11).

    Figure 5.11. Use formatting to customize your signatures with different fonts and colors or set your paragraph alignment to left, center, or right. A d vanced Edit opens your HTML editor, which is usually FrontPage.

    graphics/05fig11.jpg

    graphics/lightbulb_icon.gif

    You should limit your signature to three to five lines, with each line no longer than 75 characters long. Don't use a vCard with signatures you use all the timeuse it on a signature you use the first time you correspond with someone.


  4. When your signature is satisfactory, choose OK and you're returned to the Create Signature dialog, where you can preview it. If you need to edit the signature, choose Edit.

  5. After you finish creating your signatures, choose OK to return to the Mail Format dialog.

Adding Signatures to Email Messages

After you've created email signatures, it's time to assign your new signatures to your email accounts by selecting the same or different signatures for new messages and replies.

Assign signatures to your email accounts using the Mail Format dialog, shown earlier in Figure 5.1. If you closed the dialogs after creating your signatures, reopen the Options dialog using T ools, O ptions and selecting the Mail Format tab.

For each account listed in the Se l ect Signatures for Account drop-down list, choose a signature for n e w messages and a signature for replies and forwards.

graphics/bookpencil_icon.gif

Assign a signature to each account and to new mail and replies, even if it's only a blank signature and you'll be able to take full advantage of Outlook's signature handling features.


When you create a new message, the signature is added to the message body. When you reply, the correct signature for the account is added to the message body.

When you use Word as your editor and have more than one email account configured, you can use different signatures for your accounts and the correct signature is used when you choose a secondary account from the Accou n ts button. Using Outlook's editor with multiple email accounts, the correct signature is added only on replies.

Outlook stores three copies of each signature at C:\Documents and Settings\username\Application Data\Microsoft\Signatures ; one each in HTML, plain text, and RTF format.

graphics/lightbulb_icon.gif

When you use Outlook's editor, create a blank signature to use on all replies and forwards, and then use I nsert, S ignature to select the signature you want to use.


Using Word as your editor, you can right-click on a signature and select a different signature. Create a blank signature and use it when you don't want to include a signature, instead of deleting the signature.