Customizing Your Menus and Toolbars
Customizing Your Menus and ToolbarsOutlook now has two methods you can use to customize toolbars to show the buttons and menus you use the most and to remove the ones you don't use. If you've customized toolbars in older versions of Office, you're familiar with the first method in which you drag menus and buttons around with the mouse. Choose T ools, C ustomize to open the Customize dialog to create customized toolbars (see Figure 16.2). Select the Tool b ars tab to make a new toolbar, C ommands to add new buttons and menus to your toolbars, or O ptions to configure display options such as personalized menus and icon sizes. Figure 16.2. Use the Customize dialog to create customized toolbars.
The second method of customizing toolbars is the R earrange Commands button found by choosing the Customize, C ommands menu selection. The R earrange Commands option is new to Office 2003 and gives users the opportunity to use an interface to add, delete, or move commands. R earrange Commands keeps the menu in view until you're finished editing it, which is especially helpful when you're editing submenus.
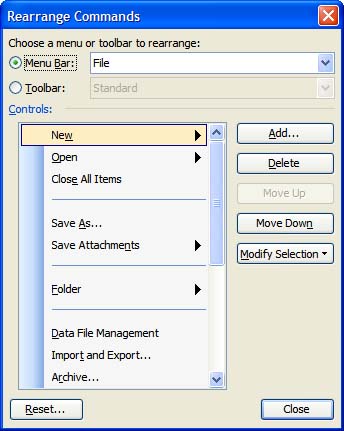
Using Rearrange Commands OptionRearrange Commands is a new way to customize tools in Office 2003. Open the Customize dialog using T ools, C ustomize and look for the R earrange Commands button on the C ommands tab. You'll see a dialog like the one shown in Figure 16.3. Figure 16.3. Rearrange Commands provides a simple interface for customizing command bars. Using the Rearrange Commands menu, do the following:
Table 16.1 lists all the options available when you use Rearrange Commands. Table 16.1. Rearrange Commands Options
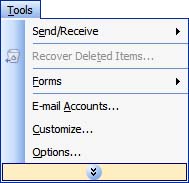
The Reset button in the Rearrange Commands dialog restores the command bar shown in the window to its default settings, removing all of your customizations, including any changes made to submenus. Changing the Toolbar AppearanceWhen you select a menu and see just a few commands on the menu along with a round button at the bottom, as shown in Figure 16.4, personalized menus are enabled. If the menu doesn't expand after a few seconds, click on the button to expand the menu. If you don't like personalized menus, you can disable the option on the Options tab of the Customize dialog. Figure 16.4. Personalized menus show the most frequently used commands when you first open the menu. When the menu remains selected for more than a few seconds, the menu expands and you can see all the commands on it.
Personalized menu usage data is stored in C:\Documents and Settings\username\ Application Data\Microsoft\Office\MSOUTLO.PIP . Each Office program has a *.pip file in this directory that contains the usage data for its toolbars. You can reset the data for the Outlook toolbar by choosing the R eset Menu and Toolbar Usage Data button on the Options tab. If this is your first time using Outlook, other settings on the Options tab that you might find helpful are Show ScreenTips on Toolbars and Show S h ortcuts in ScreenTips. Both of these options help you learn the keyboard shortcuts Outlook uses by displaying them in a small balloon when you hover over a button.
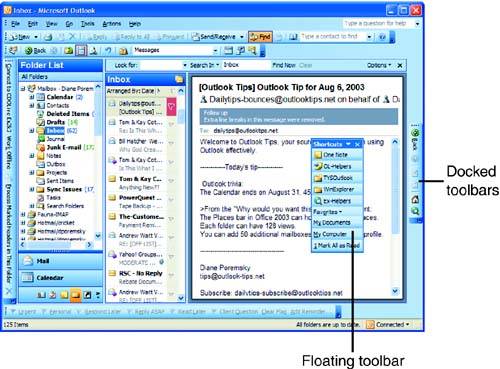
Outlook's toolbars dock at the top of the window by default, but they can be placed anywhere on the screen (see Figure 16.5). You can dock them on the sides of Outlook's window or float them on the screen. When a toolbar is floating, you can drag any edge in or out to adjust the height and width of the toolbar, from horizontal to vertical. Figure 16.5. Dock toolbars on any edge of the Outlook windows or float toolbars inside or outside the window. Move a toolbar by hovering the mouse over the resize handles on the left, holding down the left mouse button, and dragging the toolbar. When you drag a toolbar close to the window edge, it changes shape and docks on the window edge. When toolbars are docked on the left or right window edges, the icons rotate so that they're always in the correct position; text labels on the buttons remain vertical.
Two or more toolbars can share a row to save screen space. When you place multiple toolbars on one row, you'll have some tools that won't fit on the screen. Look under the Toolbar Options button at the end of the toolbar for the buttons that are hidden. When you choose a hidden button, the button shows and a less-used tool moves to the overflow area. This is part of the personalized menu feature which hides less used menu items but remains enabled if the personalization settings in T ools, C ustomize, O ptions are disabled.
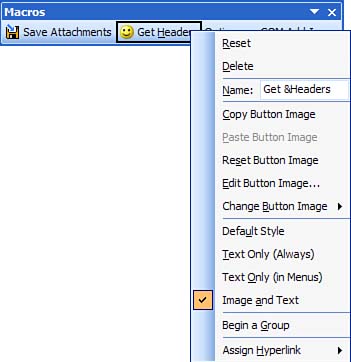
Using the Modify Selection MenuUse the Modify Selection menu to customize individual buttons or menus. After opening the C ustomize dialog from the T ools menu, right-click on any button on the toolbar or menu to show the M odify Selection menu for that command. If you use the R earrange Commands dialog to edit your menus, select the command and click Modify Selection to show the M odify Selection menu for that command. Finally, selecting any button enables the M odify Selection button in the Customize dialog, which you can use to modify the command. Table 16.2 is a list of the Modify Selection options. Table 16.2. Modify Selection Options
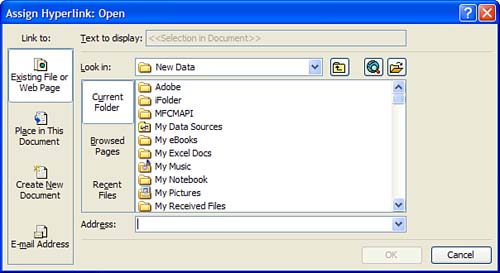
Among the commands listed here, Assign Hyperlink is a powerful, yet underused feature in Outlook. You can use it to create buttons to open and run almost any program or file, from Windows utilities such as Notepad or Calculator to Word documents or Access databases, open Web sites, and create preaddressed email messages. For example, you can enter calc in the Hyperlink field so that when you click the assigned button, Windows Calculator runs. (Some programs might need the full pathname, but many Windows utilities need only the filename.) You can use a Web address, mailto URL, or network path as a hyperlink.
Task: Create a Custom Command ButtonCustomizing toolbar buttons enables you to open almost any file or folder and requires no VBA code. One example of the usefulness of this is for users who upgrade from older versions and use the Outlook Bar for shortcuts to frequently used files and folders. This example shows you how to make a shortcut to an Outlook folder, but keep in mind that you can create a shortcut to any folder or file in the Windows file system:
To use a Windows folder or file instead of an Outlook folder, enter the file path to the folder and filename in step 7. You can browse the Assign Hyperlink dialog for the file or folder or copy the folder path from the Address bar in Windows Explorer. If the Address bar isn't showing, right-click on the Windows Explorer toolbar and select Address Bar.
Adding and Deleting ToolsTo customize your command bars, open the Customize dialog by choosing the T ools, C ustomize menu selection. When you select a button or menu item, an outline appears around the edge of the button. Clicking the right mouse button grabs the command so that you can move it. You can then drag it to the position where you'd like it to appear and release the mouse button. If the commands you use the most are missing from the toolbars, you can add them to the existing toolbars or create new toolbars for them. If the toolbars have commands you don't use, you can remove them. To add additional commands to a toolbar:
To delete commands from a toolbar:
Adding and Removing SeparatorsMany menus and toolbars have small bars called separators between the buttons (refer to Figure 16.1), giving you the ability to organize the buttons into groups. You can create separators using the Begin a Group command found on the Modify Selection menu of a button or just by dragging a command button. Create separators between two buttons by dragging the rightmost of the two buttons slightly farther from the button to its left. You can remove separators by dragging the rightmost button closer to the button on the left. Create menu separators by sliding a menu item down and remove separators by sliding a menu item up. Changing How Tools DisplayAs mentioned earlier, each command has a default display setting. The Commands tab of the Customize dialog displays commands using the default settings. You can change any button or menu to use any of these settings:
After opening the Customize dialog, right-click on the button you want to change and choose the command from the Modify Selection menu (see Figure 16.8). The change is applied immediately so that you can see how it looks. Figure 16.8. Change the display of the button using the Modify Selection dialog.
Along with changing how the button name and image are displayed, you can also change the name and the keyboard shortcut used to activate the button. However, it's not a good idea to change the name or shortcut for the default commands. Doing so leads to confusion if someone else uses your computer or if you tell someone to look for a command by name and you forget that you changed the name. To change a name or keyboard shortcut, open the Customize dialog and right-click on the button. Enter a new name in the N ame field and place an ampersand (&) in front of the character you want to use as the shortcut. For example, the hot key for Forward is w , which is entered in the N ame field as For&ward . To activate the command, press Alt+ the character that follows the ampersand. If the shortcut already exists, pressing Alt+ the character will move you from the first instance to each additional instance, starting at the top of the window. When you use the same shortcut more than once, you must press Enter to activate the highlighted command. If you don't like an image, you can either edit it or paste an image from another tool or program. All the Office programs have the same Customize dialog and editing options. You can copy a button image from Word or Excel and paste it on a button in Outlook. You can also copy any 32x32 pixel bitmap and paste it as a button image. To copy a button image from Word to use in Outlook:
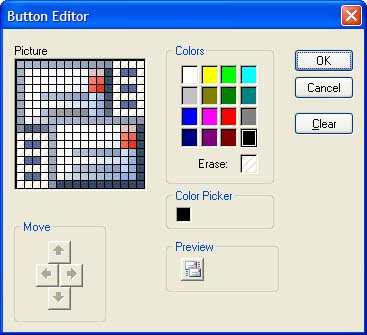
Outlook's button now uses the button image copied from Word. When copying an image, open the image in your favorite image editor. Select a 32x32 area of the image to copy. Then paste it into Outlook beginning with step 5 in the preceding list. Use E dit Button Image to edit the button images. Select a color and click in the squares in the Picture field. Double-click to create transparency by erasing color from the squares (see Figure 16.9). Figure 16.9. The image editor included with Outlook offers only basic editing features. Select Erase to create transparent areas. Select Color Picker to choose from additional colors.
Moving Tools on ToolbarsYou can position commands anywhere you'd likein a different order on the existing toolbar, on a different toolbar or menu, and even on a new toolbar. When you're just moving the command, hold the Alt key + left mouse button and drag the button to a new position or toolbar. If you're planning more customizations, use T ools, C ustomize and open the Customize dialog. Drag the buttons around to reposition them.
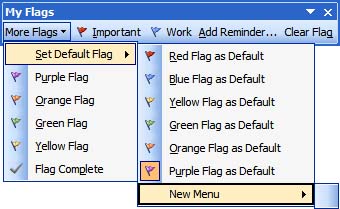
Modifying the Display of Drop-Down ListsAlong with normal command bar buttons, Outlook includes command buttons that contain drop-down lists. You're already familiar with the New button on the Standard toolbar, as well as the menus on the menu bar and the menu commands on some of the menus with triangles pointing to the right to indicate that they contain more menus. When you create hyperlinks using a standard button, you can edit any command button without affecting the behavior of other buttons that were created using the same button. For example, if you need three buttons, you can drag three copies of the same button to a toolbar and assign different hyperlinks to each button. However, you can't edit the predefined drop-down buttonsif you drag a drop-down button to a toolbar and edit it, the changes are mirrored in the original button. In the case of the New menu, the changes are reflected in both the New button on the Standard toolbar and the New menu on the File menu. When you want to create custom drop-down buttons, you need to use the blank New Menu button found in T ools, C ustomize, C ommands. Scroll to the bottom of the Cate g ories list to locate the New Menu category and then drag a New Menu button from the Comman d s list to a menu or toolbar. When you place a New Menu button on a toolbar, the button has the small triangle pointing down. When you place it on the submenu, the triangle points right, as shown in Figure 16.10. When it's put on the menu bar, it looks like the other menus and doesn't have the triangle. Figure 16.10. When you use menu commands on a toolbar, the commands include triangles to indicate they include submenus. You can position menus and tool buttons on a toolbar, menu, or submenu. All New Menu drop- downs have most of the Modify Selections menu options dimmed, and you're limited to deleting the button, resetting it, editing the name, or beginning a new group. You're also limited to using text for the buttons, not images. After you've added and named the New Menu command, you can drag buttons to submenus. When you hover the mouse over a menu, it opens and you can then move the mouse over the opened menu and drop the tool on it. You might find it easier to use the Rearrange Commands option on the C ommands tab to arrange the submenus. Resetting ToolbarsAfter you make changes to your command bars, you might decide that you want to restore the default settings. You can easily reset the command bars:
If you have many changes to reset, close Outlook, delete outcmd.dat , and restart Outlook. This restores the toolbars and menus to the default settings and removes every custom toolbar you created. |

EAN: 2147483647
Pages: 228