Validating User Input
|
Earlier in this chapter, I talked about making sure that visitors don t enter malicious script of some sort. Another type of checking you probably want to do is validation, or making sure that visitors have indeed entered a value and haven t made a typographical error in their entry. For example, on the guestbook entry page, you ask people to enter an e-mail address. E- mail addresses always have the format name@domain.ext, as in mikepope@contoso.com. Although you can t validate that the e-mail address is a real e-mail address, you can at least make sure that visitors haven t left off the @domain part of the address or made some other formatting error.
In this section, you ll modify the ![]() Guestbook.aspx page so that the page checks visitor input and displays messages if visitors have made errors. A page with errors on it might look like the one shown in Figure 10-4.
Guestbook.aspx page so that the page checks visitor input and displays messages if visitors have made errors. A page with errors on it might look like the one shown in Figure 10-4.
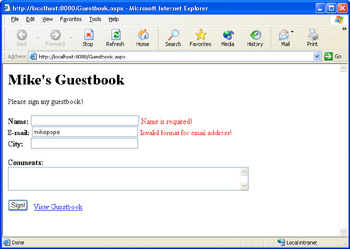
Figure 10-4: A page displaying error messages due to invalid user input.
Understanding Validator Controls
Because validating user input is such a common task in Web pages, ASP.NET provides a set of validator controls that take care of the most common validation scenarios. ASP.NET includes the following validator controls:
-
RequiredFieldValidator The RequiredFieldValidator control makes sure that users have entered a value when you don t want them to leave a field blank. In the guestbook page, you can use a RequiredFieldValidator control to make sure that visitors enter a name.
-
RegularExpressionValidator The RegularExpressionValidator control matches user input against a specific pattern. A typical use for the RegularExpressionValidator control is to check that users have entered a ZIP code using five digits or the ZIP+4 pattern, or to check the format of a phone number. On the
 Guestbook.aspx page, you can use pattern matching to check the format of the visitor s e-mail address.
Note Why is this control named RegularExpressionValidator? Because the pattern that the validator control matches against is defined in a kind of language called regular expressions. (See the sidebar More on Regular Expressions and Pattern Matching. ) Mastering regular expressions is a subject for a book unto itself, but fortunately you won t have to write any regular expressions here, because Web Matrix provides a selection of predefined regular expressions for common pattern matching.
-
RangeValidator The RangeValidator control makes sure that a value is between a specified minimum and maximum. You can define the range using numbers, dates, or even alphabetic characters.
-
CompareValidator The CompareValidator control allows you to specify an operator (equals, less than, or greater than) and a value to check user input against. You can use the control to compare user input against a fixed value or you can compare the user s input against the value of another control. For example, if you re creating a page that prompts users to create a new password, you can use the CompareValidator control to make sure that users enter the password the same way twice. You can also use the CompareValidator control to test against data types for example, to simply confirm that the user has entered a date.
-
CustomValidator The CustomValidator control is the everything else control for when the other validator controls don t meet your needs. The CustomValidator control calls code that you create. In your code, you perform whatever logic is needed to be sure that the user s entry is valid. A typical use for the CustomValidator control is to validate user input by looking something up in a database. For example, if you prompt users for a login name, you can use a CustomValidator control to look up the login name in a database. If you find the login name in the database, the user s entry is valid.
In this section, you ll learn the basic techniques of working with validator controls by working with three validators: the RequiredFieldValidator, RegularExpressionValidator, and CustomValidator controls. If you understand how to work with these three controls, you won t have any trouble learning to work with the rest of the validator controls. In subsequent chapters, you ll get more practice with validator controls, because I m going to recommend that you add validator controls to any page that accepts user input.
You can find more information about working with validator controls, including the RangeValidator and CompareValidator controls, by reading the ASP.NET Quickstart examples at http://samples.gotdotnet.com/quickstart/aspplus/doc/webvalidation.aspx.
When you use the RegularExpressionValidator control to compare user input to a specific pattern, you define the pattern to match using regular expressions. Regular expressions are constructed using a very precise and very powerful syntax that s also unfortunately rather opaque to the uninitiated.
The general idea behind regular expressions is probably familiar to you from working with Microsoft Windows. You probably know that in Windows you can often use an asterisk (*) to mean any number of characters. When you use the Windows Search window to look for a file, for instance, you can enter the pattern *.aspx to mean any file with the extension aspx, or more precisely any file whose name consists of any string of characters followed by a period and then aspx. Similarly, in Windows a question mark (?) means any single character, so that in a file search, the pattern *.d?? finds any file with the extension .doc, .dll, and so on. (SQL has similar conventions for performing searches with the LIKE operator.)
Regular expressions use a syntax that involves special characters just like in Windows file searches, only the syntax of regular expressions is an order of magnitude more complex. For example, the following regular expression checks U.S. ZIP codes, allowing either five digits or ZIP+4:
\d{5}(-\d{4})? A regular expression for checking for well-formed Web page URLs looks like the following:
http://([\w-]+\.)+[\w-]+(/[\w- ./?%&=]*)?
Anyway, you get the idea. Programmers who know regular expression syntax can pack a lot of power into a relatively short expression. We won t have to deal with regular expressions directly, because we ll use predefined expressions, but you should be aware of how regular expressions work. If you re interested in learning more about regular expressions, you can find many articles on the Web about regular expression syntax. A good starting point is the article Introduction to Regular Expressions that you can find at http://msdn.microsoft.com/library/default.asp?url=/library/en-us/script56/html/reconintroductiontoregularexpressions.asp
Adding Validation to the Guestbook
The best way to understand validator controls is to see them in action. We ll add validator controls to the ![]() Guestbook.aspx page to validate the following fields:
Guestbook.aspx page to validate the following fields:
-
Name We ll make the Name field a required field.
-
E-mail We ll check that the e-mail address is in the correct format.
-
Comments We ll make the Comments field required, because there s little point in having a guestbook entry with no comment. In addition, we ll make sure that the user enters at least three characters into the field but no more than 1000 characters, which is the maximum size of the field. I chose three characters because it seemed like the minimum size for a legitimate comment.
Validate that visitors enter a name
-
Open or switch to the
Guestbook.aspx file, and switch to Design view. -
From the Web Controls tab in the Toolbox, drag a RequiredFieldValidator control just to the right of the text box for the visitor s name.
Tip The validator controls are at the bottom of the Web Controls tab in the Toolbox. You might have to scroll down in the tab to find them.
When you ve added the RequiredFieldValidator control, the page will initially look like this:
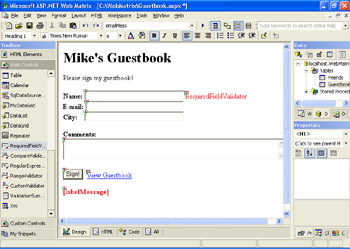
Select the RequiredFieldValidator control, and in the Properties window, use the drop-down list to set the ControlToValidate property to textName. By setting the ControlToValidate property, you re telling the validator control what field it is checking.
Set the validator control s ErrorMessage property to Name is required! The error message appears in the page in Design view, but the message doesn t show up in the browser unless the validator control detects an error.
Test the page. Press F5, and when the page appears in the browser, don t enter anything, just click the Sign! button. You ll see the error message telling you that a Name value was not entered.
That was easy, wasn t it? Let s add validations to the e-mail address.
Check the format of the e-mail field
-
From the Web Controls tab in the Toolbox, drag a RegularExpressionValidator control just to the right of the E-Mail text box.
-
Set the RegularExpressionValidator control s ControlToValidate property to textEmail and its ErrorMessage property to Invalid format for e- mail address!
-
In the Properties window, click the ellipsis button in the ValidationExpression property to display the Regular Expression Editor dialog box, shown here:
