If you want to keep your Web application on a hosting site, you need to make the pages available on the hosting site. You also need to create, and if appropriate, populate your application s database tables on the hosting site. Copying the pages is the easy part, so let s start with that task.
Copying Web Pages to a Hosting Site
To make your Web pages accessible on the hosting site, you need to copy the pages from your computer to the hosting site s server. I can t give you exact instructions for copying Web pages to your hosting site, because each site runs differently. Instead, I ll provide general instructions that work for most hosting sites and hope that you can extrapolate to fit the circumstances of your hosting site. The most fundamental assumption I ll make is that your hosting site allows you to transfer files to its server using File Transfer Protocol (FTP). I assume this because FTP is the most common way to copy files to a server. If your hosting site doesn t support FTP, you ll need to follow the instructions that your hosting site recommends. In that case, the instructions in this section for copying files won t apply to you. However, the section Copying Database Tables to a Hosting Site later in this appendix might still apply.
When you signed up for hosting services, your hosting site administrator sent you information that you need for connecting to the hosting server and transferring files. The information you need is the name of the hosting site s FTP server, the user name you ve been assigned, and your password. You ll also need to know the HTTP URL that points to the location where your files will reside. (The FTP server name and HTTP URL might be similar, but don t necessarily have to be.)
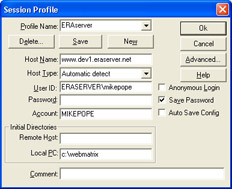
With the information I listed in hand, you re ready to connect and copy files. You might already have an FTP client program that you re used to utilizing. If so, you can transfer files with that program as you would any files. Figure B-2 shows how I connect to my hosting site using a popular FTP program.
Figure B-2: Connecting to a hosting site using a popular FTP client program.
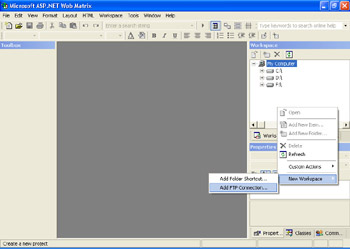
If you don t have an FTP client program, you can take advantage of the support in Web Matrix for FTP. Right-click anywhere in the Web Matrix Workspace window and choose New Workspace, Add FTP Connection, as shown in Figure B-3.
Figure B-3: Creating a new FTP workspace in Web Matrix.
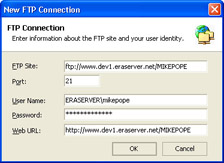
Web Matrix displays the New FTP Connection dialog box, where you can enter the FTP connection provided by the hosting site administrator, as shown in Figure B-4.
Figure B-4: Connecting to an FTP server in Web Matrix.
After you click OK, Web Matrix connects to the FTP site and displays the files from the site in the Workspace window. From this point, you can work with the pages as if they were on your local computer you can open, create, and delete them. For example, you can open a page and edit it. When you save the file, Web Matrix saves the file across FTP directly to the hosting site. (You might notice a slight delay when saving a file because it s being transferred across FTP.) You can run the pages on the FTP site normally, too just press F5, and Web Matrix will pass the Web URL that you provided in the New FTP Connection dialog box to Internet Explorer.
You can copy files from your local hard disk to the FTP site as well. In the Workspace window, open the node for the drive where your Web pages are located, and then just drag the pages from that node to the node for your FTP server. Web Matrix automatically copies the files.
Tip
You can create a top-level node in Web Matrix s Workspace window for the folder where your Web pages are located, which makes it easier to copy the pages to the FTP server.
It s relatively easy to copy files to your hosting site. Copying database information, however, is more involved. Let s tackle that next.
Copying Database Tables to a Hosting Site
If you want to run data-access Web pages such as the guestbook page (Chapter 10) or calendar pages (Chapter 14) on a hosting site, the hosting site must provide access to SQL Server. If your hosting site agreement includes database access, the hosting site administrator probably set up an account for you on the hosting site s SQL Server and then sent you information about how to connect to SQL Server. Most commonly, the administrator will send you a connection string that you use in your Web pages to connect to the hosting site s SQL Server.
Note
Even if you have SQL Server installed on your computer, Web pages on another site (such as the hosting site) can t access your SQL Server across the Web. Web pages need to be able to connect to a SQL Server that s on the same local area network (LAN) or the same computer as the Web server.
You can t copy tables from MSDE or SQL Server on your computer directly to SQL Server on the host computer. SQL Server data isn t stored in a format that allows you to copy it as an individual file. Deploying the data tables from your Web application is therefore an indirect process. In effect, you must follow these steps:
Determine the structure (schema) of the tables in your WebMatrix database application.
Export the data from your local MSDE tables into a format that you can copy to the hosting site s server.
Re-create the same tables on the hosting site s SQL Server according to the schema you determined in step 1.
On the hosting site, import the data from the exported files into the hosting site s SQL Server.
Change connection strings in any data-access pages in your application to the connection string provided by your hosting site administrator.
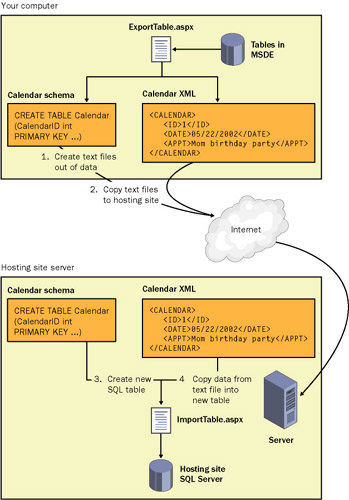
Although you might be able to perform the export side of these tasks on your computer using Web Matrix tools (or SQL Server tools, if you have those), you don t have a means to manipulate the SQL Server on the hosting site directly. Typically, the only commands you can execute on the hosting site are the commands that you build into Web pages. To help you with the process of transferring MSDE tables and data from your computer to a hosting site, therefore, I ve created two Web pages that you can use as utilities: the ExportTable.aspx page and the ImportTable.aspx. You run the page on your local computer. The export page reads the schema of an MSDE table, creates a SQL CREATE TABLE statement that matches the structure of the MSDE table, and then stores the SQL statement in a .schema file. The page reads the data out of the table and creates an XML file out of the data.
You then copy the schema and XML files to the hosting site server, along with the page. Using your browser, you request the ImportTable.aspx file from the hosting site. You can then specify a file to import. The page re-creates the table in the hosting site s SQL Server, and if you want, reads the data from the XML file into the new table. Figure B-5 illustrates how the export and import process works.
Figure B-5: Transferring MSDE data to the hosting site via text files.
The following procedure describes how to export a table from MSDE.
Export a table from MSDE
From the ASP.NET Utilities folder on the companion CD, copy the ExportTable.aspx file to C:\WebMatrix or to the folder where you keep your Web pages.
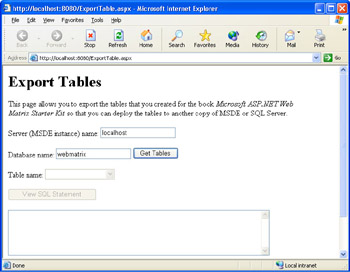
Run the page. You can open the file in Web Matrix and run it, or if you can run pages using IIS, you can simply request the page in your browser. The page looks like the following:
Enter the instance name for your copy of MSDE, and enter the name of your database. (If you followed the recommendation in the book, your database is named WebMatrix.) When you ve entered the two values, click Get Tables. The page fills the drop-down list with the names of tables available in the database you specified.
Select a table, and then click View SQL Statement. The page displays a SQL CREATE TABLE statement that corresponds to the structure of the table that you selected.
Examine the CREATE TABLE statement, and if you want, edit it.
Click the Export button.
Web Matrix creates two files based on the selected table name. The .schema file contains the CREATE TABLE statement that was displayed in the text box. The .xml file contains the data (if any) from the table. For example, if you selected the Calendar table, the ExportTable.aspx page creates the Calendar.schema file and the Calendar.xml file.
The two files you just created contain the information required to re-create the original table on the hosting site s SQL Server. You re then ready to import the table into the hosting site s SQL Server.
Import a table into a hosting site s SQL Server
Make sure you know the connection string that your hosting site administrator has prepared for you. If you don t have a connection string, contact the hosting site administrator.
Using the technique you usually employ to copy files to the server, copy the .schema file and the .xml file to the hosting site.
Copy the ImportTable.aspx file to the hosting site as well. You can find the ImportTable.aspx file in the ASP.NET Utilities folder on the companion CD.
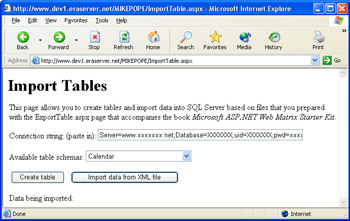
Run the ImportTable.aspx file in your browser, using the URL of your hosting site. The page looks like the following:
Enter or paste the connection string into the page.
Select a table from the drop-down list. The list contains the names of tables for which you have copied the .schema file to the hosting site.
Click Create Table to create the table using the SQL statement in the .schema file. If the process results in an error, study the error message carefully to determine what the problem is. Typical problems are that the connection string is not valid, that the table already exists, or that you don t have sufficient privileges to create the table. If you can t resolve the problem, contact the hosting site administrator and send him or her a copy of the SQL statement that you re trying to execute, along with the text of the error message you re seeing. (You can get the SQL statement from the .schema file.)
If you want to import data into the new table, click the Import Data From XML File button. The page reads the data in the .xml file and creates new records in the selected table in the hosting site s SQL Server.
Note
The Import Table.aspx page does not check whether the table contains any data. Importing data into a table with existing data can have different results, depending on the table. If the table uses an auto-increment primary key, importing data can result in duplicate records. If the table doesn t use an auto-increment primary key, the import process might generate an error indicating that a primary-key violation has occurred.
If all goes well, you ll be able to use the ExportTable.aspx and ImportTable.aspx pages to move your MSDE data to the hosting site s SQL Server. The final step in moving your data tables to the hosting site is to edit any Web pages in your application that involve data access and to change the connection string in the page. When you built the Web pages on your computer to access MSDE on your computer, Web Matrix embedded a connection string (or more than one) into the page. After you copy a Web page to a hosting site, however, any connection strings in the page won t be valid any more, so you need to substitute the connection string provided by the hosting site administrator.
Editing connection strings in your data-access pages isn t difficult, but it s a little tedious. Connection strings can appear in two places in your data-access pages: as a property of any SqlDataSourceControl on the page, and in the code that Web Matrix generates to select or import data. In this book, the Web pages listed in the following table contain connection strings that you need to change after copying the files to the hosting site.
Page
Chapter
Connection string location
AddSlides.aspx
13
AddSlide function (code)
SqlDataSourceControl, ConnectionString property
CalendarEntry.aspx
14
InsertCalendar function (code)
CreateSlideshow.aspx
13
InsertSlideshow function (code)
SqlDataSourceControl, ConnectionString property
FriendsDisplay.aspx
9
SqlDataSourceControl, ConnectionString property
Guestboo.aspx
10
AddGuestBookEntry function (code)
Guestbook_Email.aspx
15
AddGuestbookEntry function (code)
SlideshowPicker.aspx
12
SqlDataSourceControl, ConnectionString property
SlideshowViewer.aspx
12
GetSlides function (code)
ViewCalendar.aspx
14
GetAppointments function (code)
SqlDataSourceControl, ConnectionString property
ViewGuestbookGrid.aspx
10
SqlDataSourceControl, ConnectionString property
ViewGuestbookList.aspx
11
SqlDataSourceControl, ConnectionString property
ViewGuestbookList_Repeater. aspx
11
SqlDataSourceControl, ConnectionString property
Exporting, Importing, and Security
In this book, I ve been careful to alert you to potential security issues that can arise in the code on your Web pages or in the administration of your Web site. The export and import pages that I describe in this appendix can represent a major security risk on your site. In effect, the pages provide direct access to the database server for your application. Because the export and import processes represent such a security vulnerability to your application, you must use them with extreme caution. In general, don t allow visitors to your site to access the ExportTable.aspx or ImportTable.aspx pages at all. The safest practice is to use the pages one time to export the data from MSDE and import it into the hosting site s SQL Server, and then to remove both pages from the site immediately. Likewise, as soon as you ve imported data into the hosting site s SQL Server, delete the .schema and .xml files that you copied to the hosting site before importing.
Because you should use the import and export pages only within a secure context, the pages themselves violate some of the secure practices I recommended in the book. For example, neither page filters user input from text boxes. In the ExportTable.aspx page, the textSqlStatement control allows you to edit a raw SQL statement and does not prevent you from entering a potentially destructive statement. Both pages directly display error messages from MSDE or SQL Server, in direct contradiction to the practice I recommended in Appendix A.
I made these design choices because the export and import pages are designed to be used by a trusted user namely, you, the Web site owner. For example, I pass error message information through from MSDE and SQL Server because while working with these pages it s important that you see the details of any errors that occur during the export or import process. Similarly, I allow you to edit the SQL statement in the ExportTable.aspx page because it gives you a level of control over the SQL statement that might be necessary for you to import data on the hosting site successfully.
In general, you should work with the export and import pages as you would with any administrative-level utility. Use them carefully, and don t let anyone you don t trust completely to access the pages. Finally, remember that no one can access the pages if the pages aren t on your Web site; therefore, be careful to remove the pages after you ve finished working with them.