Chapter 31. Services for UNIX (SFU)
| CONTENTS |
- Introduction to SFU
- Using the Network File System (NFS) Functionality of SFU
- Telnet Client
- Telnet Server
- UNIX Utilities
- NFS Server
- Password Synchronization
Introduction to SFU
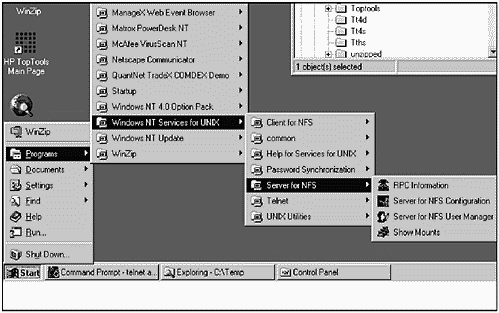
Microsoft Services for UNIX (SFU) provides interoperability between UNIX and Windows in many essential areas. Microsoft has packaged several widely used third-party interoperability products in SFU. Such important UNIX and Windows interoperability functions as NFS, Telnet, and UNIX utilities are part of SFU. Figure 31-1 shows these functions as menu picks that are displayed when SFU is loaded on a Windows system. We'll go through the most important functional areas of SFU in the upcoming sections, starting with NFS.
Figure 31-1. SFU Menu Structure
Using the Network File System (NFS) Functionality of SFU
With the NFS functionality of SFU, you would typically run your NFS client, such as the one included with SFU, on your Windows system in order to mount file systems on a UNIX system.
The NFS client of SFU bridges your Microsoft Server Message Block (SMB) network to your UNIX network by acting as a proxy. It forwards SMB requests from a Windows client to a UNIX NFS server, and vice versa. I always concentrate on the client aspect of NFS running on Windows, because UNIX systems are usually bigger, more centralized systems to which Windows users want to get access. Therefore, Windows users usually mount UNIX directories on their Windows systems and not vice versa.
This situation is not necessarily the case. With SFU, you can also set up your Windows system as an NFS Server. Figure 31-1 shows the menu structure of SFU after it has been installed. The Server for NFS menu pick is selected.
To begin, we'll focus on the Client for NFS option, because this is very commonly used in mixed Windows and UNIX environments, and we'll then come back to the Server for NFS option later in the chapter.
Under Client for NFS Configuration are the following six categories of information to enter related to NFS:
Authentication
Mount Options
File Access
Filenames
Configured NFS LANs
Symbolic Links
Let's walk through each of these, beginning with Authentication, shown in Figure 31-2.
Figure 31-2. SFU Authentication
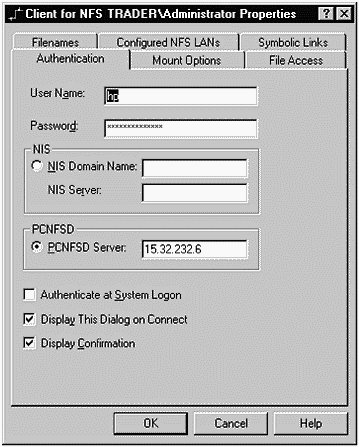
Authentication requires us to add some basic information about our connection to the NFS server. The User Name and Password are those we use to connect to the NFS Server. These should be set up on the server in advance of attempting to make a connection to the server. You also have the option to use NIS, which won't be part of this example. The server to which you are making an NFS connection must be running the PC NFS daemon. You can check to see whether your server is running this daemon. Figure 31-3 shows checking for pcnfsd on the NFS server:
Figure 31-3. Checking for pcnfsd on a UNIX System
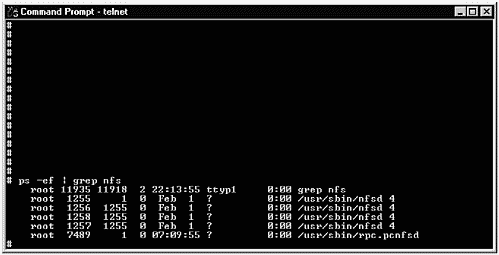
The last entry, using ps, shows that pcnfsd is indeed running on our NFS server.
![]()
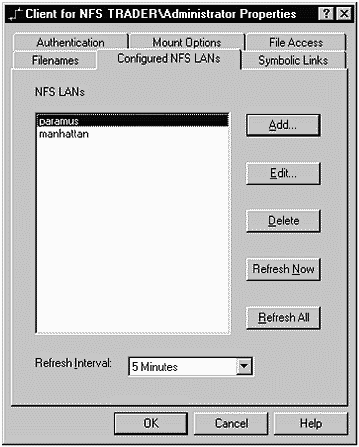
With the User Name, Password, and PCNFSD Server specified, we can move on to Configured NFS LANs. Figure 31-4 shows that I have configured two LANs on which I want to use NFS:
Figure 31-4. SFU Configured NFS LANs
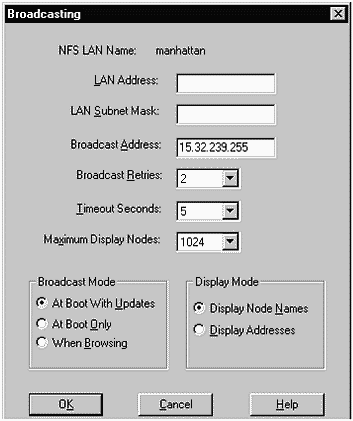
You can Edit... these LANs to include such information as the Broadcast Address, as shown in Figure 31-5:
Figure 31-5. Edita Specific LAN
Next, you have options for the way symbolic links will be handled when you establish a client NFS connection. Symbolic links are a way of mapping a file or directory to an existing file or directory. If you select Resolve Symbolic Links, then you will be shown the actual path name to which the link is set. The options available for Symbolic Links are shown in Figure 31-6:
Figure 31-6. SFU Client for NFS
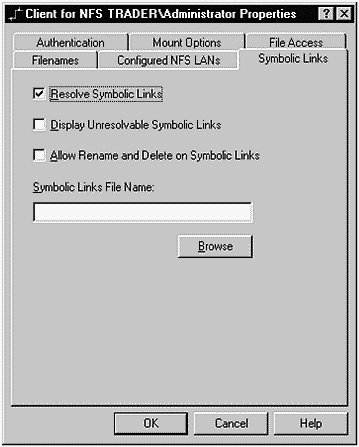
I typically like to resolve symbolic links, but, don't care to manipulate existing links or display those that cannot be resolved.
There are somewhat different conventions used in file naming on Windows and UNIX. SFU gives you several options related to Filenames as shown in Figure 31-7.
Figure 31-7. SFU Client for NFS
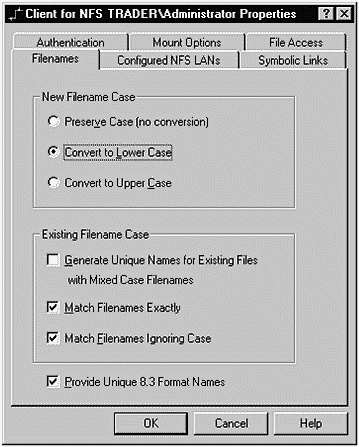
I like all new file names to be lowercase. This seems to result in the minimum amount of confusion when working with multiple operating systems. I also like to work with existing file names exactly as they exist, as indicated by the options I have chosen in Figure 31-7.
There are many mount options that you have when working with NFS. Figure 31-8 shows the Mount Options window:
Figure 31-8. SFU Mount Options
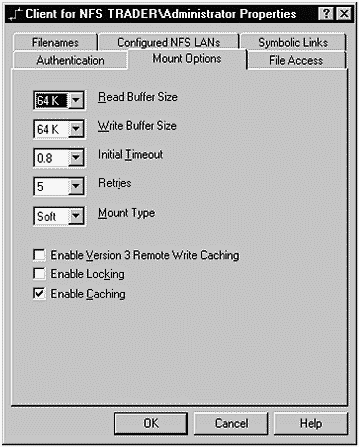
We are using the default Read Buffer Size of 64,000 bytes. I like to keep this number large, because it is the data part of the packet used during NFS reads. In general, bigger is better. The same is true of the Write Buffer Size. The Initial_ Timeout specifies the amount of time to wait for a response from the server before a retry. Retries specifies the number of times you'll attempt to access the server before dropping the operation altogether. I also use a Mount Type of Soft, as opposed to Hard, and I check Enable Caching.
File Access allows you to specify privileges for users establishing NFS mounts. These are the privileges you're accustomed to seeing when working with files as shown in Figure 31-9.
Figure 31-9. SFU File Access
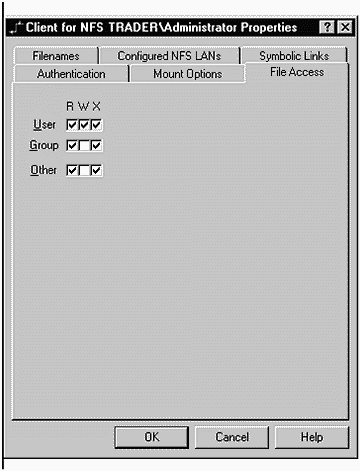
By default, User will have unlimited access to files, and those in the Group and Other will have read (R) and execute (X) access only. These are common privilege assignments.
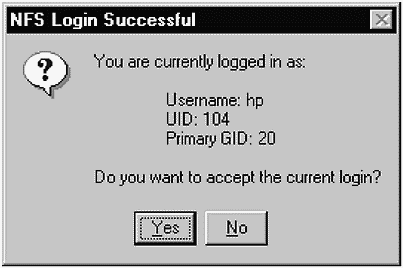
We can easily establish our NFS connection by selecting OK from the Authentication window shown in Figure 31-2. A box appears asking you to confirm the user name and other information, such as that shown in Figure 31-10.
Figure 31-10. NFS Login Successful
![]()
The Username, UID, and Primary GID correspond to those on the UNIX NFS server. If we view the passwd file on the UNIX NFS server system and look for our user hp, we'll see the following entry:
hp:EkyXw/N.EwFNw:104:20::/home/hp:/sbin/sh
The information in this passwd entry corresponds to that shown in our NFS Login window.
![]()
After login takes place, we can view the file systems exported on the UNIX NFS server using Explorer on our Windows system. Figure 31-11 shows the manhattan LAN with a specific system selected:
Figure 31-11. Viewing the NFS Mounted File System
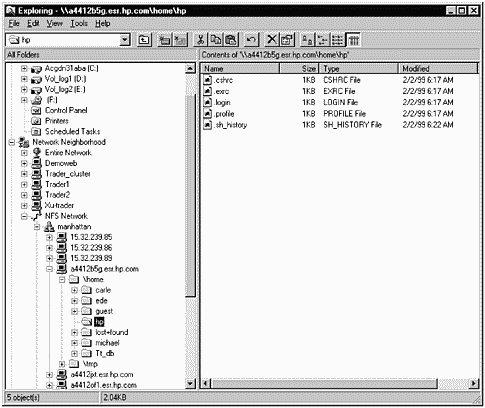
\home\hp is selected, and the right Explorer window shows the files in the \home\hp directory. We have permission to manipulate the files in the hp directory. We can check this by selecting a file, such as .cshrc, and viewing its properties. Figure 31-12 shows the Properties window.
Figure 31-12. SFU Properties
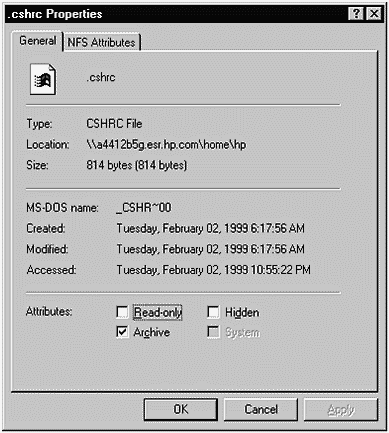
The Read-only box in this window is not checked; therefore, we have full access to this file.
Telnet Client
![]()
There is also a Telnet client loaded as part of SFU. Selecting Telnet -Telnet Client from the SFU menu produces the Telnet window shown in Figure 31-13.
Figure 31-13. SFU Telnet Client
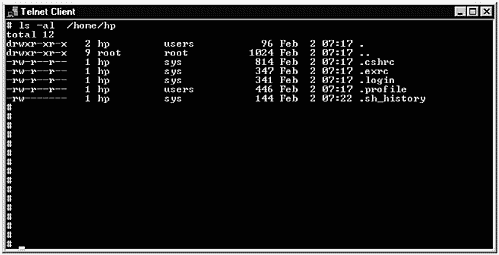
I have created a long listing of the contents of /home/hp in this Telnet window.
Telnet Server
![]()
There is also a Telnet server loaded as part of SFU. This means you can connect from a UNIX system, or any other system with a Telnet client, to a Windows NT system with the SFU Telnet server. Figure 31-14 shows accessing the Windows Telnet server from a UNIX system:
Figure 31-14. SFU Telnet Server
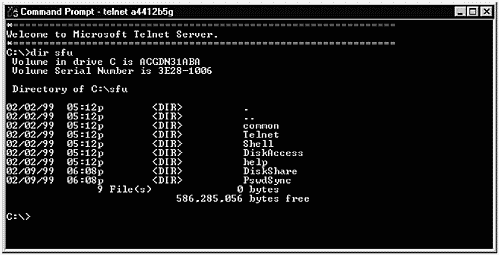
In Figure 31-14, I have initiated a Telnet session from my UNIX system to my Windows system. After receiving the welcome information from the Microsoft Telnet server, I can issue commands, such as the dir shown, exactly as I would from the prompt if I were working directly on the Windows system.
The Telnet server functionality of SFU gives some direct access from UNIX to Windows, which is a big help in mixed environments.
This functionality is further enhanced by many UNIX utilities that you can run on the Windows system through this Telnet connection or on the Windows system directly. The next section, " UNIX Utilities," covers these utilities.
UNIX Utilities
One highly desirable capability of SFU is a UNIX Command Shell invoked with Unix Utilities - Unix Command Shell. Figure 31-15 shows a window open with the UNIX utilities listed.
Figure 31-15. SFU UNIX Utilities Listed
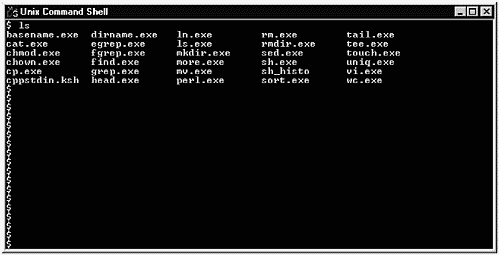
The utilities listed in Figure 31-15 work in SFU just the way they work in UNIX. You also have access to these UNIX utilities through a
![]()
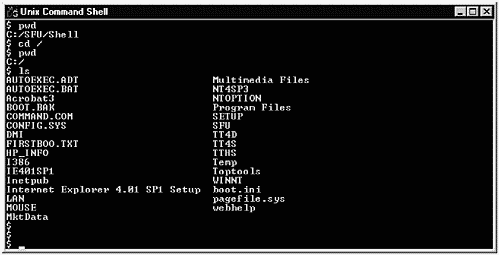
Telnet session that you can establish from another system. To give you an idea how these utilities work, let's issue a few commands, as shown in Figure 31-16.
Figure 31-16. SFU Example of Using Some UNIX Utilities
![]()
![]()
This window shows that when we invoke Unix Utilities, we are in the C:/SFU/Shell directory on our Windows system. We change directory to C: by issuing cd /, as wewould on a UNIXsystem. pwd confirms that we are at the C: level. We then issue an ls to see the files in C:.
Let's issue two more of the Unix Utilities to get a better feel for how these utilities perform in Windows, as shown in Figure 31-17:
Figure 31-17. SFU Example of Using Some UNIX Utilities
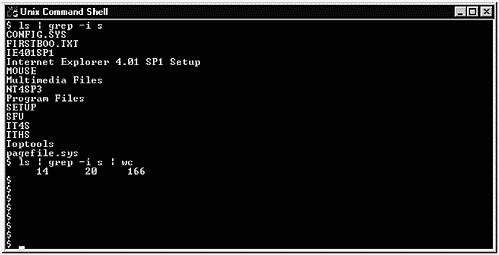
In this window, we issued an ls and a grep command that ignored case (- i) and searched for s. Files that contained both upper- and lowercase s were listed. We then piped this same output to wc to get a word count.
![]()
![]()
NFS Server
Not only can a Windows system act as an NFS client, but it can also act as an NFS server with SFU. A system running NFS can mount a file system exported on a Windows system.
Under Server for NFS Configuration, you can configure all aspects of your NFS server setup. The defaults for most categories of configuration are fine for initial testing, which we'll perform here. You may want to later perform additional configuration to tune your NFS server.
For our example, I've created one Share Name, as shown in Figure 31-18.
Figure 31-18. SFU Share Name
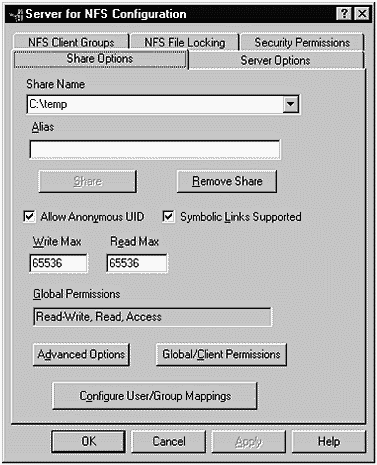
By selecting Server for NFS Configuration from the menu and then Share Options, I entered the Share Name C:\temp shown in Figure 31-18.
We can view Mount Information tosee what file systemswe have exported, as shown in Figure 31-19.
Figure 31-19. SFU Mount Information
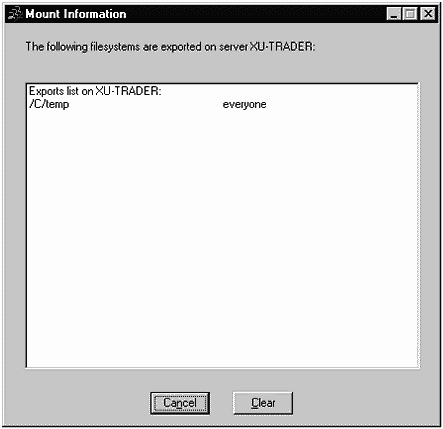
Our file system of C:\temp is indeed in the exported list with no restrictions on who may access it.
With this Share Name having been established, we can use the defaults for all other categories of NFS server configuration and mount C:\temp on a UNIX system. To mount C:\temp, you would issue the following command on your UNIX system:
![]()
# mount 19.32.23.112:C:\temp /ntmount This command will work on most UNIX systems. We have first specified the mount command, which you would normally issue as root. Next is the name of the Windows system that has the file system we wish to mount on it; in this case, I have used the IP address rather than the system name. The system name, or IP address, is followed by a colon (:). Next is the name of the file system we wish to mount as it appears on the Windows system, in this case C:\temp. Last is the name of the directory on the UNIX system under which we'll mount C:\temp, in this case /ntmount. You can also add a variety of different options with the mount command, but we'll use all defaults in our example.
![]()
![]()
Let's now check to see whether indeed the NFS mount we specified has been established on the UNIX system. The following example shows issuing the bdf command (which is somewhat similar to the df command covered earlier in this book) on the UNIX system to see whether the mount has been established, then a cd to the ntmount directory, and finally an ls of the files in this directory:
# bdf Filesystem kbytes used avail used Mounted on /dev/vg00/lvol3 151552 53165 92162 37% / /dev/vg00/lvol1 47831 14324 28722 33% /stand /dev/vg00/lvol8 163840 87595 71039 55% /var /dev/vg00/lvol7 339968 314984 23189 93% /usr /dev/vg00/lvol6 102400 62284 37607 62% /tmp /dev/vg00/lvol5 1048576 656649 367439 64% /opt /dev/vg00/lvol4 69632 3244 34850 48% /home /dev/vgCE/lvpatch 1024000 1357 958732 0% /ce/patches /dev/vgCE/lvfw 512000 1314 478856 0% /ce/firmware /dev/vgCE/cetmp 512000 419166 87028 83% /ce/ce-tmp 19.32.23.112:temp 2096160 1523360 572800 73% /ntmount # cd /ntmount # ls _istmp0.dir test.html ~df8ec8.tmp ~dfd65e.tmp _istmp1.dir tt2.exe ~df8ee7.tmp ~dfd65f.tmp _istmp2.dir tt3.exe ~dfa393.tmp ~dfd660.tmp ie401sp1.exe ttdemo.zip ~dfa394.tmp ~dfd66b.tmp ie4setup.exe ttwiz(1).exe ~dfa3a3.tmp ~dfd66c.tmp jack.log wbemcore.exe ~dfa3a4.tmp ~dfe649.tmp jack1.log winzip70.exe ~dfb2a.tmp ~dfe64a.tmp jack2.log ~df7e2f.tmp ~dfb39.tmp ~dfe64b.tmp mmc14.tmp ~df7e40.tmp ~dfb3a.tmp ~dfe64c.tmp mmcaaa7.tmp ~df7e41.tmp ~dfd63c.tmp ~dfe659.tmp mmcaaad.tmp ~df7e42.tmp ~dfd63d.tmp ~dfe65a.tmp mmcaab1.tmp ~df7e4f.tmp ~dfd64c.tmp ~dfe65b.tmp nph-ntfinal.exe ~df7e50.tmp ~dfd64d.tmp ~dfe65c.tmp ntagt33e.exe ~df7e51.tmp ~dfd64e.tmp ~dfe65d.tmp ntoption.exe ~df7e52.tmp ~dfd64f.tmp ~dfe669.tmp sfu ~df7e53.tmp ~dfd65b.tmp sfu1 ~df8e99.tmp ~dfd65c.tmp temp.log ~df8ea9.tmp ~dfd65d.tmp
![]()
![]()
After issuing this command, we see /ntmount as one of the file systems mounted on the UNIX system. At this point, I changed to a user other than root, because it is inadvisable in general for root to be manipulating files on an NFS mounted file system. I changed to user hp. We will next change directory to /ntmount and view its contents that correspond to those under C:\temp on the Windows system. Issuing a long listing, we see the files with ownership of hp:
$ ll total 5710 drwxrwxrwx 2 hp users 64 Feb 9 17:58 _istmp0.dir drwxrwxrwx 3 hp users 96 Feb 2 10:18 _istmp1.dir drwxrwxrwx 2 hp users 64 Feb 2 10:19 _istmp2.dir -rwxrwxrwx 1 hp users 24227193 Feb 1 19:50 ie401sp1.exe -rwxrwxrwx 1 hp users 443160 Jan 10 10:21 ie4setup.exe -rwxrwxrwx 1 hp users 218 Feb 10 1999 jack.log -rwxrwxrwx 1 hp users 218 Feb 10 1999 jack1.log -rwxrwxrwx 1 hp users 218 Feb 10 1999 jack2.log -rwxrwxrwx 1 hp users 60416 Feb 2 15:26 mmc14.tmp -rwxrwxrwx 1 hp users 102400 Feb 9 09:24 mmcaaa7.tmp -rwxrwxrwx 1 hp users 102400 Feb 9 12:40 mmcaaad.tmp -rwxrwxrwx 1 hp users 102400 Feb 9 12:40 mmcaab1.tmp -rwxrwxrwx 1 hp users 464200 Feb 1 19:33 nph-ntfinal.exe -rwxrwxrwx 1 hp sers 5514240 Feb 1 17:43 ntagt33e.exe -rwxrwxrwx 1 hp users 38940572 Feb 1 20:07 ntoption.exe drwxrwxrwx 20 hp users 640 Feb 3 09:58 sfu drwxrwxrwx 5 hp users 160 Feb 10 1999 sfu1 -rwxrwxrwx 1 hp users 218 Feb 2 11:34 temp.log -rwxrwxrwx 1 hp users 35 Feb 1 19:48 test.html -rwxrwxrwx 1 hp users 7046431 Feb 1 20:19 tt2.exe -rwxrwxrwx 1 hp users 5758110 Feb 1 20:21 tt3.exe -rwxrwxrwx 1 hp users 3232301 Feb 3 15:18 ttdemo.zip -rwxrwxrwx 1 hp users 1086772 Feb 1 16:53 ttwiz(1).exe -rwxrwxrwx 1 hp users 3456925 Feb 1 19:55 wbemcore.exe -rwxrwxrwx 1 hp users 943949 Feb 3 15:51 winzip70.exe -rwxrwxrwx 1 hp users 4096 Feb 2 15:26 ~df7e2f.tmp -rwxrwxrwx 1 hp users 3584 Feb 2 15:26 ~df7e40.tmp -rwxrwxrwx hp users 3584 Feb 2 15:26 ~df7e41.tmp -rwxrwxrwx 1 hp users 3584 Feb 2 15:26 ~df7e42.tmp -rwxrwxrwx 1 hp users 3072 Feb 2 15:26 ~df7e4f.tmp -rwxrwxrwx 1 hp users 3072 Feb 2 15:26 ~df7e50.tmp -rwxrwxrwx 1 hp users 3584 Feb 2 15:26 ~df7e51.tmp -rwxrwxrwx 1 hp sers 3584 Feb 2 15:26 ~df7e52.tmp -rwxrwxrwx 1 hp users 3584 Feb 2 15:26 ~df7e53.tmp -rwxrwxrwx 1 hp users 9728 Feb 9 09:24 ~df8e99.tmp -rwxrwxrwx 1 hp users 3072 Feb 9 09:24 ~df8ea9.tmp -rwxrwxrwx 1 hp users 5120 Feb 9 09:24 ~df8ec8.tmp -rwxrwxrwx 1 hp users 3584 Feb 9 09:24 ~df8ee7.tmp -rwxrwxrwx 1 hp users 6144 Feb 2 15:26 ~dfa393.tmp -rwxrwxrwx 1 hp users 9728 Feb 2 15:26 ~dfa394.tmp -rwxrwxrwx 1 hp users 3072 Feb 2 15:26 ~dfa3a3.tmp -rwxrwxrwx 1 hp users 5120 Feb 2 15:26 ~dfa3a4.tmp -rwxrwxrwx 1 hp users 3072 Feb 9 09:24 ~dfb2a.tmp -rwxrwxrwx 1 hp users 3072 Feb 9 09:24 ~dfb39.tmp -rwxrwxrwx 1 hp users 3072 Feb 9 09:24 ~dfb3a.tmp -rwxrwxrwx 1 hp users 4608 Feb 9 09:24 ~dfd63c.tmp -rwxrwxrwx 1 hp users 16384 Feb 9 09:24 ~dfd63d.tmp -rwxrwxrwx 1 hp users 4608 Feb 9 09:24 ~dfd64c.tmp -rwxrwxrwx 1 hp users 3072 Feb 9 09:24 ~dfd64d.tmp -rwxrwxrwx 1 hp users 3072 Feb 9 09:24 ~dfd64e.tmp -rwxrwxrwx 1 hp users 3072 Feb 9 09:24 ~dfd64f.tmp -rwxrwxrwx 1 hp users 3072 Feb 9 09:24 ~dfd65b.tmp -rwxrwxrwx 1 hp users 3072 Feb 9 09:24 ~dfd65c.tmp -rwxrwxrwx 1 hp users 3072 Feb 9 09:24 ~dfd65d.tmp -rwxrwxrwx 1 hp users 3072 Feb 9 09:24 ~dfd65e.tmp -rwxrwxrwx 1 hp users 3072 Feb 9 09:24 ~dfd65f.tmp -rwxrwxrwx 1 hp users 8192 Feb 9 09:24 ~dfd660.tmp -rwxrwxrwx 1 hp users 4608 Feb 9 09:24 ~dfd66b.tmp -rwxrwxrwx 1 hp users 3072 Feb 9 09:24 ~dfd66c.tmp -rwxrwxrwx 1 hp users 4096 Feb 9 09:24 ~dfe649.tmp -rwxrwxrwx 1 hp users 3584 Feb 9 09:24 ~dfe64a.tmp -rwxrwxrwx 1 hp users 3584 Feb 9 09:24 ~dfe64b.tmp -rwxrwxrwx 1 hp users 3584 Feb 9 09:24 ~dfe64c.tmp -rwxrwxrwx 1 hp users 3584 Feb 9 09:24 ~dfe659.tmp -rwxrwxrwx 1 hp users 3072 Feb 9 09:24 ~dfe65a.tmp -rwxrwxrwx 1 hp users 3072 Feb 9 09:24 ~dfe65b.tmp -rwxrwxrwx 1 hp users 3584 Feb 9 09:24 ~dfe65c.tmp -rwxrwxrwx 1 hp users 3584 Feb 9 09:24 ~dfe65d.tmp -rwxrwxrwx 1 hp users 3584 Feb 9 09:24 ~dfe669.tmp $ We do indeed see that user hp and the corresponding group of users are part of this long listing.
The NFS Server setup we have performed in this section can be combined with the NFS Client setup performed earlier to allow the Windows file system to be exported as part of the NFS Server and imported as part of the NFS Client. The extent to which you use NFS as part of your file-sharing strategy depends on the makeup of your environment. Because NFS is available on most all UNIX variants, you may find that using NFS on Windows makes sense for your environment. If you expect heavy NFS use in a mixed Windows and UNIX environment, you may want to start small, with a few key directories shared using NFS, and test its performance to make sure that it is adequate for your users. As you can see from the previous examples, NFS on Windows can greatly enhance the overall file sharing in your mixed Windows and UNIX environment.
Password Synchronization
SFU synchronizes Windows passwords to UNIX. I didn't include an example of this synchronization. There is an encrypted file sent from Windows to UNIX containing password information. The file should be set to read-only for root. There is also a daemon that is required to implement the password synchronization. After the setup is complete, user passwords on UNIX will be synchronized with those on Windows.
| CONTENTS |
EAN: 2147483647
Pages: 34