Chapter 12. Introduction to Shell Programming
| CONTENTS |
- Shell Programming
- Steps to Create Shell Programs
- ksh Programming
- An HP-UX Logical Volume Manager Shell Program
- C Shell Programming
- Manual Pages for Some Commands Used in Chapter 12
Shell Programming
There is much more to a shell than meets the eye. The shell can do much more than the command-line interpreter everyone is used to using. UNIX shells actually provide a powerful interpretive programming language as well.
In this chapter, we'll cover ksh shell programming. I chose ksh because most ksh programming techniques work with the Bourne shell as well. There is a follow-on to ksh programming at the end of the chapter for csh because the csh employs some different programming techniques from the ksh.
We'll cover the most important ksh programming techniques. The climax of this chapter is a fairly sophisticated shell program to remove files and place them in a directory, rather than just permanently removing files from the system with rm. This program employs all the shell programming techiques covered in the chapter. This shell program, called trash, with some minor modifications, can be run in the Bourne shell as well.
The shell is one of the most powerful and veratile features on any UNIX system. If you can't find the right command to accomplish a task, you can probably build it quite easily using a shell script.
The best way to learn shell programming is by example. There are many examples given in this chapter. Some serve no purpose other than to demonstrate the current topic. Most, however, are useful tools or parts of tools that you can easily expand and adapt into your environment. The examples provide easy-to-understand prompts and output messages. Most examples show what is needed to provide the functionality we are after. They do not do a great deal of error checking. From my experience, however, it only takes a few minutes to get a shell program to do what you want; it can take hours to handle every situation and every error condition. Therefore, these programs are not very dressed up (maybe a sport coat versus a tuxedo). I'm giving you what you need to know to build some useful tools for your environment. I hope that you will have enough knowledge and interest by the time we get to the end of this chapter to learn and do more.
Most of the examples in this chapter were performed on a Solaris system; however, shells are nearly identical going from one system to another, so you should be able to get the programs in this chapter running on your system quickly.
Steps to Create Shell Programs
When you craft a shell program, there are some initial steps you want to perform so that you have consistency among all of your programs. The following is a list of some important concepts to employ with your shell programs:
-
Names of shell programs and their output - You should give your shell programs and their output a meaningful name. If you call your shell programs script1, script2, and so on, these will not have any meaning for you and other potential users of the programs. If your shell program finds files of a particular type, then you can name the program filefind or some other descriptive name. Do the same with the output of shell programs. Don't call the output of a shell program output1 if there is some descriptive name you can give it such as filefind.out. Also avoid giving shell programs and their output names that already exist. You may use commands such as read and test, so you may create confusion and conflicts if you were to give your program and their output the same names. The first shell program in this chapter shows today's date. If we were to name the program date, we would actually run the system date command as opposed to our shell program date. Thereason is that in most cases, the system date command would be found before our shell program date file.
-
Repository for shell programs - If you plan to produce numerous shell programs, you may want to place them in a directory. You can have a directory in your home directory called bin or shellprogs, in which all programs are located. You can then update your path to include the directory name where your shell programs are located.
-
Specify shell to execute program - The very first line of the program specifies the shell to be used to execute the program. The path of the shell is preceeded by #!, which is a "magic number" that indicates that the path of the shell is about to follow. The shell programs in this chapter use the ksh path.
-
Formatting of shell programs - Do not underestimate the importance of proper formatting to enhance the readability of shell programs. You should indent areas of the program to indicate that commands are part of a group. Indenting only three or four spaces is fine for groups of commands. You may also want to set autoindent in vi so that the next line starts at the same point as the previous line (try:set ai in vi to see how this technique works). You can break up long lines by placing a \ (backslash) at the end of one line and continue the command on the next line.
-
Comments - Include detailed comments in your shell program. You can write paragraphs of comments to describe what an upcoming section of your program will accomplish. These will help you understand your program when you look at it months or years after having originally created it as well as help others understand the program. No limit exists on the amout of comments you can include. Start comment lines with a # (pound sign).
-
Make the shell program executable - Thechmod command covered in the previous chapters introducing various shells is used to make your program executable.
Following the previous list of recommendations will make creating and using shell programs more efficient. Now we need to cover the types of shell programs.
A shell program is simply a file containing a set of commands you wish to execute sequentially. The file needs to be set with execute permissions so that you can execute it just by typing the name of the script.
There are two basic forms of shell programs:
-
Simple command files - When you have a command line or set of command lines that you use repeatedly, you can use one simple command to execute them all.
-
Structured programs - The shell provides much more than the ability to "batch" together a series of commands. It has many of the features that any higher-level programming language contains:
-
Variables for storing data
-
Decision-making controls (the if and case commands)
-
Looping abilities (the for and while loops)
-
Function calls for modularity
-
Given these two basic forms, you can build everything from simple command replacements to much larger and more complex data manipulation and system administration tools.
ksh Programming
I have created a directory in my home directory called shellprogs to serve as a repository for my shell programs. In order to execute these programs without having to specify an absolute path, I have updated my path in.profile to include the following line:
export PATH=${PATH}:~shellprogs This adds /home/martyp/shellprogs to my path, assuming colon is the delimiter, which is usually the case. After updating.profile you can log out and log in to update your path. You can issue the command below to confirm that your path has indeed been updated to include the directory in which you keep your shell programs:
martyp $ echo $PATH /usr/bin:/usr/ucb:/etc:.:/home/martyp/shellprogs martyp $ Let's now go to the shellprogs directory and type a simple command file called today:
#!/bin/ksh # This is a simple command file to display today's date. echo "Today's date is" date +%x
Before we look at each line in the program, let's run it to see the output:

martyp $ today ksh: today: cannot execute martyp $ ls -al total 6 drwxrwxr-x 2 martyp staff 512 May 21 09:53 . drwxrwx--- 4 martyp staff 512 May 21 09:25 .. -rw-rw-r-- 1 martyp staff 100 May 21 09:54 today martyp $ chmod +x today martyp $ ls -al total 6 drwxrwxr-x 2 martyp staff 512 May 21 09:53 . drwxrwx--- 4 martyp staff 512 May 21 09:25 .. -rwxrwxr-x 1 martyp staff 100 May 21 09:54 today martyp $ today Today's date is 05/21/99 martyp $

We could not execute today because the file was created without execute permissions, which we confirm by performing a long listing. We then add execute permission to the file with chmod +x, whichis confirmed with the next long listing. We are then able to execute today and view its results.

The umask discussion in each of the earlier shell chapters describes the defaults for new files. Almost invariably, new files are created without execute permission; therefore, you will have to update the permissions on the file to include execute.
Let's now walk through this simple shell program and analyze each line.
#!/bin/ksh

The first line specifies that the ksh will be used. If you are using Bash, C shell, or any other shell, you would specify its location in this manner. Some systems have multiple versions of shells running on them. It may be that a shell has been updated since the last release and some users may want to maintain the old version of the shell. For this reason, you want to be sure that the absolute path you specify is indeed that of the shell you wish to use. Note that the #! must be the very first two characters in the file.
Normally, when you run a shell program, the system tries to execute commands using the same shell that you are using for your interactive command lines. If we don't include this line, someone running a shell other than the ksh might have unexpected results when trying to run one of our programs.
As a good practice, you should include #!shellname as the first line of every shell program you write.
Let's now view the next line of our program:
# This is a simple command file to display today's date.
These are comments. Everything after a # in a command line is considered a comment (#! on the first line is the one very big exception). Keep in mind my early remarks about including comments liberally. It is a great pleasure to share a well commented shell program with a friend, knowing that you have adequately documented the program with comments.
Here is the next command:
echo "Today's date is"
The echo command generates prompts and messages in shell programs. See the echo manual entry to see all the options available with echo for formatting your output. We commonly enclose the string to be displayed in double quotes. In this case, we did because we needed to let the shell know that the apostrophe was part of the string and not a single quote that needs a match.
Next is the last command in our program:
date +%x
This executes the date command. There are indeed many options to the date command, some of which are not intuitive. In this case, we use one of the simplest forms of the command, which produces today's date.
Let's cover one more example of a command file that you may find useful. This program informs you of the present working directory and then produces a long listing of the files in the directory. The following is a listing of the shell program myll:
#!/bin/ksh # This is a simple shell program that displays the current # directory name before a long file listing (ll) of that # directory. # The script name is myll echo "Long listing of directory:" pwd echo ll -l
This program uses ll; you may need to use ls -al. The following is what myll looks like when it runs:
martyp $ myll Long listing of directory: /home/martyp/shellprogs total 4 -rwxrwxr-x 1 martyp staff 220 May 24 05:28 myll -rwxrwxr-x 1 martyp staff 100 May 21 09:54 today martyp $ This name of the present working directory is /home/martyp/ shellprogs. A long listing of the contents of this directory shows the two programs we have covered so far in this chapter.
Before we can produce more complex shell programs, we need to learn more about some of the programming features built into the shell. Let's start with shell variables.
Shell Variables
A shell variable is similar to a variable in any programming language. A variable is simply a name that you give to a storage location. Unlike most languages, however, you never have to declare or initialize your variables; you just use them.
Shell variables can have just about any name that starts with a letter (uppercase or lowercase). To avoid confusion with special shell characters (like file name generation characters), keep the names simple and use just letters, numbers, and underscore (_).
To assign values to shell variables, you simply type the following:
name=value
Note that there are no spaces before and after the = character.
Here are some examples of setting shell variables from the command line. These examples work correctly:
$ myname=ralph $ HerName=mary
This one does not work because of the space after "his":
$ his name=norton his: not found The shell assumes that "his" is a command and tries to execute it. The rest of the line is ignored.
This example contains an illegal character (+) in the name:
$ one+one=two one+one=two: not found A variable must start with a letter. A common mistake is to give a variable a name that makes perfect sense to you but does not start with a letter. The following example uses a variable that starts with a number:
$ 3word=hi 3word=hi: not found The "3" causes a "not found" to be produced when we attempt to assign this variable.
Now that we can store values in our variables, we need to know how to use those values. The dollar sign ($) is used to get the value of a variable. Any time the shell sees a $ in the command line, it assumes that the characters immediately following it are a variable name. It replaces the $variable with its value. Here are some simple examples using variables at the command line:
$ myname=ralph $ echo myname myname $ echo $myname ralph $ echo $abc123
In the first echo command, there is no $, so the shell ignores myname, and echo gets myname as an argument to be echoed. In the second echo, however, the shell sees the $, looks up the value of myname, and puts it on the command line. Now echo sees ralph as its argument (not myname or $myname). The final echo statement is similar, except that we have not given a value to abc123, so the shell assumes that it has no value and replaces $abc123 with nothing. Therefore, echo has no arguments and echos a blank line.
There may be times when you want to concatenate variables and strings. This is very easy to do in the shell:
$ myname=ralph $ echo "My name is $myname"
My name is ralph
There may be times when the shell can become confused if the variable name is not easily identified in the command line:
$ string=dobeedobee $ echo "$stringdoo"
We wanted to display "dobeedobee," but the shell thought the variable name was stringdoo, which had no value. To accomplish this, we can use curly braces around the variable name to separate it from surrounding characters:
$ echo "${string}doo" dobeedobeedoo You can set variables in shell programs in the same way, but you might also like to do things such as save the output of a command in a variable so that we can use it later. You may want to ask users a question and read their response into a variable so that you can examine it.
Command Substitution
Command substitution allows us to save the output from a command (stdout) into a shell variable. To demonstrate this, let's take another look at how our "today" example can be done using command substitution.
#!/bin/ksh d='date +%x' echo "Today's date is $d"
The back quotes (') around the date command tell the shell to execute date and place its output on the command line. The output will then be assigned to the variable d. We'll name this updated script today1 and run it:
$ today1 Today's date is 05/24/00 We could also have done this task without using the variable d. We could have just included the date command in the echo string, as shown in the today2 script shown in the following example:
#!/bin/ksh echo "Today's date is 'date +%x'"
When we run this program, we see exactly the same output as we did with today1:
$ today2 Today's date is 05/24/00 We'll use shell variables and command substitution extensively in some of the upcoming examples. Let's now cover reading user input.
Reading User Input
The most common way to get information from the user is to prompt him or her and then read the response. The echo command is most commonly used to display the prompt; then the read command is used to read a line of input from the user (standard input). Words from the input line can be assigned to one or several shell variables.
Here is an example with comments to show you how read can be used:
#!/bin/ksh # program: readtest echo "Please enter your name: \c" # the \c leaves cursor on # this line. read name # I have no $ because we are doing an assignment # of whatever the user enters into name. echo "Hello, $name" echo "Please enter your two favorite colors: \c" read color1 color2 # first word entered goes into color1 # remainder of line goes into color2 echo "You entered $color2 and $color1"
If we ran this program, it would look something like this:
$ readtest Please enter your name: gerry Hello, gerry Please enter your two favorite colors: blue green You entered green and blue $
Notice how the read command assigned the two words entered for colors into the two respective color variables. If the user entered fewer words than the read command was expecting, the remaining variables are set to null. If the user enters too many words, all extra words entered are assigned into the last variable. This technique is how you can get a whole line of input into one variable. Here's an example of what happens when you enter more than two colors:
$ readtest Please enter your name: gerry Hello, gerry Please enter your two favorite colors: chartreuse orchid blue You entered orchid blue and chartreuse $
The program took the last two colors entered and assigned them to color2. For this reason, you have to be careful of what a user may enter with the read command and how you map that information to variables.
You may have a built-in variable used with read called REPLY. With REPLY, a line of input is assigned to the variable REPLY. Itend not to use this often because I don't like to leave anything to chance. I normally explicitly name a variable to which input is assigned. The following example shows the listing and running of readtest1, which includes a line that contains only the read command, the response of which is assigned toREPLY:

martyp $cat readtest1 #!/bin/ksh # program: readtest echo "Please enter your name: \c" # the \c leaves cursor on # this line. read name # I have no $ because we are doing an assignment # of whatever the user enters into name. echo "Hello, $name" echo "Please enter your two favorite colors: \c" read color1 color2 # first word entered goes into color1 # remainder of line goes into color2 echo "You entered $color2 and $color1" echo "Where are you from?" read # read response into $REPLY echo "I'm sure $REPLY is great" martyp $ readtest1 Please enter your name: MARTY Hello, MARTY Please enter your two favorite colors: RED BLUE You entered BLUE and RED Where are you from? MANY DIFFERENT PLACES I'm sure MANY DIFFERENT PLACES is great martyp $
You can see in this example that the response I typed of "MANY DIFFERENT PLACES" was indeed read into REPLY.
Although echo is used throughout this chapter, you may also see print used to display lines on the screen.
Arguments to Shell Programs
Shell programs can have command-line arguments just like any regular command. Command-line arguments that you use when you invoke your shell program are stored in a special set of variables. These are called the positional parameters.
The first ten words on the command line are directly accessible in the shell program using the special variables $0-$9. This is how they work:
| $0 | The command name |
| $1 | The first argument |
| $2 | The second argument |
| $3 | . |
| . | |
| . | |
| $9 | The ninth argument |
If you are not sure how many command line arguments you may get when your program is run, there are two other variables that can help:
| $# | The number of command-line arguments |
| $* | A space-separated list of all the command-line arguments (which does not include the command name) |
The variable $* iscommonly used with the for loop (soon to be explained) to process shell script command lines with any number of arguments.
Let's now take the myll we worked with earlier and modify it to produce a long listing of the directory that we specify when we run the program. Figure 12-1 shows the modified myll:
Figure 12-1. myll Shell Program
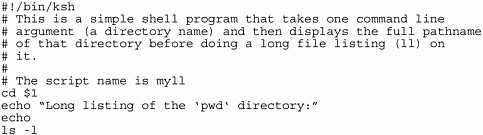
If we run myll with a directory name, the script changes directory, echoes the message containing the full path name (notice the command substitution), and then executes the ls -l command.

Note that the cd in the myll program will change only the working directory of the script; it does not affect the working directory of the shell from which we run myll.
martyp $ myll /tmp Long listing of the /tmp directory: total 2384 -rw------- 1 root sys 265228 Feb 22 15:21 dtdbcache_:0 -rw-r--r-- 1 root sys 70829 Feb 23 10:44 g -rw-r--r-- 1 root sys 13642 Feb 23 10:48 i -rw-rw-rw- 1 root root 14071 May 24 06:10 license_log -rwxr-xr-x 1 chrisb users 317 Apr 20 17:38 ls -rw-rw-r-- 1 root sys 4441 Mar 25 14:37 mwaps7454 -rw-rw-rw- 1 anne users 4341 May 20 13:56 ps23974 -rw-r--r-- 1 rodt users 4218 Apr 14 11:17 ps3358 -rw-r--r-- 1 rodt users 4763 Feb 24 07:23 ps6465 -rw-rw-r-- 1 root sys 4446 Mar 25 14:31 ps7036 -rw-rw-r-- 1 root sys 4442 Mar 25 14:35 ps7138 -rw-rw-r-- 1 root sys 4446 Mar 25 14:35 ps7215 -rw-rw-r-- 1 root sys 4498 Mar 25 14:36 ps7342 -rw-rw-r-- 1 root sys 4446 Mar 25 14:38 ps7622 -rw-rw-r-- 1 root sys 4615 Mar 25 15:30 ps7812 -rw-rw-r-- 1 root sys 5728 Feb 18 11:09 ps_data -rw-r--r-- 1 root sys 0 Apr 26 10:50 sh20890.1 -rw-r--r-- 1 root sys 0 Apr 26 10:50 sh20891.1 -rw-r--r-- 1 root sys 0 Apr 26 10:51 sh20978.1 -rw-r--r-- 1 root sys 0 Apr 26 10:51 sh20979.1 -rw-r--r-- 1 chrisb users 5325 Mar 26 13:42 sman_9664 -rw-rw-r-- 1 root sys 295996 Mar 1 10:15 ups_data drwx------ 2 root other 69 Mar 9 11:37 whatis.11526 drwx------ 2 root other 69 Mar 9 11:37 whatis.11686 drwx------ 2 root other 69 Mar 9 11:38 whatis.11853 drwx------ 2 root other 69 Mar 9 11:38 whatis.12014 -rw-r--r-- 1 root sys 354221 Feb 23 10:49 x -rw-r--r-- 1 chrisb users 0 Feb 23 14:39 xx martyp $ In this case, we could give myll no argument and it would still work properly. If we don't provide any command-line arguments, then $1 will be null, so nothing goes on the command line after cd. This will make cd take us to our home directory and perform the ll there.
If we provide more than one argument, only the first is used and any others are ignored.
If we use a command-line argument, it must be a directory name; otherwise, the cd command fails and the script terminates with a "bad directory" error message. Later I will show how to test for valid directory names and file names so that you can work around potential errors.

A more complex example can be used to build new versions of the ps command. Below are two examples that use command line arguments and command substitution to help you with your process management.
The psg shell program in Figure 12-2 is handy for searching through what is typically a long process status listing to find only cer tain commands or user processes. These examples use grep. grep finds all lines that contain the pattern for which you are searching.
Figure 12-2. psg Shell Program
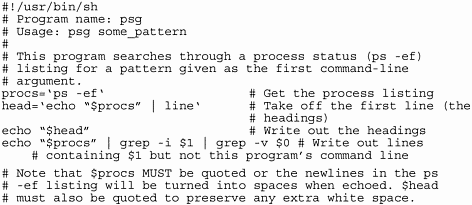

Here's what psg looks like when it runs. In this example, we want to look at all the Korn shells running on the system.
martyp $ psg ksh UID PID PPID C STIME TTY TIME CMD root 2954 2936 0 Feb 22 ? 0:01 /bin/ksh /usr/dt/bin/Xsession root 3002 2999 0 Feb 22 pts/2 0:01 -ksh -c unset DT; DISPLg root 3067 1 0 Feb 22 ? 0:00 /bin/ksh /usr/dt/bin/sdtvolcheckm jnola 11516 11514 0 May 11 pts/3 0:01 -ksh martyp 29291 29289 0 09:30:04 pts/4 0:02 -ksh This program also works to find the terminal, process ID, parent process ID, start date, and any other information from ps.
As a user, you may start processes that you wish to stop. You may, for instance, start an application that does not come up on your display. You can identify the process with psg and then usethe next program to stop the process, provided that you have the rights to stop the process.
The gkill shell program in Figure 12-3 searches through a ps -ef listing for a pattern (just like psg); then it kills all listed processes. The examples use the cut command, which allows you to specify a range of columns to retain.
Figure 12-3. gkill Shell Program
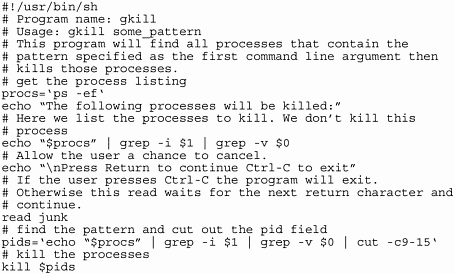

If we don't provide any command-line arguments, grep issues an error and the program continues. In the next section, we will learn how to check if $1 is set and how to gracefully clean up if it's not.
Let's now start a process in the background, use the psg program to identify the process number, and then use gkill to stop the process:

martyp $ find / -name .c > cprogs 2>&1 & [1] 29683 martyp $ psg find UID PID PPID C STIME TTY TIME CMD martyp 29683 29579 7 13:54:19 pts/4 0:02 find / -name .c martyp $ gkill 29683 The following processes will be killed: martyp 29683 29579 10 13:54:19 pts/4 0:03 find / -name .c Press Return to continue Ctrl-C to exit martyp $
When we start the find command, we are given its process number. To be sure we don't kill the wrong process, I checked for all of the find programs running with psg. When I was sure of the process number to kill, I used psg to kill the process.

Although the shell programs in this section were simple, they employed many important shell programming techniques. Let's now move to testing and branching, which are some of the most powerful aspects of shell programming.
Testing and Branching
Decision-making is one of the shell's most powerful features. You have two ways to check conditions and branch to a piece of code that can handle that condition.
For example, you may want to ask the user a question and then check whether the answer was yes or no. You may also want to check whether a file exists before you operate on it. In either case, you can use the if command to accomplish the task. Here are a few shell script segments that explain each part of the if command:
echo "Continue? \c" read ans if [ "$ans" = "n" ] then echo "Goodbye" exit fi
The echo and read provide a prompt and response, as usual. The if statement executes the next command, and if it succeeds, it executes any commands between the then and the fi (if spelled backwards).
Note that the \c in the echo command suppresses the new line that echo normally generates. This action leaves the cursor on the line immediately after the "Continue? " prompt. This is commonly used when prompting for user input.
The test command is the most common command to use with the if command. The [ "$ans" = "n" ] is the test command. It performs many types of file, string, and numeric logical tests, and if the condition is true, the test succeeds.
The syntax of the test command requires spaces around the [] or you will get a syntax error when the program runs. Also notice the double quotes around the response variable $ans. These are a strange anomaly with the test command. If the user presses only [[RETURN]] at the prompt without typing any other character, the value of $ans will be null. If we didn't have the quote marks around $ans in the test command, it would look like this when the value of $ans was substituted into the test command:
[ = "n" ]
This generates a "test: argument expected" error when you run the program. This is a very common mistake, and if you ever get this error, you should look for variables in your test commands with null values.
There is another form of the if command that is very common. It allows you to do one thing if a condition is met or do something else if not:
if [ ] # if some condition is true then # do something else # otherwise do this fi
There are many conditions that the test command can test. Table 12-1 shows some of the more common conditions for which you can test.
| String tests: | |
|---|---|
| ["$a"=="string"] | True if $a is equalto"string" |
| [ "$a" != "string" ] | True if $a is NOT equal to "string" |
| [ -z "$a" ] | True if $a is null (zero characters) |
| [ -n "$a" ] | True if $a is NOT null |
| Numeric tests: | |
| [ $x -eq 1 ] | True if $x is equal to 1 |
| [ $x -ne 1 ] | True if $x is NOT equal to 1 |
| [ $x -lt 1 ] | True if $x is less than 1 |
| [ $x -gt 1 ] | True if $x is greater than 1 |
| [ $x -le 1 ] | True if $x is less than or equal to 1 |
| [ $x -ge 1 ] | True if $x is greater than or equal to 1 |
| File tests: | |
| [ -d $file ] | True if $file is a directory |
| [ -f $file ] | True if $file is a file |
| [ -s $file ] | True if $file is a file with > 0 bytes |
| [ -r $file ] | True if $file is readable |
| [ -w $file ] | True if $file is writable |
| [ -x $file ] | True if $file is executable |
Tests can be combined using -a to logically "AND" the tests together, -o to logically "OR" two tests, and ! to "negate" a test. For example, this test statement is true only if the $interactive variable is set to true or $file is a directory:
[ "$interactive" = "TRUE" -o -d $file ]
This will be used in some of the upcoming example programs.
Here is a useful extension to the gkill program earlier shown. It checks to see that we have exactly one command-line argument before the program will attempt to do the processing. It uses a numeric test and the $# variable, which represents the number of command-line arguments. It should be inserted before any other lines of code in the gkill example given above:
# If we don't have exactly one command-line argument, # write an error and exit. if [$#-ne1 ] then echo "Usage: $0 pattern" echo "Some pattern matching the processes to kill"" echo "must be specified" exit 1 # Exit 1 terminates the program and tells the # calling shell that we had an error. fi
Some other possible extensions to the gkill program might be to:
-
Allow the user to specify a signal to use with the kill command. For example:
gkill -9 ralphwould find all of ralph's processes and then kill them with kill -9.
-
Make sure that a valid message is printed if we can't find any processes to kill using the specified pattern.
This same type of command-line check is easily applied to the psg program to make sure you that have exactly one argument representing the pattern for which to search.
When you are reading user input, you may want to check, if the user entered a value at all. If not, you would provide a reasonable default value. This is easily done with a variable modifier.
This example reads an answer ("ans") from the user and then checks its value using an if command:
echo "Do you really want to remove all of your files? \c" read ans if [ ${ans:-n} == y ] then rm -rf * fi The ${ans:-n} statement checks the value of $ans. If there is a value in $ans, use it in the command line. If the user simply pressed [[RETURN]] at the prompt, $ans will be null. In this case, ${ans:-n} will evaluate to n when we do the comparison. Basically, in one small statement it says, "if the user did not provide an answer, assume they meant n."
There is another modifier that is often used:
${var:=default} It returns the value of var if it is set; it returns the default if var is not set, and it will also assign the default as the value of var for future use.
Making Decisions with the case Statement
The case statement is another way to make decisions and test conditions in shell programs. It is most commonly used to check for certain patterns in command-line arguments. For example, if you wanted to determine whether the first command-line argument is an option (starts with a -), the case statement is the easiest way to do so. The case statement is also used to respond to different user input (such as asking the user to select a choice from a menu).
The case statement is probably one of the most complicated shell commands because of its syntax:
case pattern_to_match in pattern1) cmdA cmdB ;; pattern2) cmdC ;; ... *) cmdZ ;; esac
pattern_to_match is usually a shell variable that you are testing (such as a command-line argument or a user response). If pattern_to_match matches pattern1, then commands cmdA and cmdB are executed. The;; separates this pattern's command list from the next pattern. In all cases, when;; is reached, the program jumps to the esac (case spelled backwards).
If pattern_to_match matches pattern2, then cmdC is executed and we jump to esac, the end of the case statement.
The * is provided so that if pattern_to_match did not match anything else, it will execute cmdZ. It's important to have a default action to handle the case where the user types an invalid entry.
For more robust pattern matching, any file name generation characters ( *, [ ], ? ) can be used to do special pattern matches. There is also a very useful way to check for multiple patterns in one line using the | symbol, which means logical "OR". Here's an example:
echo "Do you want to continue? (y/n) \c" read ans case $ans in y|Y) echo "Continuing" ;; ... n|N) echo "Done, Goodbye" exit ;; *) echo "Invalid input" ;; esac
Here is another example where we are testing to see whether $1 (the first command-line argument) is a valid option (a character we recognize that begins with a -):
case $1 in -l | -d) # Perform a listing echo "All files in $HOME:\n" ll -R $HOME | more ;; -i) # -i means set to an interactive flag to true interactive="TRUE" ;; *) # Invalid input echo "$0: $1 is an invalid option" exit 1 ;; esac
A case statement is used in another example later in this chapter.
Looping
There are many times when you want to perform an action repeatedly. In the shell, there are two ways to do this:
-
The for loop takes a list of items and performs the commands in the loop once for each item in the list.
-
The while loop executes some commands (usually the test command) if that command executes successfully. (If the test condition is true, then the commands in the loop are executed, and the command is again executed to see whether we should loop again.)
The basic format of the for loop is:
for var in list_of_items do cmdA cmdB cmdC done
When the loop starts, the variable var has its value set to the first word in the list_of_items through which to loop. Then the three commands between the do and the done statements are executed. After the program reaches the done statement, it goes back to the top of the loop and assigns var to the next item in the list, executes the commands, and so on. The last time through the loop, the program continues with the next executable statement after the done statement.
The list_of_items can be any list of words separated by white space. You can type the words or use variables or command substitution to build the list. For example, let's say that we want to copy a new.kshrc file into the home directory of several users. A for loop is the easiest way to do so:
for name in ralph norton alice edith archie do echo $name cp /tmp/.kshrc.new /users/$name/.kshrc done
This example can be extended to copy certain files to several machines using the rcp command and verify that they got there using the remsh command:
for host in neptune jupiter mars earth sun do echo $host rcp /etc/passwd /etc/hosts $host:/etc rcp /.profile $host:/.profile remsh $host ll /etc/passwd /etc/hosts /.profile done
You can also process lists of files in the current directory using command substitution to generate the list_of_items:
for file in 'ls' do if [ -r $file ] then echo "$file is readable fi done
Note that for file in* would have done the same thing.
If you have a large list of things you would like to loop through and you don't want to type them on the command line, you can enter them in a file instead. Then, using the cat command and command substitution, you can generate the list_of_items:
for i in 'cat important_files' do # do something with each of the files listed in the # important_files file. done
The for loop, however, is most commonly used to process the list of command line arguments ($*):
for name in $* do if [ ! -f $name -a ! -d $name ] then echo "$name is not a valid file or directory name" else # do something with the file or directory fi done
The upcoming trash program contains a for loop that processes command-line arguments in a similar way.
The while Loop
The while loop has the following format:
while cmd1 do cmdA cmdB cmdC done
cmd1 is executed first. If it executes successfully, then the commands between the do and the done statements are executed. cmd1 is then executed again; if successful, the commands in the loop are executed again, and so on. When cmd1 fails, the program jumps past the done statement and resumes execution with the next executable statement.
Most of the time, the command executed in place of cmd1 is the test command. You can then perform logical tests as described in the if section. If the test succeeds (is true), the commands in the loop are executed and the script tests the condition again. The while loop is useful if you have a fixed number of times you want the loop to run or if you want something to happen until some condition is met.

Let's now take a look at an example of using while. We'llrun the netstat command once every 30 seconds a total of ten times, looking for the output of our primary LAN interface. In the case of the Solaris system on which we are running, this will be le0. Keep in mind that your primary LAN interface may have a different name, almost surely if you are not using a Solaris system. Let's first take a look at our short program.
This program displays the primary LAN interface (le0) statistics, which may be lan0 or some other name depending on the UNIX variant you are using, using netstat ten times, once every 30 seconds:
#!/bin/ksh i=1 while [ $i -le 10 ] do print $i netstat -i | grep le0 sleep 30 let i=i+1 done
We increment i in a very simple fashion by adding one to it each time through the loop. We evaluate the value of i every time through the loop to determine whether it is less than or equal to (le) ten. Ifso, we run netstat -i.
Before we run this program, called net1, let'srun the netstat -i command to view its output, and then run net1. Please keep in mind that the netstat command varies greatly among UNIX variants, so your output may look much different.
martyp $ netstat -i Name Mtu Net/Dest Address Ipkts Ierrs Opkts Oerrs Collis Queue lo0 8232 loopback localhost 18927030 0 18927030 0 0 0 le0 1500 sunsys sunsys 310417964 0 17193381 52064 7573173 sunsys:/home/martyp/shellprogs martyp $ net1 1 le0 1500 sunsys sunsys 310418018 0 17193388 52064 7573173 2 le0 1500 sunsys sunsys 310418738 0 17193395 52064 7573173 3 le0 1500 sunsys sunsys 310419579 0 17193401 52064 7573173 4 le0 1500 sunsys sunsys 310420295 0 17193405 52064 7573173 5 le0 1500 sunsys sunsys 310421099 0 17193446 52064 7573173 6 le0 1500 sunsys sunsys 310421786 0 17193455 52064 7573173 7 le0 1500 sunsys sunsys 310422425 0 17193462 52064 7573173 8 le0 1500 sunsys sunsys 310423089 0 17193467 52064 7573173 9 le0 1500 sunsys sunsys 310423749 0 17193471 52064 7573173 10 le0 1500 sunsys sunsys 310424507 0 17193478 52064 7573173 sunsys:/home/martyp/shellprogs martyp $
net1 produces just the output we want for le0 every 30 seconds on our system, called sunsys. We also print out the value of i each time through the loop just so that we can see that we are incrementing it properly.
On HP-UX 11i systems, the netstat command was modified to provide less information. The lanadmin command can be used to supply detailed information on collisions and errors. The following script runs lanscan to automatically produce a list of network interface cards on an 11i system and then produces a lanadmin output for each card.
#!/bin/sh #@(#) $Header: $ #@(#) Description: Script to create network stats output with lanadmin #@(#) $Source: $ #@(#) $Locker: $ #@(#) $Log: $ #@(#) # INPUT: # OUTPUT: # FILES ACCESSED: # NOTES: # AUTHOR: # REVISION HISTORY: # Setup path PATH=/bin:/usr/bin:/usr/sbin/:/usr/local/bin/;export PATH # # Determine OS Revision level # run lanscan to determine network cards # OS_VERSION=$(uname -r | awk -F. '{print $2}') if [ $OS_VERSION -lt 10 ] then COMMAND1=/bin/landiag else COMMAND1=/usr/sbin/lanadmin fi if [ -x $COMMAND1 ] then COMMAND2=/usr/sbin/lanscan if [ -x $COMMAND2 ] then if [ $OS_VERSION -lt 10 ] then for CARD in 'ls -1 /dev/lan* | awk -F "/" '{print $3}'' do echo "" $COMMAND1 -t <<- EOF 2> /dev/null | egrep "=" lan name $CARD display quit EOF done # # use field 3 of lanscan output to obtain card instance used for ppa below # else for NMID in '$COMMAND2 | grep 0x | awk '{print $3}'' do echo "" $COMMAND1 -t <<- EOF 2> /dev/null | egrep "=" lan ppa $NMID display quit EOF done fi else print print print "The command \"$COMMAND2\" is not executable" print "No data from \"$COMMAND1\" will be collected" print print fi else print print print "The command \"$COMMAND1\" is not executable" print print fi Field three of lanscan is used to provide the ppa information to lanadmin as the card instance for which a lanadmin output will be produced. The following is the lanscan output and result of running the script on a system with five network cards that are ppa 0 through 1:
# lanscan Hardware Station Crd Hdw Net-Interface NM MAC HP-DLPI DLPI Path Address In# State NamePPA ID Type Support Mjr# 0/0/0/0 0x001083FEDCB7 0 UP lan0 snap0 1 ETHER Yes 119 0/4/0/0/4/0 0x001083F72ED0 1 UP lan1 snap1 2 ETHER Yes 119 0/4/0/0/5/0 0x001083F72E9B 2 UP lan2 snap2 3 ETHER Yes 119 0/4/0/0/6/0 0x001083F77E22 3 UP lan3 snap3 4 ETHER Yes 119 0/4/0/0/7/0 0x001083F71E59 4 UP lan4 snap4 5 ETHER Yes 119 # networkscript.sh PPA Number = 0 Description = lan0 Hewlett-Packard 10/100 TX Half-Duplex TT = 1500 Type (value) = ethernet-csmacd(6) MTU Size = 1500 Speed = 10000000 Station Address = 0x1083fedcb7 Administration Status (value) = up(1) Operation Status (value) = down(2) Last Change = 10440 Inbound Octets = 0 Inbound Unicast Packets = 0 Inbound Non-Unicast Packets = 0 Inbound Discards = 0 Inbound Errors = 0 Inbound Unknown Protocols = 0 Outbound Octets = 820 Outbound Unicast Packets = 20 Outbound Non-Unicast Packets = 0 Outbound Discards = 0 Outbound Errors = 0 Outbound Queue Length = 0 Specific = 655367 Index = 1 Alignment Errors = 0 FCS Errors = 0 Single Collision Frames = 0 Multiple Collision Frames = 0 Deferred Transmissions = 0 Late Collisions = 0 Excessive Collisions = 0 Internal MAC Transmit Errors = 0 Carrier Sense Errors = 0 Frames Too Long = 0 Internal MAC Receive Errors = 0 PPA Number = 1 Description = lan1 Hewlett-Packard 10/100 TX Full-Duplex TT = 1500 Type (value) = ethernet-csmacd(6) MTU Size = 1500 Speed = 100000000 Station Address = 0x1083f72ed0 Administration Status (value) = up(1) Operation Status (value) = up(1) Last Change = 11018 Inbound Octets = 2778542151 Inbound Unicast Packets = 10008640 Inbound Non-Unicast Packets = 14480929 Inbound Discards = 0 Inbound Errors = 0 Inbound Unknown Protocols = 12443000 Outbound Octets = 3811379313 Outbound Unicast Packets = 18378160 Outbound Non-Unicast Packets = 50019 Outbound Discards = 0 Outbound Errors = 0 Outbound Queue Length = 0 Specific = 655367 Index = 2 Alignment Errors = 0 FCS Errors = 0 Single Collision Frames = 0 Multiple Collision Frames = 0 Deferred Transmissions = 0 Late Collisions = 0 Excessive Collisions = 0 Internal MAC Transmit Errors = 0 Carrier Sense Errors = 0 Frames Too Long = 0 Internal MAC Receive Errors = 0 PPA Number = 2 Description = lan2 Hewlett-Packard 10/100 TX Full-Duplex TT = 1500 Type (value) = ethernet-csmacd(6) MTU Size = 1500 Speed = 100000000 Station Address = 0x1083f72e9b Administration Status (value) = up(1) Operation Status (value) = up(1) Last Change = 12223 Inbound Octets = 1053052283 Inbound Unicast Packets = 660 Inbound Non-Unicast Packets = 14478087 Inbound Discards = 0 Inbound Errors = 0 Inbound Unknown Protocols = 12442909 Outbound Octets = 5802138 Outbound Unicast Packets = 43576 Outbound Non-Unicast Packets = 43065 Outbound Discards = 0 Outbound Errors = 0 Outbound Queue Length = 0 Specific = 655367 Index = 3 Alignment Errors = 0 FCS Errors = 0 Single Collision Frames = 0 Multiple Collision Frames = 0 Deferred Transmissions = 0 Late Collisions = 0 Excessive Collisions = 0 Internal MAC Transmit Errors = 0 Carrier Sense Errors = 0 Frames Too Long = 0 Internal MAC Receive Errors = 0 PPA Number = 3 Description = lan3 Hewlett-Packard 10/100 TX Full-Duplex TT = 1500 Type (value) = ethernet-csmacd(6) MTU Size = 1500 Speed = 100000000 Station Address = 0x1083f77e22 Administration Status (value) = up(1) Operation Status (value) = up(1) Last Change = 13428 Inbound Octets = 943616591 Inbound Unicast Packets = 9064639 Inbound Non-Unicast Packets = 765175 Inbound Discards = 0 Inbound Errors = 0 Inbound Unknown Protocols = 39 Outbound Octets = 6454687 Outbound Unicast Packets = 58769 Outbound Non-Unicast Packets = 43040 Outbound Discards = 0 Outbound Errors = 0 Outbound Queue Length = 0 Specific = 655367 Index = 4 Alignment Errors = 0 FCS Errors = 0 Single Collision Frames = 0 Multiple Collision Frames = 0 Deferred Transmissions = 0 Late Collisions = 0 Excessive Collisions = 0 Internal MAC Transmit Errors = 0 Carrier Sense Errors = 0 Frames Too Long = 0 Internal MAC Receive Errors = 0 PPA Number = 4 Description = lan4 Hewlett-Packard 10/100 TX Full-Duplex TT = 1500 Type (value) = ethernet-csmacd(6) MTU Size = 1500 Speed = 100000000 Station Address = 0x1083f71e59 Administration Status (value) = up(1) Operation Status (value) = up(1) Last Change = 14633 Inbound Octets = 249984023 Inbound Unicast Packets = 2628160 Inbound Non-Unicast Packets = 765196 Inbound Discards = 0 Inbound Errors = 0 Inbound Unknown Protocols = 49 Outbound Octets = 3886863362 Outbound Unicast Packets = 10894938 Outbound Non-Unicast Packets = 425625 Outbound Discards = 0 Outbound Errors = 0 Outbound Queue Length = 0 Specific = 655367 Index = 5 Alignment Errors = 0 FCS Errors = 0 Single Collision Frames = 0 Multiple Collision Frames = 0 Deferred Transmissions = 0 Late Collisions = 0 Excessive Collisions = 0 Internal MAC Transmit Errors = 0 Carrier Sense Errors = 0 Frames Too Long = 0 Internal MAC Receive Errors = 0 Immediately before lanscan is run, our script prints the ppa number so that we know the network interface card for which the lanscan output is produced.
For all five network cards in our example, there are no collisions or errors, as shown near the end of each lanadmin output; however, these fields are produced by lanadmin.
The while loop can also be used to process command-line arguments one at a time, using the number of command-line arguments and the shift command:
while [ $# -ne 0 ] do case $1 in -*) # $1 must be an option because it starts with - # Add it to the list of options: opts="$opts $1" ;; *) # $1 must be an argument. Add it to the list of # command-line arguments: args="$args $1" ;; esac shift done
The shift command shifts the remaining arguments in $* to the left by one position and decrements $#. What was the first argument ($1) is now gone forever; what was in $2 is now in $1, etc. In theprocess of shifting command-line arguments, $# is also decremented to accurately reflect the number of arguments left in $*.
You may want some commands to run until the user stops the program or until some stop condition is met. An infinite while loop is the best way to do so. For example, let's say that we are prompting users for some input and we will continue to prompt them until they give us valid input:
while true do # prompt users and get their response echo "Enter yes or no: \c" read ans # Check whether the response is valid if [ "$ans" == "yes" -o "$ans" == "no" ] then # If it is valid, stop the looping break else # Otherwise print an error message and try it again # from the top of the loop echo "Invalid input, try again!\n" fi done # Now that we have valid input, we can process the user's # request . . . true is a special command that always executes successfully. The loop does not terminate unless the user stops the program by killing it or until a break command is executed in the loop. The break command will stop the loop.
Shell Functions
As you write shell programs, you will notice that there are certain sets of commands which appear in many places within a program. For example, several times in a script, you may check user input and issue an appropriate message if the input is invalid. It can be tedious to type the same lines of code in your program numerous times. It can be a nuisance if you later want to change these lines.
Instead, you can you can put these commands into a shell function. Functions look and act like a new command that can be used inside the script. Here's an example of a basic shell function:
# This is a function that may be called from anywhere within # the program. It displays a standard usage error message # and then exits the program. print_usage() { echo "Usage:" echo "To trash files: $0 [-i] files_to_trash..." echo "Display trashed files: $0 -d" echo "Remove all trashed files: $0 -rm" echo "Print this message: $0 -help" exit 1 } print_usage is now a new command in your shell program. You can use it anywhere in this script.
Shell functions also have their own set of positional parameters ($1-$9, $#, and $*), so you can pass them as arguments just as any other command. The only nuance is that $0 represents the name of the shell program, not the name of the function.
Earlier, we talked about arguments. When you type the name of the shell script, you can supply arguments that are saved in the variables $1 through $9. The first ten words on the command line are directly accessible in the shell program using the special variables $0-$9. The following shows how they work:
| $0 | The command name |
| $1 | The first argument |
| $2 | The second argument |
| $3 | . |
| . | |
| . | |
| $9 | The ninth argument |
If you are not sure how many command-line arguments you may get when your program is run, there are two other variables that can help:
| $# | The number of command-line arguments |
| $* | A space-separated list of all of the command-line arguments (which does not include the command name). |
The variable $* is commonly used with a for loop to process shell script command lines with any number of arguments.
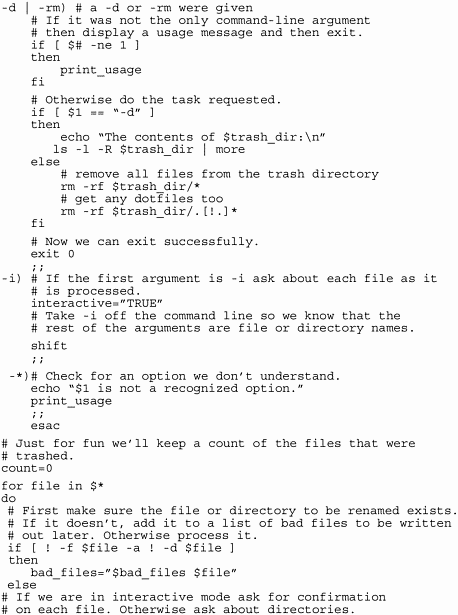
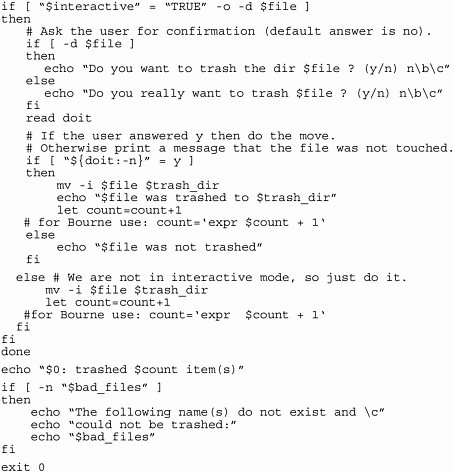
Figure 12-4 is a fairly complex program that exercises all the concepts we have covered so far. It is a trash program that removes files from their original locations. Instead of removing them permanently, it places them in a trash can in your home directory. This is a fairly robust program, but I'm sure that you can think of many extensions as you read through it.
Figure 12-4. trash Shell Program
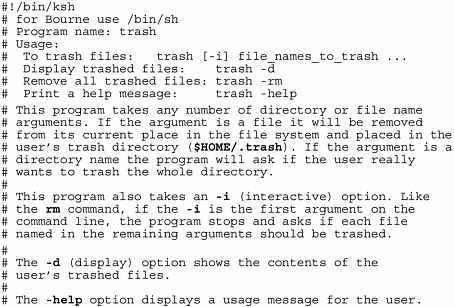
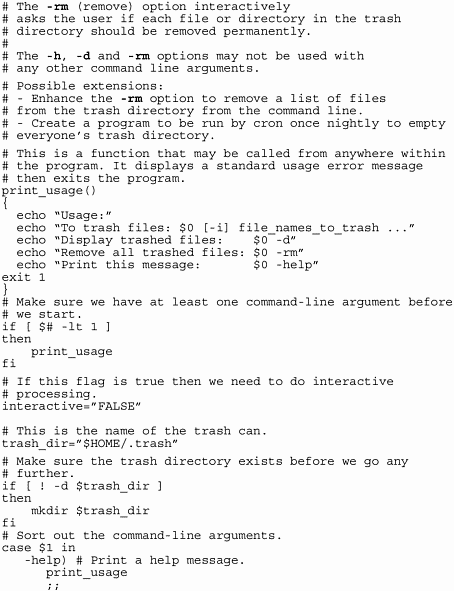
Let's now run the trash program. The following example shows issuing just the program named trash, the next example shows issuing trash -help, the next example shows issuing trash -i junk to interactively remove the file junk, and the last example shows issuing trash -d to display files that have been removed with trash and are in the /home/martyp/trash directory:
martyp $ trash Usage: To trash files: trash [-i] file_names_to_trash ... Display trashed files: trash -d Remove all trashed files: trash -rm Print this message: trash -help martyp $ trash -help Usage: To trash files: trash [-i] file_names_to_trash ... Display trashed files: trash -d Remove all trashed files: trash -rm Print this message: trash -help martyp $ trash -i junk Do you really want to trash junk ? (y/n) y mv: overwrite /home/martyp/.trash/junk (yes/no)? yes junk was trashed to /home/martyp/.trash trash: trashed 1 item(s) martyp $ trash -d The contents of /home/martyp/.trash: /home/martyp/.trash: total 1364 -rw------- 1 martyp staff 684808 May 30 05:31 core -rwxrwxr-x 1 martyp staff 631 May 30 06:45 file1 -rwxrwxr-x 1 martyp staff 45 May 31 06:04 junk martyp $
Notice that when we removed the file junk, trash asked us whether we wanted tooverwrite a filebythe same name that hadbeen earlier removed with trash and placed in the /home/martyp/trash directory.
This program employs every concept we have covered in this shell programming chapter so far. You may want to take a close look at this program so that you can use these techniques in the programs you craft. I have also included comments for the lines that need to be changed to make this program work in the Bourne shell. The KornShell and the Bourne shell are very similar, so you can use most of the same techniques when writing programs for these two shells.
awk in Shell Programs

awk is a very powerful symbolic programming language and data manipulation tool.
Simply stated, awk searches for patterns in lines of input (from standard input or from a file). For each line that matches the specified pattern, it can perform some very complex processing on that line. The code to actually process matching lines of input is a cross between a shell script and a C program.


Data manipulation tasks that would be very complex with combinations of grep, cut, and paste are very easily done with awk. Because awk is a programming language, it can also perform mathematical operations or check the input very easily, a task that is normally difficult with shells. It can even perform floating-point math.
The basic form of an awk program looks like this:
awk '/pattern_to_match/ { program to run }' input_file_names Notice that the whole program is enclosed in single quotes. If no input file names are specified, awk reads from standard input (as from a pipe).
The pattern_to_match must appear between the / (slash) characters. The pattern is actually called a regular expression. Some common regular expression examples are shown shortly.
The program to execute is written in awk code, which looks something like C. The program is executed whenever a line of input matches the pattern_to_match. If /pattern_to_match/ does not precede the program in {}, then the program is executed for every line of input.
awk works with fields of the input lines. Fields are words separated by white space. The fields in awk patterns and programs are referenced with $, followed by the field number. For example, the second field of an input line is $2. If you are using an awk command in your shell programs, the fields ($1, $2, etc.) are not confused with the shell script's positional parameters, because the awk variables are enclosed in single quotes and the shell ignores them.
But I don't want to just talk about it. Let's take a look at some examples.
This simple example lists only the terminals that are active on your system in which the terminal name is the second field of a who listing:
who | awk '{ print $2 }' Here is an example of running who and then running this one-line command:
martyp $ who thomfsu console Feb 22 15:21 (:0) martyp pts/3 May 31 06:03 (atlm0216.atl.hp.com) martyp $ who | awk '{print $2}' console pts/3 martyp $
This output shows only the active terminals on the system.
Note that cut could have done this also, but you would have had to know exactly which columns the terminal name occupied in the who output, as shown below:
martyp $ who thomfsu console Feb 22 15:21 (:0) martyp pts/3 May 31 06:03 (atlm0216.atl.hp.com) martyp $ who | cut -c12-20 console pts/3 martyp $
If the user or terminal name is longer than normal in any line, this command does not work. The awk example will work because it looks at fields, not columns.
Some trivia to wow your friends with at your next cocktail party: awk is the first letter of the last names of its authors - Alfred Aho, Peter Weinberger, and Brian Kernighan.
An HP-UX Logical Volume Manager Shell Program
In a section of Chapter 8 covering "Adding Disks," I provided an example of the HP-UX steps required to manually add a volume group consisting of five primary disks and five alternate disks. This manual procedure was done for one of ten volume groups. The remaining nine volume groups would have to be added using the same manual procedure, changing the names of the disks and volume groups as part of the manual procedure. Since manually performing these steps is highly error-prone, this is an ideal procedure to automate with a shell program.
To begin automating this procedure, let's take a look at the file that contains the physical disks to be used for the primary and alternate paths on the XP 256. The XP 256 is an advanced storage device that has in it the capability to failover to an alternate controller should the primary controller fail. The same sets of disks are connected to the primary and alternate controller, but the disks are given two different sets of device files. One set is for the disks when connected to the primary controller and the second set is for the same disks when connected to the alternate controllers. This is the same concept that you may have encountered if you are a ServiceGuard user. There is a set of disks connected through two different paths, so you must define the disks with different names depending on whether they are connected through the primary or alternate path. The following is a listing of the file pri containing the primary disks in groups of five:
c9t0d0 c9t0d1 c9t0d2 c8t0d0 c8t0d1 c7t0d0 c7t0d1 c7t0d2 c10t0d0 c10t0d1 c9t0d3 c9t0d4 c9t0d5 c8t0d3 c8t0d4 c7t0d3 c7t0d4 c7t0d5 c10t0d3 c10t0d4 c9t0d6 c9t0d7 c9t1d0 c8t0d6 c8t0d7 c7t0d6 c7t0d7 c7t1d0 c10t0d6 c10t0d7 c9t1d1 c9t1d2 c9t1d3 c8t1d1 c8t1d2 c7t1d1 c7t1d2 c7t1d3 c10t1d1 c10t1d2 c9t1d4 c9t1d5 c9t1d6 c8t1d4 c8t1d5 c7t1d4 c7t1d5 c7t1d6 c10t1d4 c10t1d5
Notice that in this listing the disks have been grouped in fives. Each group of five disks will constitute a volume group. There are a total of 10 groups of five disks that will be placed in volume groups vgu01 through vgu10.
There will also be an alternate group of five disks. The alternate disks will be used in the event of a disk controller failover, as described earlier. The following is a listing of the file alt, containing a list of alternate disks in groups of five:
c8t8d0 c8t8d1 c8t8d2 c9t8d0 c9t8d1 c10t8d0 c10t8d1 c10t8d2 c7t8d0 c7t8d1 c8t8d3 c8t8d4 c8t8d5 c9t8d3 c9t8d4 c10t8d3 c10t8d4 c10t8d5 c7t8d3 c7t8d4 c8t8d6 c8t8d7 c8t9d0 c9t8d6 c9t8d7 c10t8d6 c10t8d7 c10t9d0 c7t8d6 c7t8d7 c8t9d1 c8t9d2 c8t9d3 c9t9d1 c9t9d2 c10t9d1 c10t9d2 c10t9d3 c7t9d1 c7t9d2 c8t9d4 c8t9d5 c8t9d6 c9t9d4 c9t9d5 c10t9d4 c10t9d5 c10t9d6 c7t9d4 c7t9d5
There are a total of 10 groups of alternate disks shown in this listing that will also be part of the volume groups vgu01 through vgu10. Using these primary and alternate disks that have been set up on the XP 256, we'll set up the appropriate volumes on the host system. In this example, the host system is a V-Class system.
Let's now cover the steps to manually create one of these volume groups. First, we'll create a physical volume for each of the disks in the volume group with the pvcreate command. Next, we'll create a directory for the volume group with mkdir, then create a device special file for the volume group within the directory with mknod. This will set up the directory and special file required for the first of the 10 volume groups. Next, we'll create the volume group in which the five primary disks will be contained using vgcreate. We'll specify the first disk when we create the volume group and then include the other disks in the volume group with vgextend. Then we will extend the volume group with vgextend to include the five alternate disks. The final step is to create a single logical volume for the entire volume group. You might want to create several logical volumes within a volume group but in our example, we need only one logical volume that consumes the entire capacity of the volume group, which is 8755 physical extents. The following procedure is the list of manual steps to create the first volume group, which we'll then automate with a shell program:
# pvcreate /dev/rdsk/c9t0d0 # run for each of the 5 pri disks # mkdir /dev/vgu01 # make dir for first vol group # mknod /dev/vgu01/group -c 64 0x01000 # create special file with major and minor numbers shown # vgcreate /dev/vgu01 /dev/dsk/c9t0d0 # Place first disk in volume group # vgextend /dev/vgu01 /dev/dsk/c9t0d1 # extend volume with remaining four primary disks disks # vgextend /dev/vgu01 /dev/dsk/c8t8d0 # extend volume group to include five alternte disks # lvcreate -l 8755 /dev/vgu01 # creates lvol1 (lvol1 by default) that consumes all 8755 extents
We completed the procedure for only one disk and there are nine additional disks in this volume group. In addition, there are another nine volume groups for which this procedure must be completed. That is a total of an additional 99 disks for which various commands must be run. There is a lot of room for error with that much typing involved, so this is an ideal process to automate.
Since there are a primary set of disks and an alternate set of disks, we'll write a short program to automate each procedure. The following program performs all of the steps required to create a physical volume for each disk, create a volume group, and include the primary disks in it:
#!/bin/ksh set -x ;set tracing on vgnum=$1 ;first item on each line is the volume group no. shift ;shift to get to first disk for i in $* ;run pvcreate for every disk name in first line do pvcreate /dev/rdsk/$i done reada ;pause program to view what has been run mkdir /dev/vgu$vgnum ;mkdir for volume group mknod /dev/vgu$vgnum/group c 0x$(vgnum)0000 ;mknod for volume group vgcreate /dev/vgu$vgnum /dev/dsk/$1 ;vgcreate 1st disk in vg shift ;shift over to second disk for i in $* ;extend volume group to include remaining four disks do vgextend /dev/vgu$vgnum /dev/dsk/$i done lvcreate -l 8755 /dev/vgu$vgnum ;create single log vol for entire vg
I use set -x in this file to turn on execution tracing. I always do this when first debugging a shell program so you can see the lines in the shell program as they are executed. The line being executed will appear with a "+" in front of it, followed by what you would normally see when the program is run. The read a is a way of pausing the program to wait for input so I can review what has been run up to that point in the program.
In order for this program to run, we have to slightly modify the file containing the primary disk devices and add the volume group number to the beginning of each line. In addition I decided to call the program from the file that has the primary disks in it and operate on one line of disks at a time. The following listing shows the updated file containing the name of the shell program in the previous listing (vg.sh) followed by the volume group number and then the list of five primary disks names for each volume group:
#vg.sh 01 c9t0d0 c9t0d1 c9t0d2 c8t0d0 c8t0d1 #read a #vg.sh 02 c7t0d0 c7t0d1 c7t0d2 c10t0d0 c10t0d1 #read a #vg.sh 03 c9t0d3 c9t0d4 c9t0d5 c8t0d3 c8t0d4 #read a #vg.sh 04 c7t0d3 c7t0d4 c7t0d5 c10t0d3 c10t0d4 #read a #vg.sh 05 c9t0d6 c9t0d7 c9t1d0 c8t0d6 c8t0d7 #read a #vg.sh 06 c7t0d6 c7t0d7 c7t1d0 c10t0d6 c10t0d7 #read a #vg.sh 07 c9t1d1 c9t1d2 c9t1d3 c8t1d1 c8t1d2 #read a #vg.sh 08 c7t1d1 c7t1d2 c7t1d3 c10t1d1 c10t1d2 #read a #vg.sh 09 c9t1d4 c9t1d5 c9t1d6 c8t1d4 c8t1d5 #read a #vg.sh 10 c7t1d4 c7t1d5 c7t1d6 c10t1d4 c10t1d5
The read a between lines of this file will pause and wait for you to enter a Return before the next line will be executed. I did this in case I decided to run several lines and I wanted to check the results between the execution of lines.
We can now uncomment the first line of the file and type the file name pri and it will call vg.sh and run the program (you have to give appropriate permissions to the files and make sure both vg.sh and pri are executable). I like to run such files one line at a time and check the volume groups as they are created. The script is written to run one line at a time, but is easily modifiable to run all 10 lines.
We need to do much less work with the alternate disk names. The physical volumes have already been created, and the volume group and single logical volume already set up in vg.sh. We'll create another script called vga.sh, "a" for alternate, in which we'll extend the volume group to include the alternate name for each disk. This script is shown in the listing below:
#!/bin/ksh set -x ;set tracing on vgnum=$1 ;first item on each line is the volume group number shift ;shift to get to first disk for i in $* ;extend vol group to include all five disks on line vgextend /dev/vgu$vgnum /dev/dsk/$i done
This script performs only the task of extending the volume group vgnum to include all five disks that appear on the line. Much like the file pri, the file alt will call the script vga.alt as shown in the following listing:
#vga.sh 01 c8t8d0 c8t8d1 c8t8d2 c9t8d0 c9t8d1 #vga.sh 02 c10t8d0 c10t8d1 c10t8d2 c7t8d0 c7t8d1 #vga.sh 03 c8t8d3 c8t8d4 c8t8d5 c9t8d3 c9t8d4 #vga.sh 04 c10t8d3 c10t8d4 c10t8d5 c7t8d3 c7t8d4 #vga.sh 05 c8t8d6 c8t8d7 c8t9d0 c9t8d6 c9t8d7 #vga.sh 06 c10t8d6 c10t8d7 c10t9d0 c7t8d6 c7t8d7 #vga.sh 07 c8t9d1 c8t9d2 c8t9d3 c9t9d1 c9t9d2 #vga.sh 08 c10t9d1 c10t9d2 c10t9d3 c7t9d1 c7t9d2 #vga.sh 09 c8t9d4 c8t9d5 c8t9d6 c9t9d4 c9t9d5 #vga.sh 10 c10t9d4 c10t9d5 c10t9d6 c7t9d4 c7t9d5
You would uncomment the line for which you want to run the script. Again, you could run all ten lines, but I like to check what has taken place after each line has been run. You could add the read a between the lines of this file if you wanted to run several lines and have a pause between them to check the results.
These two scripts automate a lot of typing. There are 100 disks for which commands must be run as well as other Logical Volume Manager commands. This is the type of HP-UX system administration task that is ideally suited for shell programming.
I completed the steps that had to be run for the additional disks to complete the work such as the vgcreate for the addtional four disks and the vgextend for the additional nine disk devices. I included only the first disk in the examples so you could see the initial steps that had to be taken.
We don't have to set up any RAID levels within the primary or alternate volume because this is being done internally to the XP 256.
The following vgdisplay listing shows the disks we set up for volume group vgu01 with both the groups of five primary and alternate disks:
# vgdisplay /dev/vgu01 -v VG Name /dev/vgu01 VG Write Access read/write VG Status available Max LV 255 Cur LV 1 Open LV 1 Max PV 16 Cur PV 5 Act PV 5 Max PE per PV 1751 VGDA 10 PE Size (Mbytes) 4 Total PE 8755 Alloc PE 8755 Free PE 0 Total PVG 0 Total Spare PVs 0 Total Spare PVs in use 0 --- Logical volumes --- LV Name /dev/vgu01/lvol1 LV Status available/syncd LV Size (Mbytes) 35020 Current LE 8755 Allocated PE 8755 Used PV 5 --- Physical volumes --- PV Name /dev/dsk/c9t0d0 PV Name /dev/dsk/c8t8d0Alternate Link PV Status available Total PE 1751 Free PE 0 PV Name /dev/dsk/c9t0d1 PV Name /dev/dsk/c8t8d1Alternate Link PV Status available Total PE 1751 Free PE 0 PV Name /dev/dsk/c9t0d2 PV Name /dev/dsk/c8t8d2Alternate Link PV Status available Total PE 1751 Free PE 0 PV Name /dev/dsk/c8t0d0 PV Name /dev/dsk/c9t8d0Alternate Link PV Status available Total PE 1751 Free PE 0 PV Name /dev/dsk/c8t0d1 PV Name /dev/dsk/c9t8d1Alternate Link PV Status available Total PE 1751 Free PE 0 There are some points of interest to cover in this vgdisplay. The first is that there is a primary and alternate path to the same disk as we had defined them earlier. For instance, the first disk in the volume group has a primary path name of c9t0d0 and an alterate path name of c8t8d0. Next, both the volume group vgu01 and the only logical volume in it, lvol1, consist of a total of 8755 PE or physical extents (the size of a volume group is PE x PE size, or 8755 x 4MB in our case.)
We should also check one logical volume on vgu01 called lvol1. We can check the parameters of this logical volume with the lvdisplay command as shown in the following example:
# lvdisplay -v /dev/vgu01/l* --- Logical volumes --- LV Name /dev/vgu01/lvol1 VG Name /dev/vgu01 LV Permission read/write LV Status available/syncd Mirror copies 0 Consistency Recovery MWC Schedule parallel LV Size (Mbytes) 35020 Current LE 8755 Allocated PE 8755 Stripes 0 Stripe Size (Kbytes) 0 Bad block on Allocation strict IO Timeout (Seconds) default --- Distribution of logical volume --- PV Name LE on PV PE on PV /dev/dsk/c9t0d0 1751 1751 /dev/dsk/c9t0d1 1751 1751 /dev/dsk/c9t0d2 1751 1751 /dev/dsk/c8t0d0 1751 1751 /dev/dsk/c8t0d1 1751 1751 --- Logical extents --- LE PV1 PE1 Status 1 00000 /dev/dsk/c9t0d0 00000 current 00001 /dev/dsk/c9t0d0 00001 current 00002 /dev/dsk/c9t0d0 00002 current 00003 /dev/dsk/c9t0d0 00003 current 00004 /dev/dsk/c9t0d0 00004 current 00005 /dev/dsk/c9t0d0 00005 current 00006 /dev/dsk/c9t0d0 00006 current 00007 /dev/dsk/c9t0d0 00007 current 00008 /dev/dsk/c9t0d0 00008 current 00009 /dev/dsk/c9t0d0 00009 current 00010 /dev/dsk/c9t0d0 00010 current 00011 /dev/dsk/c9t0d0 00011 current 00012 /dev/dsk/c9t0d0 00012 current 00013 /dev/dsk/c9t0d0 00013 current 00014 /dev/dsk/c9t0d0 00014 current 00015 /dev/dsk/c9t0d0 00015 current 00016 /dev/dsk/c9t0d0 00016 current 00017 /dev/dsk/c9t0d0 00017 current 00018 /dev/dsk/c9t0d0 00018 current 00019 /dev/dsk/c9t0d0 00019 current 00020 /dev/dsk/c9t0d0 00020 current 00021 /dev/dsk/c9t0d0 00021 current 00022 /dev/dsk/c9t0d0 00022 current 00023 /dev/dsk/c9t0d0 00023 current 00024 /dev/dsk/c9t0d0 00024 current 00025 /dev/dsk/c9t0d0 00025 current 00026 /dev/dsk/c9t0d0 00026 current 00027 /dev/dsk/c9t0d0 00027 current 00028 /dev/dsk/c9t0d0 00028 current 00029 /dev/dsk/c9t0d0 00029 current 00030 /dev/dsk/c9t0d0 00030 current 00031 /dev/dsk/c9t0d0 00031 current 00032 /dev/dsk/c9t0d0 00032 current . . . 08733 /dev/dsk/c8t0d1 01729 current 08734 /dev/dsk/c8t0d1 01730 current 08735 /dev/dsk/c8t0d1 01731 current 08736 /dev/dsk/c8t0d1 01732 current 08737 /dev/dsk/c8t0d1 01733 current 08738 /dev/dsk/c8t0d1 01734 current 08739 /dev/dsk/c8t0d1 01735 current 08740 /dev/dsk/c8t0d1 01736 current 08741 /dev/dsk/c8t0d1 01737 current 08742 /dev/dsk/c8t0d1 01738 current 08743 /dev/dsk/c8t0d1 01739 current 08744 /dev/dsk/c8t0d1 01740 current 08745 /dev/dsk/c8t0d1 01741 current 08746 /dev/dsk/c8t0d1 01742 current 08747 /dev/dsk/c8t0d1 01743 current 08748 /dev/dsk/c8t0d1 01744 current 08749 /dev/dsk/c8t0d1 01745 current 08750 /dev/dsk/c8t0d1 01746 current 08751 /dev/dsk/c8t0d1 01747 current 08752 /dev/dsk/c8t0d1 01748 current 08753 /dev/dsk/c8t0d1 01749 current 08754 /dev/dsk/c8t0d1 01750 current
This listing has been abbreviated where the three dots are shown. Only the beginning of the first disk and end, of the last disk are shown. The lvdisplay does indeed show the five primary disks of which the logical volume is comprised.
The final step is to place a file system on the logical volume we have set up in vgu00. This is a taskfor whichSAM is ideallysuited. I completed this procedure using SAM in Chapter 8, so you can refer to it if you want to see the SAM screen shots.
The next section is a short introduction to C shell programming.
C Shell Programming
Although shell programming techniques apply to all shells, generally speaking, there are some differences exist between the C shell and the KornShell. If you are using the C shell, I want you to get off to a quick start, so I'll cover the basics of C shell programming in this section. I'll cover each shell programming technique briefly and use basic examples to help reinforce each technique. In all of the following shell programs, any line beginning with a "#" is a comment. This is true except for the very first line of a shell program in which the shell that the script is written for is executed. In all of the following programs, the C shell is executed with #!/bin/csh, which is the path of the C shell on the Solaris system used in the examples.
Command Substitution
The shell variables earlier covered can be used to save the output from a command. You can then use these variables when issuing other commands. The following shell program executes the date command and saves the results in the variable d. The variable d is then used within the echo command in the program cdate:
#!/bin/csh # program "today" that provides the date set d='date +%x' echo "Today's date is $d"
When we run cdate, the following is produced:
martyp $ cdate Today's date is 06/01/00 martyp $ The "+%x" in the above example produces the current date. Command substitution of this type is used in several upcoming shell scripts.
Reading User Input
Two common methods help you read user input to shell programs. The first is to prompt the user for information, and the second is to provide arguments to shell programs.
To begin, I'll cover prompting a user for information. A character, word, or sentence can be read into a variable. The following example first shows prompting the user for a word, and then a sentence:
#!/bin/csh echo "Please enter your name:" set name = $< echo "hello, $name" echo "Please enter your favorite quote:" set quote = $< echo "Your favorite quote is:" echo $quote
Here is an example of running this program:
martyp $ userinput Please enter your name: Marty hello, Marty Please enter your favorite quote: Creating is the essence of life. Your favorite quote is: Creating is the essence of life. martyp $
Using this technique, you can prompt a user for information in a shell program. This technique is used in an upcoming program.
You can also enter command line arguments. When you type the name of the shell script, you can supply arguments that are saved in the variables $1 through $9. The first ten words on the command line are directly accessible in the shell program using the special variables $0-$9. This is how they work:
| $0 | The command name |
| $1 | The first argument |
| $2 | The second argument |
| $3 | . |
| . | |
| . | |
| $9 | The ninth argument |
If you are not sure how many command-line arguments you may get when your program is run, there are two other variables that can help:
| $# | The number of command-line arguments |
| $* | A space-separated list of all the command-line arguments (which does not include the command name) |
The variable $* is commonly used with the for loop (soon to be explained) to process shell script command lines with any number of arguments.
The following script changes to the specified directory ($1) and searches for the specified pattern ($2) in the specified file ($3):
#!/bin/csh # search # Usage: search directory pattern file echo " " cd $1 # change to search dir and grep -n "$2" $3 # search for $2 in $3 echo " " # print line endif
grep is used to search a file for a pattern and print the line in which the pattern was found. awk, which was earlier covered, can be used to pick out a specific field within a line.
Here is an example of the search program:
martyp $ search /home/martyp/shellprogs awk ifstat 12:# as one command so it can be easily piped to awk. 18:awk 'BEGIN { printf "%10s%10s%10s%10s%10s\n", "ipkts", 38:' # End of the awk program. martyp $ In this example, we run search in the directory /home/martyp/ shellprogs, looking for the pattern awk in the file ifstat. The result of this search produces three lines in the file ifstat, in whichawk appears. These are lines number 12, 18, and 38.
In the next section, we'll expand this program somewhat to include testing and branching.
Testing and Branching
There are many kinds of decision-making that your shell programs can perform. if provides the flexibility to make decisions and take the appropriate action. Let's expand the search script to verify that three arguments have been provided:
#!/bin/csh # search # Usage: search directory pattern files if ($#argv != 3) then # if < 3 args provided echo "Usage: search directory pattern files" # then print Usage else echo " " # else print line and cd $1 # change to search dir grep -n "$2" $3 # search for $2 in $3 echo " " # print line endif
This program is called search1. We run this program using the same arguments as we did with the search program; however, search1 is enhanced to provide a usage message if we don't provide arguments when we run it. The following example shows running search1:
martyp $ search1 Usage: search directory pattern files martyp $ search1 /home/martyp/shellprogs awk llsum 12:# drwxrwxrwx 2 gerry aec 24 Mar 21 18:25 awk_ex 15:# awk field numbers: 18:awk ' BEGIN { x=i=0; printf "%-16s%-10s%8s%8s\n",\ martyp $
On the first attempt to run search1, we provided no arguments. The program checked to see whether we provided fewer than three arguments and produced the Usage message, because it found fewer than three arguments. Upon seeing the Usage message, it became clear how to use the program and we provided the required three arguments on the next attempt to run the program. In this example, we run search1 in the directory /home/martyp/shellprogs, looking for the pattern awk in the file llsum. The result of this search produces three lines in the file llsum, in whichawk appears. These are lines number 12, 15, and 18.

Here are four commonly used forms of if:
1) if (expression) command 2) if (expression) then command(s) endif 3) if (expression) then command(s) else command(s) endif 4) if (expression) then command(s) [else if expression) then command(s)] . . . [else command(s)] endif
There are many operators that can be used in the C shell to compare integer values, such as the < used in the previous example. Here is a list of operators:
| > | greater than |
| < | less than |
| >= | greater than or equal to |
| <= | less than or equal to |
| == | equal to |
| != | not equal to |
Looping
The C shell supports a number of techniques to support looping, including:
-
The foreach loop, which takes a list of items and performs the commands in the loop once for each item in the list.
-
The while loop, which executes a command (such as the test command) if the command executes successfully.
The format of the foreach loop is
foreach name (list) command(s) end
The following example uses a foreach loop to test whether or not the systems in the /etc/hosts file are connected to the local host.
#!/bin/csh #Program name: csh_hostck #This program will test connectivity to all other hosts in #your network listed in your /etc/hosts file. # It uses the awk command to get the names from the hosts file #and the ping command to check connectivity. #Note that we use /bin/echo because csh echo doesn't support #escape chars like \t or \c which are used in the #foreach loop. #Any line in /etc/hosts that starts with a number represents #a host entry. Anything else is a comment or a blank line. #Find all lines in /etc/hosts that start with a number and #print the second field (the hostname). set hosts='awk '/^[1-9]/ { print $2 }' /etc/hosts' # grave on outside, single quote on inside /bin/echo "Remote host connection status:" foreach sys ($hosts) /bin/echo "$sys - \c" # send one 64 byte packet and look for # the"is alive" message in # the output that indicates success. # messages vary between UNIX variants. ping $sys 64 1 | grep "is alive" > /dev/null if ( $status == 0 ) then echo "OK" else echo "DID NOT RESPOND" endif end
The crazy-looking line with awk is used to obtain the name of remote hosts from the /etc/hosts file. The foreach loop takes all of the items in the list, the hosts in this case, and checks the status of each.
The hosts file on this system has three entries: the localhost, the LAN interface, and a DNS system. When we run the program in the following example, we expect to see a result for the testing of all three entries:
martyp $ csh_hostck Remote host connection status: localhost - OK sunsys - OK dnssrv1 - OK martyp $ 
All three entries in the hosts file have been evaluated with ping and produce a status of OK. When hardcoding information into scripts, such as the path of ping and the result you get from the ping command, please keep in mind that these may vary among different UNIX variants. One of the reasons you want to liberally comment on your shell programs is to make them easy to modify under such cir-cumstances.
You could usethewhile loop to execute commands for some number of iterations. The while loop is in the following format:
while (expression) command(s) end
The following program, called netcheck, runs netstat at the desired interval, and prints out the heading once and the status of le0 nine times:
#!/bin/csh # program to run netstat at every specified interval # Usage: netcheck interval set limit=9 # set limit on number times # to run netstat echo " " netstat -i | grep Name # print netstat line with head ings set count=0 while ($count<$limit) # if limit hasn't reached # limit run netstat netstat -i | grep le0 sleep $1 # sleep for interval # specified on command line @ count++ # increment limit end echo "count has reached $limit, run netcheck again to see le0 status"
Here is an example run of the netcheck program:
martyp $ netcheck 3 Name Mtu Net/Dest Address Ipkts Ierrs Opkts Oerrs Collis Queue le0 1500 sunsys sunsys 314374989 0 17252200 52135 7580906 le0 1500 sunsys sunsys 314375038 0 17252203 52135 7580906 le0 1500 sunsys sunsys 314375114 0 17252206 52135 7580906 le0 1500 sunsys sunsys 314375185 0 17252209 52135 7580906 le0 1500 sunsys sunsys 314375257 0 17252212 52135 7580906 le0 1500 sunsys sunsys 314375332 0 17252215 52135 7580906 le0 1500 sunsys sunsys 314375444 0 17252218 52135 7580906 le0 1500 sunsys sunsys 314375508 0 17252221 52135 7580906 le0 1500 sunsys sunsys 314375588 0 17252224 52135 7580906 count has reached 9, run netcheck again to see le0 status martyp $
The output of netcheck produces nine netstat outputs at the three-second interval we had specified. Keep in mind that you may have to modify such information as the name of the LAN interface when you use this program on your system.
This program increments the expression with the following:
@count++ If the expression is true, then the command(s) will execute. The @count++ is an assignment operator in the form of:
@ variable_name operator expression In this case, the variable is first assigned with "=" and is later auto incremented (++). There are a number of operations that can be performed on the variable, as described in Table 12-2:
| Operation | Symbol | Example with count = 100 | Result |
|---|---|---|---|
| store value | = | @count=100 | 100 |
| auto increment | ++ | @count++ | 101 |
| auto decrement | -- | @count-- | 99 |
| add value | += | @count+=50 | 150 |
| subtract value | -= | @count-=50 | 50 |
| multiply by value | *= | @count*=2 | 200 |
| divide by value | /= | @count/2 | 50 |
There are also comparison operators, such as the "<" used in the example, as well as arithmetic, bitwise, and logical operators. As you craft more and more shell scripts, you will want to use all these operators.
There are a set of test conditions related to files that are useful when writing shell scripts that use files. Using the format - operator filename, you can use the tests in Table 12-3.
| Operator | Meaning |
|---|---|
| r | read access |
| w | write access |
| x | execute access |
| o | ownership |
| z | zero length |
| f | file, not a directory |
| d | directory, not a file |
The following program, called filetest, uses these operators to test the file.profile. Because.profile is not executable, of zero length, or a directory, I would expect filetest to find these false.
Here is a long listing of.profile:
martyp $ ls -al .profile -rw-r--r-- 1 martyp staff 594 May 21 09:29 ../.profile martyp $ Here is a listing of the shell script filetest:
#!/bin/csh # Program to test file $1 if (-e $1) then echo "$1 exists" else echo "$1 does not exist" endif if (-z $1) then echo "$1 is zero length" else echo "$1 is not zero length" endif if (-f $1) then echo "$1 is a file" else echo "$1 is not a file" endif if (-d $1) then echo "$1 is a directory" else echo "$1 is not a directory" endif if (-o $1) then echo "you own $1 " else echo "you don't own $1 " endif if (-r $1) then echo "$1 is readable" else echo "$1 is not readable" endif if (-w $1) then echo "$1 is writable" else echo "$1 is not writable" endif if (-x $1) then echo "$1 is executable" else echo "$1 is not executable" endif
This is a somewhat extreme example of testing a file; however, I wanted to include many of the file tests.
Here is the output of filetest using.profile as input:
martyp $ filetest /home/martyp/.profile /home/martyp/.profile exists /home/martyp/.profile is not zero length /home/martyp/.profile is a file /home/martyp/.profile is not a directory you own /home/martyp/.profile /home/martyp/.profile is readable /home/martyp/.profile is writable /home/martyp/.profile is not executable martyp $ The result of having run filetest on.profile produces the file test results that we expect.
The next section covers a way of making decisions with switch.
Decision Making with switch
You can use switch to make decisions within a shell program. You can use switch to test command-line arguments or interactive input to shell programs, as shown in the upcoming example. If, for example, you wanted to create a menu in a shell program and you needed to determine which option a user selected when running this shell program, you can use switch.
The syntax of switch looks like the following:
switch (pattern_to_match) case pattern1 commands breaksw case pattern2 commands breaksw case pattern 3 commands breaksw default commands breaksw endsw
pattern_to_match is the user input that you are testing, and if it is equal to pattern1, then the commands under pattern1 are executed. If pattern_to_match and pattern2 are the same, then the commands under pattern2 will be executed, and so on. If no match occurs between pattern_to_match and one of the case statement patterns, then the default is executed. The following program allows you to pick from between two scripts on its menu. These are the two shell programs we crafted earlier in this chapter. You can expand this script to include as many of your programs as you wish. This example uses switch:
#!/bin/csh # Program pickscript to run some of # the C shell scripts we've created # Usage: pickscript echo " ---------------------------------------------" echo " Sys Admin Menu " echo "----------------------------------------------" echo " " echo " 1 netcheck for network interface " echo " " echo " 2 hostck to check connection " echo " to hosts in /etc/hosts " echo " " echo " ---------------------------------------------" echo " " echo " Please enter your selection -> \c" set pick = $< # read input which is number of script echo " " switch ($pick) # and assign to variable pick case 1 # if 1 was selected execute this $HOME/cshscripts/netcheck 5 breaksw case 2 # if 2 was selected, execute this $HOME/cshscripts/hostck breaksw default echo "Please select 1 or 2 next time" breaksw endsw
This program allows us to select from between two scripts to run. Let's take a look at an example of running this program:
martyp $ pickscript --------------------------------------------- Sys Admin Menu ---------------------------------------------- 1 netcheck for network interface 2 hostck to check connection to hosts in /etc/hosts --------------------------------------------- Please enter your selection 1 Name Mtu Net/Dest Address Ipkts Ierrs Opkts Oerrs Collis Queue le0 1500 sunsys sunsys 314996747 0 17261251 52135 7580952 le0 1500 sunsys sunsys 314996862 0 17261256 52135 7580952 le0 1500 sunsys sunsys 314997189 0 17261266 52135 7580952 le0 1500 sunsys sunsys 314997319 0 17261269 52135 7580952 le0 1500 sunsys sunsys 314997420 0 17261272 52135 7580952 le0 1500 sunsys sunsys 314997630 0 17261275 52135 7580952 le0 1500 sunsys sunsys 314997774 0 17261278 52135 7580952 le0 1500 sunsys sunsys 314997904 0 17261281 52135 7580952 le0 1500 sunsys sunsys 314998020 0 17261284 52135 7580952 count has reached 9, run netcheck again to see lan0 status martyp $ We selected option 1 when we ran pickscript. You can use this program as the basis for running the many shell programs you may write.
Debugging C Shell Programs
When you begin C shell programming, you'll probably make a lot of simple syntax-related errors. Using the -n option to csh, you can have the C shell check the syntax of your program without executing it. I also use the -v option to produce a verbose output. This can sometimes lead to too much information, so I start with -v and if there is too much feedback results, I eliminate it.
The following example is the earlier search1 program, which includes a check that three arguments have been provided. When checking to see that $#argv is equal to 3, I left off the right parenthesis. Here is the listing of the program and a syntax check showing the error:

martyp $ cat search1 #!/bin/csh # search # Usage: search directory pattern files if ($#argv !3 3 then # if < 3 args provided echo "Usage: search directory pattern files" # then print Usage else echo " " # else print line and cd $1 # change to search dir grep -n "$2" $3 # search for $2 in $3 echo " " # print line endif martyp $ csh -nv search1 if ( $#argv != 3 then Too many ('s martyp $
The csh -nv has performed a syntax check with verbose output. First, the line in question is printed and then an error message that tells you what is wrong with the line. In this case, it is clear that I have left off a right parenthesis.
After fixing the problem, I can run the program with the -x, which causes all commands to be echoed immediately before execution. The following example shows a run of the search program:
martyp $ csh -xv search1 shellprogs grep csh_hostck if ( $#argv != 3 ) then if (3 != 3) then echo " " echo cd $1 cd /home/martyp/shellprogs grep -n "$2" $3 grep -n grep csh_hostck 25: /usr/sbin/ping $sys 64 1 | grep "is alive" > /dev/ null echo " " echo endif endif martyp $
You can follow what is taking place on a line-by-line basis. The line beginning with 25 is the line in the file csh_hostck that has grep in it, that is, the output you would have received if the program had been run without the -xv options.
I would recommend performing the syntax check (-n) with a new shell program, and then echo all commands with the -x option only if you get unexpected results when you run the program. The debugging options will surely help you at some point when you run into problems with the shell programs you craft.
How Long Does It Take?
You can use the time command to see a report of the amount of time your shell program takes to run. The output of time is different for many UNIX variants. You may want to view the manual page for time to see what output you can expect. A typical output of time when in csh is shown in Figure 12-5:
Figure 12-5. time Example (different among UNIX variants)
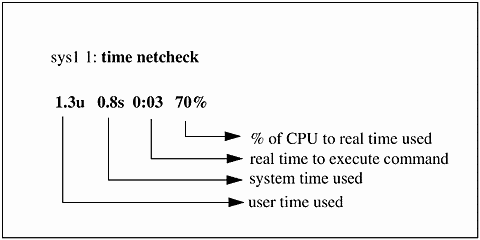
Because some of the scripts you write may consume a substantial amount of system resources, you may want to consider investigating some of the job-control capabilities of the C shell. The simplest job control you can use is to run scripts in the background so that the priority of the script is low. By issuing the script name followed by the & (ampersand), you will run the script in the background. If you run several scripts in the background, you can get the status of these by issuing the jobs command. This is a more advanced C shell topic, but, depending on the level of complexity of scripts you write, you may want to look into job control.
Manual Pages for Some Commands Used in Chapter 12
There are no manual pages included for this chapter. The manual pages for commands used in this chapter appear in other chapters, including:
ksh Chapter 10
grep, awk, sed, and other tools Chapter 6
| CONTENTS |
EAN: 2147483647
Pages: 34