| System administrators tend to be careful before running any intrusive (there is a chance something LVM-related will be changed) LVM commands. Always back up your system and create a bootable recovery tape with Ignite-UX before you run any intrusive LVM commands. The following are some procedures for tasks I have encountered on a regular basis. Please modify them to suit your needs. Don't run the commands as shown. You will need to prepare your system, substitute the names of your volumes, and perform additional steps. These commands, however, serve as good examples for ways in which the tasks shown can be performed. The first task we'll perform is to replace a bad disk in a system that is not mirrored (Figure 9-6). Figure 9-6. Replace a Non-Mirrored Disk 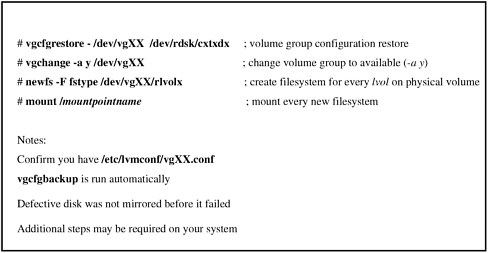 In this example we had a nonmirrored and nonroot disk that was defective and had to be replaced. After replacing the disk, the volume group information was restored for the specific disk with vgcfgrestore. We then changed the volume group to available, ran a newfs on the disk, and mounted the file systems that used the disk. In Figure 9-7 we will again replace a defective nonroot disk, but this time, the disk will be mirrored. Figure 9-7. Replace a Mirrored Disk 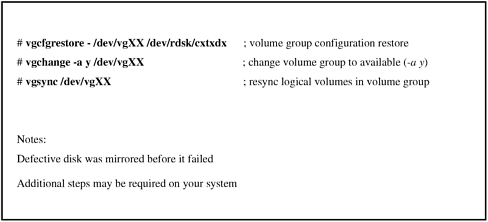 In this example, we performed the same first two steps of restoring the volume group configuration and changing the volume group to available. Because the disk was mirrored, we only have to synchronize the data on the new disk with that on its mirror with vgsync. In Figure 9-8 we will again replace a mirrored disk, but this time, the disk will have a boot area on it. Figure 9-8. Replace a Mirrored Disk Boot Disk 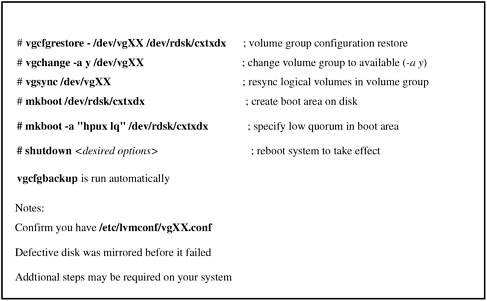 In this example, we performed the same first three steps as in the previous example, but we also have to create a boot area on the disk. The system has to be rebooted in order for this to take effect. In Figure 9-9, we want to move a volume group onto a different system. Figure 9-9. Exporting (Removing) and Importing a Volume Group Onto Another System  In this example we performed the first two steps on the system from which we're moving the volume group. We make the volume group unavailable and then export the volume group. The mapfile from the first system needs to be copied to the second system. You don't have to specify the mapfile name if standard names such as /dev/vg01 are used. In any event, the mapfile has to be copied to the system to which the volume group is being migrated. On the second system we create a directory and device special file for the new volume group. We then import the mapfile for the volume group and make the volume group active. The last step involved making additions to fstab for the filesystems to be mounted. Figure 9-10 shows extending a VxFS file system by 800 MBytes. Figure 9-10. Extend VxFS File System Using Online JFS 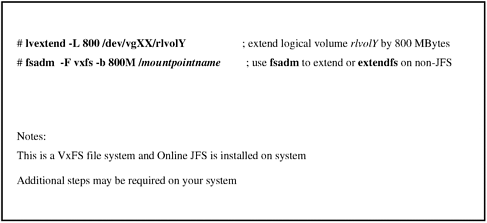 First, we use lvextend to specify the size and raw logical volume to be extended. Next we use fsadm to make the change. The Figure 9-11 shows changing a VxFS file system to support large files. Figure 9-11. Change a Logical Volume to Support Large Files 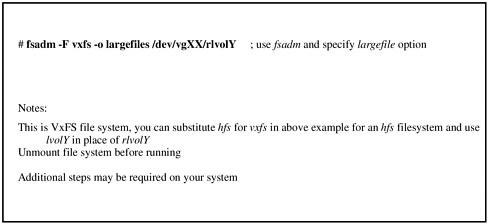 Using fsadm, we specify the raw logical volume on which we want large files supported. This change would be unnecessary had the logical volume been created to support large files. | 