| Logical Volume Manager is a disk management subsystem that allows you to manage physical disks as logical volumes. This means that a file system can span multiple physical disks. You can view Logical Volume Manager as a flexible way of defining boundaries of disk space that are independent of one another. Not only can you specify the size of a logical volume, but you can also change its size if the need arises. This possibility is a great advance-ment over dedicating a disk to a files ystem or having fixed-size partitions on a disk. Logical volumes can hold file systems, raw data, or swap space. You can now specify a logical volume to be any size you wish, have logical volumes that span multiple physical disks, and then change the size of the logical volume if you need to do so! So what do you need to know in order to set up Logical Volume Manager and realize all these great benefits? First, you need to know the terminology, and second, you need to know Logical Volume Manager commands. As with many other system administration tasks, you can use SAM to set up Logical Volume Manager for you. In fact, I recommend that you use SAM to set up Logical Volume Manager on your system(s). But, as usual, I recommend that you read this overview and at least understand the basics of Logical Volume Manager before you use SAM to set up Logical Volume Manager on your system. The SAM chapter (Chapter 11) has an example of using SAM to create logical volumes. After reading this section, you may want to take a quick look at that example. For use with the Journaled Filesystem (JFS), Hewlett-Packard has an add-on product called HP OnLineJFS. This handy product allows you to perform many of the LVM functions without going into single-user mode. For example, when a filesystem needs to be expanded, the logical volume on which it resides needs to be unmounted before the expansion takes place. Normally, that unmounting would mean shutting the system down into single-user mode so that no user or process could access the volume and it could then be unmounted. With OnLineJFS, the logical volumes and file systems are simply expanded with the system up and running and no interruption to users or processes. Logical Volume Manager Terms The following terms are used when working with Logical Volume Manager. They are only some of the terms associated with Logical Volume Manager, but they are enough for you to get started with Logical Volume Manager. You can work with Logical Volume Manager without knowing all these terms if you use SAM. It is a good idea, however, to read the following brief overview of these terms if you plan to use Logical Volume Manager, so you have some idea of what SAM is doing for you. | Volume | A volume is a device used for a file system, swap, or raw data. Without Logical Volume Manager, a volume would be either a disk partition or an entire disk drive. | | Physical Volume | A disk that has been not been initialized for use by Logical Volume Manager. An entire disk must be initialized if it is to be used by Logical Volume Manager; that is, you can't initialize only part of a disk for Logical Volume Manager use and the rest for fixed partitioning. | | Volume Group | A volume group is a collection of logical volumes that are managed by Logical Volume Manager. You would typically define which disks on your system are going to be used by Logical Volume Manager and then define how you wish to group these into volume groups. Each individual disk may be a volume group, or more than one disk may form a volume group. At this point, you have created a pool of disk space called a volume group. A disk can belong to only one volume group. A volume group may span multiple physical disks. | | Logical Volume | This is space that is defined within a volume group. A volume group is divided up into logical volumes. This is like a disk partition, which is of a fixed size, but you have the flexibility to change its size. A logical volume is contained within a volume group, but the volume group may span multiple physical disks. You can have alogical volume that is bigger than a single disk. | | Physical Extent | A set of contiguous disk blocks on a physical volume. If you define a disk to be a physical volume, then the contiguous blocks within that disk form a physical extent. Logical Volume Manager uses the physical extent as the unit for allocating disk space to logical volumes. If you use a small physical extent size, such as 1 MByte, then you have a fine granularity for defining logical volumes. If you use a large physical extent size such as 256 MBytes, then you have a coarse granularity for defining logical volumes. The default size is 4 MBytes. | | Logical Extent | A logical volume is a set of logical extents. Logical extents and physical extents are the same size within a volume group. Although logical and physical extents are the same size, this doesn't mean that two logical extents will map to two contiguous physical extents. It may be that you have two logical extents that end up being mapped to physical extents on different disks! |
Figure 9-1 graphically depicts some of the logical volume terms we just covered. In this diagram, you can see clearly that logical extents are not mapped to contiguous physical extents, because some of the physical extents are not used. Figure 9-1. Logical Volume Manager Partial Logical to Physical 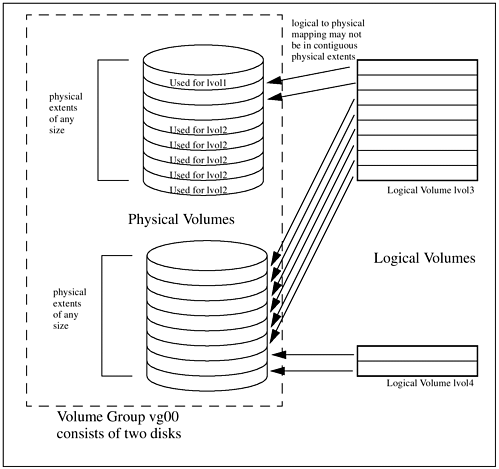 Disk Mirroring Logical volumes can be mirrored one or more times, creating an identical image of the logical volume. This means that a logical extent can map to more than one physical extent if mirrored. You may have an environment where you wish to mirror some or all of the logical volumes. SAM can be used to set up disk mirroring for you. You must first, however, decide the characteristics of your mirroring. There is a mirroring policy called "strict." You define one of the following three strict policies when you create the logical volume using the following options: | n | No, this is not a strict allocation policy, meaning that mirrored copies of a logical extent can share the same physical volume. This means that your original data and mirrored data may indeed be on the same physical disk. If you encounter a disk mechanism problem of some type, you may lose both your original and mirrored data. | | y | Yes, this is a strict allocation policy, meaning that mirrored copies of a logical extent may not share the same physical volume. This is safer than allowing mirrored copies of data to share the same physical volume. If you have a problem with a disk in this scenario, you are guaranteed that your original data is on a different physical disk from your mirrored data. Original data and mirrored data are always part of the same volume group even if you want them on different physical volumes. | | g | Mirrored data will not be on the same Physical Volume Group (PVG) as the original data. This policy is called a PVG-strict allocation policy. |
The strict allocation policy depends on your environment. Most installations that employ mirroring buy sufficient disk drives to mirror all data. In an environment such as this, I would create two volume groups, one for the original data and one for the mirrored data, and use the "strict -g" option when creating logical volumes so that the original data is on one volume group and the mirrored data on the other. Logical Volume Manager Commands The following are definitions of some of the more common Logical Volume Manager Commands. Many of these commands are found in the log file that SAM creates when setting up logical volumes for you. I am giving a description of these commands here so that when you see them, you'll have an idea of each command's use. Although these are not all of the Logical Volume Manager commands, these are the ones I use most often and are the commands you should have knowledge of when using Logical Volume Manager. The commands are grouped by physical volume (pv) commands, volume group (vg) commands, and logical volume (lv) commands. These commands are found in the manual pages. Some of the commands such as vgdisplay, pvdisplay, and lvdisplay, were issued so that you could see examples of these. The following output of bdf will be helpful to you when you view the output of Logical Volume Manager commands that are issued. The output of bdf shows several logical volumes mounted (lvol1, lvol3, lvol4, lvol5, lvol6, lvol7, lvol8), all of which are in volume group vg00 (see the bdf command overview later in this chapter). $ bdf | Files system | Kbytes | used | avail | %used | Mounted on |
|---|
| /dev/vg00/lvol3 | 47829 | 18428 | 24618 | 43% | / | | /dev/vg00/lvol1 | 67733 | 24736 | 36223 | 41 | /stand | | /dev/vg00/lvol8 | 34541 | 8673 | 22413 | 28% | /var | | /dev/vg00/lvol7 | 299157 | 149449 | 119792 | 56% | /usr | | /dev/vg00/lvol4 | 23013 | 48 | 20663 | 0% | /tmp | | /dev/vg00/lvol6 | 99669 | 32514 | 57188 | 36% | /opt | | /dev/vg00/lvol5 | 19861 | 9 | 17865 | 0% | /home | | /dev/dsk/c0t6d0 | 802212 | 552120 | 169870 | 76% | /mnt/9.x |
Physical Volume Commands | pvchange | This command is used to change a physical volume in some way. For example, you may wish to allow additional physical extents to be added to a physical volume if they are not permitted, or prohibit additional physical extents from being added to a physical volume if, indeed, they are allowed. | | pvcreate | This command is used to create a physical volume that will be part of a volume group. Remember that a volume group may consist of several physical volumes. The physical volumes are the disks on your system. | | pvdisplay | This command shows information about the physical volumes you specify. You can get a lot of information about the logical to physical mapping with this command if you use the verbose (-v) option. With -v pvdisplay will show you the mapping of logical to physical extents for the physical volumes specified. You get a lot of other useful data from this command, such as the name of the physical volume; the name of the volume group to which the physical volume belongs; the status of the physical volume; the size of physical extents on the physical volume; the total number of physical extents; and the number of free physical extents. The following is a partial example of running pvdisplay: $ pvdisplay -v /dev/dsk/c0t6d0 --- Physical volumes --- PV Name /dev/dsk/c0t1d0 VG Name /dev/vg00 PV Status available Allocatable yes VGDA 2 Cur LV 7 PE Size (Mbytes) 4 Total PE 157 Free PE 8 Allocated PE 149 Stale PE 0 --- Distribution of physical volume -- LV Name LE of LV PE for LV /dev/vg00/lvol1 12 12 /dev/vg00/lvol2 17 17 /dev/vg00/lvol6 75 75 /dev/vg00/lvol7 9 9 /dev/vg00/lvol4 25 25 /dev/vg00/lvol5 6 6 /dev/vg00/lvol3 5 5 --- Physical extents -- PE Status LV LE 0000 current /dev/vg00/lvol1 0000 0001 current /dev/vg00/lvol1 0001 0002 current /dev/vg00/lvol1 0002 0003 current /dev/vg00/lvol1 0003 0004 current /dev/vg00/lvol1 0004 0005 current /dev/vg00/lvol1 0005 0006 current /dev/vg00/lvol1 0006 0007 current /dev/vg00/lvol1 0007 0008 current /dev/vg00/lvol1 0008 0009 current /dev/vg00/lvol1 0009 0010 current /dev/vg00/lvol1 0010 0011 current /dev/vg00/lvol1 0011 0012 current /dev/vg00/lvol2 0000 0013 current /dev/vg00/lvol2 0001 0014 current /dev/vg00/lvol2 0002 0015 current /dev/vg00/lvol2 0003 0016 current /dev/vg00/lvol2 0004 0017 current /dev/vg00/lvol2 0005 0018 current /dev/vg00/lvol2 0006 0019 current /dev/vg00/lvol2 0007 0020 current /dev/vg00/lvol2 0008 0021 current /dev/vg00/lvol2 0009 0022 current /dev/vg00/lvol2 0010 0023 current /dev/vg00/lvol2 0011 0024 current /dev/vg00/lvol3 0000 0025 current /dev/vg00/lvol3 0001 0026 current /dev/vg00/lvol3 0002 0027 current /dev/vg00/lvol3 0003 0028 current /dev/vg00/lvol3 0004 0029 current /dev/vg00/lvol4 0000 0030 current /dev/vg00/lvol4 0001 0031 current /dev/vg00/lvol4 0002 0032 current /dev/vg00/lvol4 0003 0033 current /dev/vg00/lvol4 0004 0034 current /dev/vg00/lvol4 0005 0035 current /dev/vg00/lvol4 0006 . . . 0156 free 0000 From this listing, you can see that lvol1, which is roughly 48 MBytes, has many more physical extents assigned to it than lvol3, which is roughly 20 MBytes. | | pvmove | You can move physical extents from one physical volume to other physical volumes with this command. By specifying the source physical volume and one or more destination physical volumes, you can spread data around to the various physical volumes you wish with this command. |
Volume Group Commands | vgcfgbackup | This command is used to save the configuration information for a volume group. Remember that a volume group is made up of one or more physical volumes. SAM automatically runs this command after you make an LVM change. | | vgcfgrestore | This command is used to restore the configuration information for a volume group. | | vgchange | This command makes a volume group active or inactive. With the -a option, you can deactivate (-a n) a volume group or activate (-a y) a volume group. | | vgcreate | You can create a volume group and specify all of its parameters with this command. You specify a volume group name and all of the associated parameters for the volume group when creating it. | | vgdisplay | This displays all information related to the volume group if you use the verbose (-v) option, including the volume group name; the status of the volume group; the maximum, current, and open logical volumes in the volume group; the maximum, current, and active physical volumes in the volume group; and physical extent-related information. The following is an example of using vgdisplay for the volume group vg00: $ vgdisplay /dev/vg00 --- Volume groups --- VG Name /dev/vg00 VG Write Access read/write VG Status available Max LV 255 Cur LV 7 Open LV 7 Max PV 16 Cur PV 1 Act PV 1 Max PE per PV 2000 VGDA 2 PE Size (Mbytes) 4 Total PE 157 Alloc PE 149 Free PE 8 Total PVG 0 | | vgexport | This command removes a logical volume group from the system, but does not modify the logical volume information on the physical volumes. These physical volumes can then be imported to another system using vgimport. | | vgextend | Physical volumes can be added to a volume group with this command by specifying the physical volume to be added to the volume group. | | vgimport | This command can be used to import a physical volume to another system. | | vgreduce | The size of a volume group can be reduced with this command, by specifying which physical volume(s) to remove from a volume group. Make sure that the physical volume to be removed has no data on it before doing this. | | vgremove | A volume group definition can be completely removed from the system with this command. | | vgscan | In the event of a catastrophe of some type, you can use this command to scan your system in an effort to rebuild the /etc/lvmtab file. | | vgsync | There are times when mirrored data in a volume group becomes "stale" or out-of-date. vgsync is used to synchronize the physical extents in each mirrored logical volume in a volume group. |
Logical Volume Commands | lvcreate | This command is used to create a new logical volume. A logical volume is created within a volume group. A logical volume may span multiple disks, but must exist within a volume group. SAM will execute this command for you when you create a logical volume using SAM. Many options exist for this command, and two that you would often use are -L to define the size of the logical volume and -n to define the name of the logical volume. | | lvchange | This command is used to change the logical volume in some way. For example, you may wish to change the permission on a logical volume to read-write (w) or read (r) with the -p option. Or, you may want to change the strict policy (described under Disk Mirroring) to strict (y), not strict (n), or PVG strict (g). | | lvdisplay | This command shows the status and characteristics of every logical volume that you specify. If you use the verbose (-v) option of this command, you get a lot of useful data in many categories, including: 1) Information about the way in which the logical volumes are set up, such as the physical volume on which the logical extents appear; the number of local extents on a physical volume; and the number of physical extents on the physical volume. 2) Detailed information for logical extents, including the logical extent number and some information about the physical volume and physical extent for the logical extent. The following is an example of lvdisplay for the first of the logical volumes (lvol1) shown in the earlier bdf example: $ lvdisplay -v /dev/vg00/lvol1 --- Logical volumes -- LV Name /dev/vg00/lvol1 VG Name /dev/vg00 LV Permission read/write LV Status available/syncd Mirror copies 0 Consistency Recovery MWC Schedule parallel LV Size (Mbytes) 48 Current LE 12 Allocated PE 12 Stripes 0 Stripe Size (Kbytes) 0 Bad block off Allocation strict/contiguous --- Distribution of logical volume -- PV Name LE on PV PE on PV /dev/dsk/c0t1d0 12 12 --- Logical extents -- LE PV1 PE1 Status 1 0000 /dev/dsk/c0t1d0 0000 current 0001 /dev/dsk/c0t1d0 0001 current 0002 /dev/dsk/c0t1d0 0002 current 0003 /dev/dsk/c0t1d0 0003 current 0004 /dev/dsk/c0t1d0 0004 current 0005 /dev/dsk/c0t1d0 0005 current 0006 /dev/dsk/c0t1d0 0006 current 0007 /dev/dsk/c0t1d0 0007 current 0008 /dev/dsk/c0t1d0 0008 current 0009 /dev/dsk/c0t1d0 0009 current 0010 /dev/dsk/c0t1d0 0010 current 0011 /dev/dsk/c0t1d0 0011 current Although most of what is shown in this example is self-explanatory, some entries require explanation. The size of the logical volume is 48 MBytes, which consists of 12 Logical Extents (LEs,) and 12 Physical Extents (PE). This means that each physical extent is 4 MBytes in size (4 MBytes x 12 extents = 48 MBytes). We can ver-ify this by running the command to display the characteristics of the physical volume. At the bottom of this listing, you can see the mapping of logical extents onto physical extents. In this case a direct mapping takes place between logical extents 0000 - 0011 and physical extents 0000 -0011. | | lvextend | This command is used to increase the number of physical extents allocated to a logical volume. We so me times underestimate the size required for a logical volume, and with this command, you can easily correct this problem. You may want to extend a logical volume to increase the number of mirrored copies (using the -m option), to increase the size of the logical volume (using the -L option), or to increase the number of logical extents (using the -l option). | | extendfs | Use this command after lvextend. Where as the lvextend command expands the logical volume, extendfs expands the filesystem within the logical volume. If you forget to issue the extendfs command, the logical volume inside SAM will look expanded, but issuing the bdf command will not show the expansion. | | lvlnboot | Use this to set up a logical volume to be a root, boot, primary swap, or dump volume (this can be undone with lvrmboot). Issuing the lvlnboot command with the -v option gives the current settings. | | lvsplit and lvmerge | These commands are used to split and merge mirrored logical volumes, respectively. If you have a mirrored logical volume, lvsplit will split this into two logical volumes. lvmerge merges two logical volumes of the same size, increasing the number of mirrored copies. | | lvmmigrate | This command prepares a root file system in a disk partition for migration to a logical volume. You would use this if you had a partition to convert into a logical volume. | | lvreduce | Use this to decrease the number of physical extents allocated to a logical volume. When creating logical volumes, we sometimes overestimate the size of the logical volume. This command can be used to set the number of mirrored copies (with the -m option), decrease the number of logical extents (with the -l option), or decrease the size of the logical volume (with the -L option). Be careful when decreasing the size of a logical volume. You may make it smaller than the data in it. If you choose to do this, make sure that you have a good backup of your data. | | lvremove | After emptying a logical volume, you can use this command to remove logical volumes from a volume group. | | lvrmboot | Use this if you don't want a logical volume to be root, boot, primary swap, or a dump device (this is the converse of the lvlnboot command). However, unless you have a disk partition to boot from, don't leave the system without a root or boot device designated with the lvlnboot command or the system won't know where to boot from. | | lvsync | There are times when mirrored data in a logical volume becomes"stale" or out-of-date. lvsync is used to synchronize the physical extents in a logical volume. |
|
