| When assigning memory in Chapter 2, you use size.You can also specify base address and range as subset of size jusst as hwpath is a subset of min and num for CPUs. We chose to use the size. Table 5-1 shows the options related to assigning and changing memory. The first activity we have to perform is to find the amount of memory on a system so that we can assign portions of it to vPars. There are a variety of ways to determine the amount of memory on your system. The following shows only the memory-related output of the dmesg command when booting standard HP-UX in non-vPars mode: # dmesg Memory Information: IWBD / > cal page size = 4096 bytes, logical page size = 4096 bytes Physical: 4194304 Kbytes, lockable: 3180924 Kbytes, available: 3655192 Kbytes # This listing shows a Physical memory of 4GBytes. You could also run GlancePlus and select the Memory screen. Memory can easily be specified for a vPar with m::size, where size is in MBytes. To specify 2 GBytes in a virtual partition, you would use the option m::2048. After assigning memory to vPars you'll want to confirm that indeed each vPar has in it the amount of memory you specified. You can verify this in a variety of ways. The first is by issuing dmesg when booting Virtual Partitions. The Virtual Partitions Monitor boots only the devices you have specified as part of a Virtual Partition. The following example shows only the memory-related output of dmesg for cable1: Memory Information: cvhdcon3:/ # page size = 4096 bytes, logical page size = 4096 bytes Physical: 2096128 Kbytes, lockable: 1576748 Kbytes, available: 1815620 Kbytes Notice that this output shows 2 GBytes of RAM for cable1, as was specified when the vPar cable1 was created. This is different from the example in Chapter 2, where cable1 had one GByte of RAM. This is an indication of how low-level vPars work, in that resources were assigned to cable1 at the time of boot, ensuring that only the specified resources were assigned to the vPar. We can also view memory-related information by running GlancePlus and selecting the memory screen. The following screen shot shows the total memory of the system when booting standard HP-UX and not Virtual Partitions as we have done in Figure 5-3: Figure 5-3. Phys Mem in GlancePlus Showing 4 GBytes for System (non-vPars) 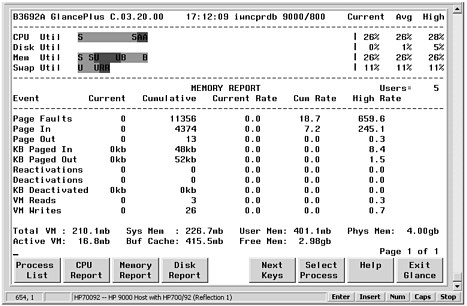 Now let's view the memory for cable1 (hostname cvhdcon3)in GlancePlus. Figure 5-4 was obtained when the system loaded cable1 at boot time: Figure 5-4. Phys Mem in GlancePlus Showing 2 GBytes for cable1 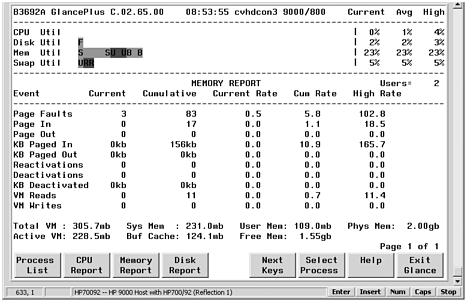 The Phys Mem in the bottom right-hand side of the screen is shown as 2 GBytes, as we had assigned for cable1. This confirms the 4 GBytes for the system and 2 GBytes for cable1 shown with dmesg. Because you have multiple Virtual Partitions running, you have to have multiple HP-UX kernels running. The kernel for a specific Virtual Partition has to be located within the memory range devoted to that Virtual Partition. The location of the kernel in memory is specified in the /usr/conf/gen/map-file file in HP-UX 11i. Among the entries in this file is the location in memory at which the kernel will be located. This line begins with Text = LOAD. This file exists on every file system for which you have a Virtual Partition and contains the kernel location for the respective Virtual Partition as well as other dynamic information. This file exists on HP-UX 11i for non-Virtual Partition systems as well and contains other information used by 11i. Working with the HP-UX 11i kernel and Virtual Partitions is covered in Chapter 4. | 