Expressions Are Strings and Wildcards
Table 26-Expr. Meta-Characters and Programs to Which They Apply
You may want to refer to this table when regular expressions are used for one of the commands in the table. Modes and NotationsWe're first going to cover some of the fundamentals of the operation of vi called modes, and then go over some of the notations used in the tables in this chapter. A feature of vi that often confuses new users is that it has modes. When you are in command mode , everything you type is interpreted as a command. In command mode, you can specify such actions as the location to which you want the cursor to move. When you are in input mode, everything you type is information to be added to the file. Command mode is the default when you start vi . You can move into command mode from input mode at any time by pressing the escape key. You move into insert mode from command mode by typing one of the input mode commands covered shortly. vi commands don't really have a standard form. For this reason, I cover common notations. Table 26-Introduction summarizes modes and commands in vi : Table 26-Introduction. Modes and Notations in vi
Starting a vi SessionLet's jump right in and edit a file. For most of the examples in this chapter, I perform various vi commands and capture the results in an X Window. The best way to learn any topic is by example. I not only provide many examples, but I also capture each example in an X Window so that you can see the results of each command. From the command line, we type vi and the name of the file we wish to edit, in this case wisdom : $ vi wisdom We are then editing the file wisdom as shown in Figure 26-1. wisdom contains a passage from Tao Te Ching or "Book of the Way." We use this file throughout this chapter. Figure 26-1. Editing the File wisdom The bottom line in Figure 26-1 is the message line in vi . After invoking vi, the message line indicates the name of the file, the number of lines, and the number of characters in the file. Different messages appear on the message line, depending on the command you issue, as we see in upcoming examples. If a tilde appears on any lines in the file, as it does in the two lines above the message line in wisdom , it means that not enough lines exist to fill up the screen. The cursor is the dark box that appears at line 1 in Figure 26-1. We can specify several file names , and after saving the first file move on to the second file by entering :n , and continue going through the list of files in this way. Or we can specify a file and position the cursor on the last line in the file. The default is for the cursor to appear over the first character in the file, as shown in Figure 26-1. Table 26-1 shows some of the ways in which we can start a vi session: Table 26-1. Starting a vi Session
Figure 26-2 shows editing wisdom and placing the cursor at line 5 with the command vi +5 wisdom : Figure 26-2. Editing the File wisdom and Placing Cursor at Line 5 with vi +5 wisdom Figure 26-3 shows editing wisdom and placing the cursor at the last line of the file with the command vi + wisdom . Figure 26-3. Editing the File wisdom and Placing Cursor at Last Line with vi + wisdom Figure 26-4 shows editing wisdom and placing the cursor at the line containing task with vi +/task wisdom . Figure 26-4. Editing the File wisdom and Placing Cursor at Line Containing task with vi +/task wisdom Cursor Control CommandsA key skill to develop in vi is getting the cursor to the desired position. You do this in command mode . You have a variety of ways to move the cursor around the screen. Table 26-2 summarizes some of the more commonly used cursor movements: Table 26-2. Cursor Control Commands In vi
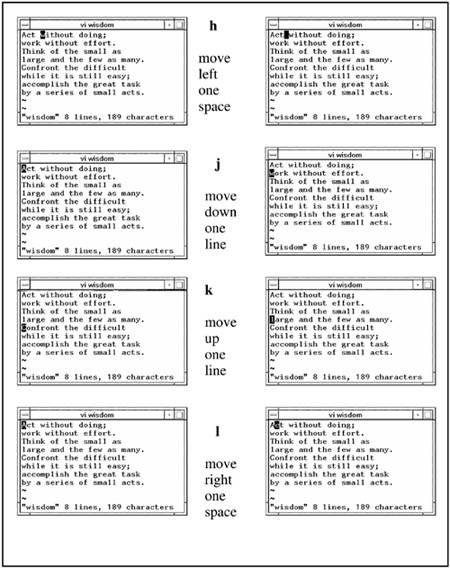
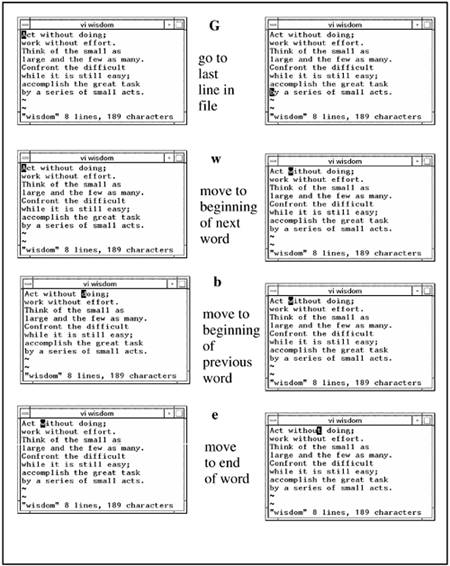
I know that the fact that you have to remember these commands in order to get the cursor to the desired position may seem a little strange at first, but this is the way vi works. Let's use wisdom to show how some of these cursor movements work. Figures 26-5 and 26-6 show some cursor movements. Like all of the upcoming figures, Figures 26-5 and 26-6 show wisdom appears before a command is entered on the left and the result after the command is entered on the right. The command issued appears in the middle. Some of the commands in upcoming figures use the enter and escape keys. Figure 26-5. Examples of Cursor Movement in vi ( h, j, k , and l ) Figure 26-6. Examples of Cursor Movement in vi ( G, w, b , and e ) Adding Text in viNow that we know how to move around the cursor, let's do something with it. You need to first learn about cursor movement, because the commands for adding text take place relative to the position of the cursor. Table 26-3 summarizes some commands for adding text: Table 26-3. Adding Text In vi
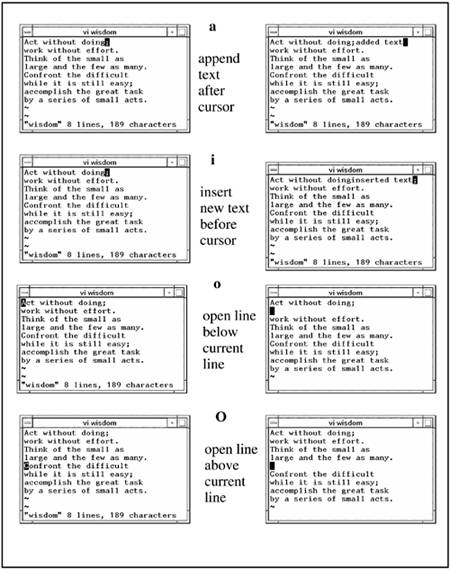
Let's now look at some examples of adding text into wisdom in Figure 26-7: Figure 26-7. Examples of Adding Text in vi Deleting Text in viWe also need to learn about cursor movement before learning how to delete text, because the commands for deleting text take place relative to the position of the cursor. Table 26-4 summarizes some commands for deleting text: Table 26-4. Deleting Text In vi
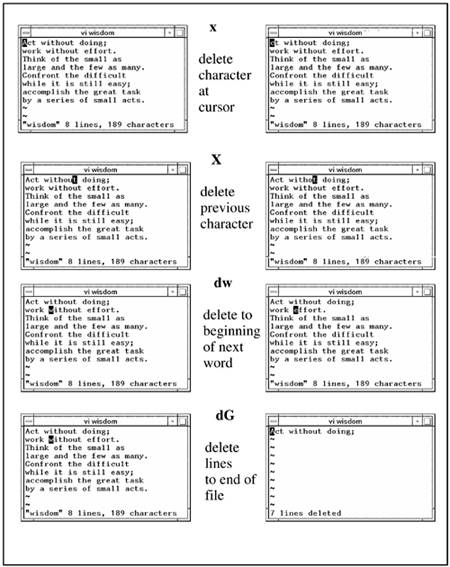
Let's now look at some examples of deleting text from wisdom in Figures 26-8 and 26-9: Figure 26-8. Examples of Deleting Text in vi ( x, X, dw , and dG ) Figure 26-9. Examples of Deleting Text in vi ( dd and db ) Changing Text in viOkay, you've added text and deleted text, and now you want to change text. vi isn't so bad so far, is it? Table 26-5 summarizes some commands for changing text: Table 26-5. Changing Text In vi
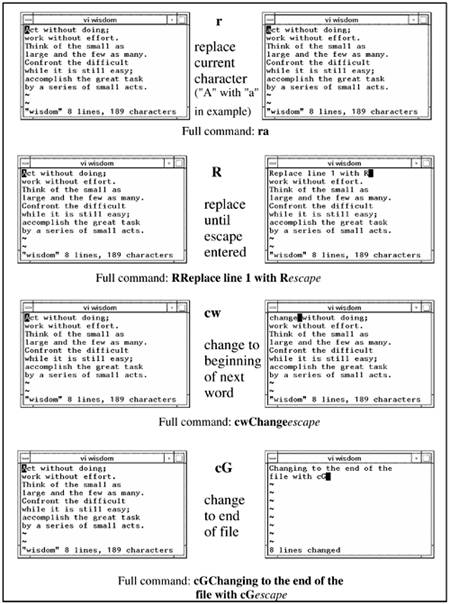
Let's now look at some examples of replacing text from wisdom in Figures 26-10 and 26-11: Figure 26-10. Examples of Changing Text in vi ( r, R, cw , and cG ) Figure 26-11. Example of Changing Text in vi with cc Search and Replace in viYou have a lot of search and replace functionality in vi . Table 26-6 summarizes some of the more common search-and-replace functionality in vi : Table 26-6. Search And Replace In vi
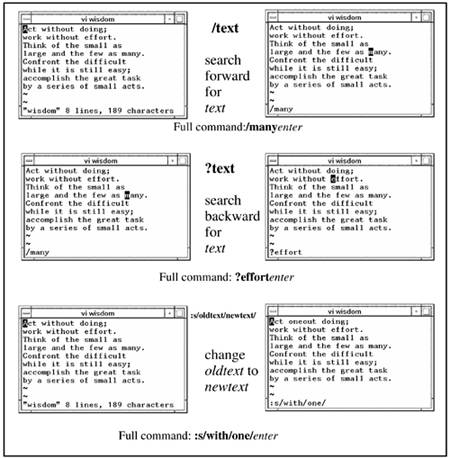
Let's now look at some examples of searching and replacing text in wisdom in Figure 26-12: Figure 26-12. Examples of Search and Replace in vi You can perform advanced searches with :g and :v . You can find and display all the lines in a file containing while with the following command: :g/while/p The /p in this command line is the print command used with the ex editor. You could find all the lines in the file that contain while and delete those lines with the following command: :g/while/d You can also specify the specific line numbers for which you want the search to take place. The following command finds all the lines between 10 and 20 that contain while and prints the line number on which they appear: :10,20g/while/nu :g runs a command on the lines that contain the text for which we are searching, and :v runs a command on the lines that do not contain the specified text. The following three commands act on the lines that do not contain while , in the same way that the previous three act on the lines that do contain while : :v/while/p :v/while/d :10,20v/while/nu The first command prints lines that do not contain while . The second command deletes the lines on which while does not appear. The third command prints the line number between 10 and 20 on which while does not appear. Copying Text in viYou can copy text in vi . Some commands for copying are shown in Table 26-7: Table 26-7. Copying In vi
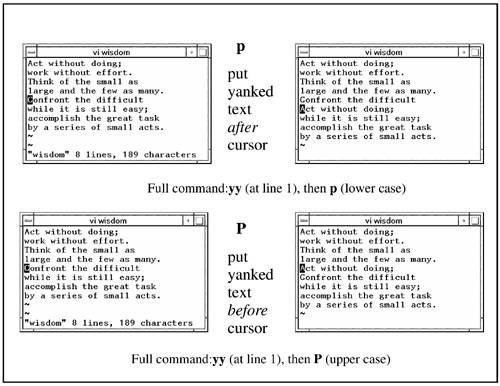
Let's now look at some examples of copying text in wisdom in Figure 26-13: Figure 26-13. Copying in vi Undo and Repeat in viYou can easily undo and repeat changes in vi with the commands shown in Table 26-8: Table 26-8. Unso In vi
Save Text and Exit viYou have a number of different ways to save files and exit vi , some of which are summarized in Table 26-9: Table 26-9. Saving Text and Exiting vi
Options in viThere are many options that you can set and unset in vi . To set an option, you type :set option . To unset an option, you type :set no option . Table 26-10 summarizes some of the more commonly used options: Table 26-10. Options In vi
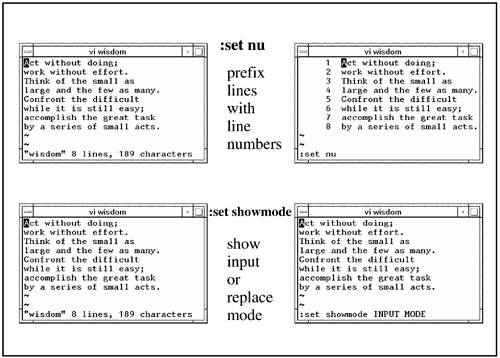
Let's now prefix the lines with line numbers and show the input or replace mode in Figure 26-14: Figure 26-14. Options in vi Many additional options are available beyond those in Table 26-10. The following is a list of options produced on a UNIX system from the :set all command. You should issue this command when in vi to see the options available to you: : set all noautoindent autoprint noautowrite nobeautify directory=/var/tmp nodoubleescape noedcompatible noerrorbells noexrc flash hardtabs=8 noignorecase keyboardedit nokeyboardedit! nolisp nolist magic mesg nomodelines nonumber nonovice nooptimize paragraphs=IPLPPPQPP LIpplpipnpbp prompt noreadonly redraw remap report=5 scroll=11 sections=NHSHH HUuhsh+c shell=/sbin/sh shiftwidth=8 noshowmatch noshowmode noslowopen tabstop=8 taglength=0 tags=tags /usr/lib/tags tagstack term=hp noterse timeout timeoutlen=500 ttytype=hp warn window=23 wrapscan wrapmargin=0 nowriteany noshowmatch noshowmode Many of the options are preceded by a "no," indicating that the option is not set. You may want to list your options with :set all and then experiment with the options of interest to you to see the effect they will have on your vi session. Status in viYou can obtain a lot of useful status information with some simple commands in vi . You can display the current line number, number of lines in the file, file name, and other status information with the commands shown in Table 26-11: Table 26-11. Status In vi
Section Positioning and Placing Marks in TextYou can define sections of text to which you can move as well as mark text with characters and move to those marks. Table 26-12 summarizes positioning and marking in vi : Table 26-12. Positioning and Marking In vi
Joining Lines in viYou can join one or more lines in vi using the commands shown in Table 26-13: Table 26-13. Joining Lines In vi
Cursor Placement and Adjusting the ScreenYou can place the cursor anywhere in your file and adjust the screen in a variety of ways using the commands shown in Table 26-14: Table 26-14. Cursor Placement and Adjusting the Screen In vi
Shell Escape CommandsYou can run a UNIX command without exiting vi by using shell escape commands. You could do something as simple as start a sub-shell with the :sh command. You could also run a command outside the file you are editing without exiting vi . Table 26-15 describes shell escape commands: Table 26-15. Shell Escape Commands In vi
:w ! grep all Think of the small as by a series of small acts. You can issue the :so command to read and execute the commands in a file. Issuing the following command when in vi would run the commands in the file file_with_commands : :so file_with_commands This file contains the following two commands: :set nu :g/all/p When we issue the earlier :so command, line numbers are shown with the :set nu command and the following lines containing all are printed: Think of the small as by a series of small acts. Macros and AbbreviationsYou are not limited to issuing individual vi commands. You can define strings of vi commands and define a key corresponding to this string that you can recall. When defining the keys for your macros, you can't use the following: K V g q v * = and function keys. There are also control keys you can't use, so stay away from control keys in general. Table 26-16 shows macros and abbreviations. Table 26-16. Macros and Abbreviations In vi
An example of using the map command would be to automatically add text when you move to the end, as shown with the following map command: :map e ea This command maps e to ea. When you go to the end of the next word with e, you are also placed in insert mode with a so that you can append new text immediately after the end of the word. You can also abbreviate long sequences with ab. For instance, you could abbreviate system administration with sa with the following command: :ab sa system administration Now, whenever you insert text, type sa and then press the escape key to complete the insert; the string system administration appears. sa is an abbreviation for system administration. Indenting TextYou can indent text in a variety of different ways. Table 26-17 shows some of the more commonly used indenting commands: Table 26-17. Indenting Text In vi
Before you adjust the shift width, you may want to issue :set all in order to see the current number of characters to which the shift width is set. It is usually eight characters by default. To set the shift width to 16 characters, issue the following command: :set sw=16 You can then shift over the next three lines to the right by 16 characters each, with the following command: 3>> The next three lines are then shifted right by 16 characters. Shell FiltersYou can send information from the file you are editing to a command and then replace the original text with the output of the command. Table 26-18 shows a shell filter: Table 26-18. Shell Filters In vi
Pattern MatchingPattern matching allows you to find patterns within the file you are editing. You can then perform functions such as changing what you have found in some way. Table 26-19 shows some of the most common pattern-matching commands: Table 26-19. Pattern Matching in vi
You may find pattern matching a little confusing when you first start to use it, so I'll go through several simple examples to get you started. Keep in mind that many of the pattern-matching techniques described here also work outside vi in your shell. Matching a SetWe'll begin with the square bracket operator . To match any of the single characters m, f, or p , you would use the following: /[mfp] A common pattern to match would be a word with the first letter in the word, either uppercase or lowercase. To match input or Input , you would use the following: /[Ii]nput After you match either Input or input , you could then change it to INPUT with the following command: :%s/[Ii]nput/INPUT/g You can use sequences of expressions to search for more than one character, as shown in the following example: /[mM][pP] This sequence will match mp, mP, Mp , or MP . You are, in effect, searching for any of the four two-character strings. Matching a RangeYou can also use the square bracket operator to match single characters within a range. To find an occurrence of any digit in a file, you could use either of the two following square bracket searches: /[0123456789] or /[0-9] The hyphen denotes a range within the square bracket. To find any character, either uppercase or lowercase, you could use the following: /[a-zA-Z] To search for characters that normally have a special meaning, such as [ , you can ignore, or escape, the special meaning by preceding the special character with a \ (backslash). To search for [ in vi , for instance, you would use the following sequence: /\[ This search finds the first occurrence of [ . Beginning and End of Line SearchYou can specify that you wish your pattern match to take place at only the beginning or end of a line. To specify a beginning of the line pattern match, use the ^ (caret) preceding your desired pattern, as shown in the following example: /^Think This matches Think only when it appears at the beginning of a line. To specify an end-of-the-line pattern match, use a $ (dollar sign) following your desired pattern, as shown in the following example: /last.$ This matches last. only when it is followed by a newline. Manual Pages for Commands Used in Chapter 24Manual Pages for Commands Used in Chapter 24 |
EAN: 2147483647
Pages: 301