Consoles
| You have a choice concerning the type of console to use with your HP system. Although the console hardware varies among different HP system models, there are usually the following ports available:
There is not much configuration for the local console other than connecting a terminal. The remote console required modem configuration. The LAN console is configured through the GSP interface as we'll see in the next example. The following listing shows several steps we'll perform to boot an nPartition in the upcoming example. This example is from Chapter 17 which covers nPartitions. I'll issue a variety of commands to give you an idea of some steps you can perform during the boot process process at various prompts. We'll do the following:
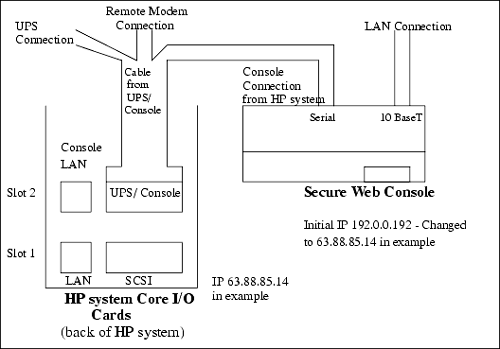
Main Menu: Enter command or menu > GSP MAIN MENU: CO: Consoles VFP: Virtual Front Panel CM: Command Menu CL: Console Logs SL: Show chassis Logs HE: Help X: Exit Connection GSP> cm <-- Go to Command Menu Enter HE to get a list of available commands GSP:CM> ls <-- List customer LAN Current configuration of GSP customer LAN interface MAC address : 00:10:83:fd:77:f7 IP address : 192.168.1.1 0xc0a80101 Name : gsp0 Subnet mask : 255.255.255.0 0xffffff00 Gateway : 192.168.1.1 0xc0a80101 Status : UP and RUNNING Current configuration of GSP private LAN interface MAC address : 00:a0:f0:00:ce:1f IP address : 192.168.2.11 0xc0a8020b Name : priv-01 Subnet mask : 255.255.255.0 0xffffff00 Gateway : 192.168.2.11 0xc0a8020b Status : UP and RUNNING GSP:CM> lc <-- Modify customer LAN This command modifies the LAN parameters. Current configuration of GSP customer LAN interface MAC address : 00:10:83:fd:77:f7 IP address : 192.168.1.1 0xc0a80101 Name : gsp0 Subnet mask : 255.255.255.0 0xffffff00 Gateway : 192.168.1.1 0xc0a80101 Status : UP and RUNNING Do you want to modify the configuration for the customer LAN? (Y/[N]) y Current IP Address is: 192.168.1.1 Do you want to modify it? (Y/[N]) y Enter new IP Address: 157.235.10.249 New IP Address will be: 157.235.10.249 Please confirm (Y/[N]) y -> IP Address will be updated. Current GSP Network Name is: gsp0 Do you want to modify it? (Y/[N]) n Current Subnet Mask is: 255.255.255.0 Do you want to modify it? (Y/[N]) n Current Gateway is: 192.168.1.1 Do you want to modify it? (Y/[N]) (Default will be IP address.) 157.235.10.2 Current Gateway is: 192.168.1.1 Do you want to modify it? (Y/[N]) (Default will be IP address.) y Enter new Gateway: 157.235.10.246 New Gateway will be: 157.235.10.246 Please confirm (Y/[N]) y -> Gateway will be updated. Current configuration of GSP private LAN interface MAC address : 00:a0:f0:00:ce:1f IP address : 192.168.2.11 0xc0a8020b Name : priv-01 Subnet mask : 255.255.255.0 0xffffff00 Gateway : 192.168.2.11 0xc0a8020b Status : UP and RUNNING Do you want to modify the configuration for the private LAN? (Y/[N]) n -> Parameters have been updated. You can see in this example that we changed the default LAN console information using the GSP. Next we'll configure the Secure Web Console. Secure Web ConsoleYou have a choice concerning the type of console to use with your HP-UX. You can connect a terminal to the console port or use a browser and the Secure Web Console (there is also a LAN console port available on systems as another alternative). There is also a console consolidation solution that supports hundreds of consoles that I won't cover here. The Secure Web Console is a card in your HP-UX system that allows you to use your browser as a console. This means that from one system running a browser, you can open up several windows that are the console screens for different HP-UX systems. This obviates the need to walk from console to console when you want to perform system administration functions - you can sit at one system running a browser and adminstrate many systems. On older systems there was an external Secure Web Console device that connects to the HP-UX console port and provides the same Web server. I'll show a diagram shortly for connecting the old device. In this section I'll cover configuring a Secure Web Console and include several screen shots so you can decide whether you prefer the Secure Web Console or a dedicated terminal as a console. Connecting and Configuring the Secure Web ConsoleThe new Secure Web Console is a card in your HP-UX system. The old Secure Web Console is a device that is connected to the console port on your HP-UX system and to your LAN. On an rp54xx system, for instance, slot 2 has in it a Core I/O card that includes a LAN console port and a connector for the UPS and console - the serial port on the Secure Web Console is plugged into this console cable. There is also a networking port on the Secure Web Console so you can connect it to your LAN. Figure 1-1 depicts the general setup of the Secure Web Console: Figure 1-1. External Secure Web Console Connectivity on rp54xx Used in Upcoming Example Keep in mind that the HP system connections on your system may differ from that shown in the figure. The cable connected to the UPS/Console port turns into the three connections shown in Figure 1-1. The Secure Web Console connects to the right-most of the three connectors when facing the back of the computer on my system. Its other connection is a networking connection to the LAN. The Secure Web Console also has its own power source so you can connect to it from your browser even when the computer is powered off. The Secure Web Console has a default IP address of 192.0.0.192. This address is assigned so that you can connect to the Secure Web Console upon installation and reconfigure it. With the hardware connections complete, we'll proceed to setup the system running a browser and connect to the Secure Web Console using the following steps:
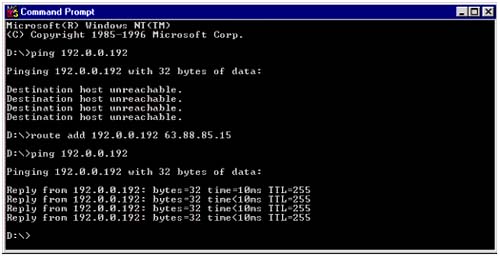
Figure 1-2 shows the steps I performed. You can see route and ping on my PC at the command line to get access to the Secure Web Console: Figure 1-2. route and ping with Secure Web Console This screen shot does not show the "disable proxies" step I performed prior to the commands issued at the prompt.
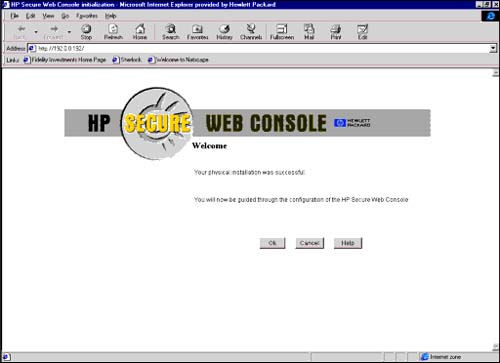
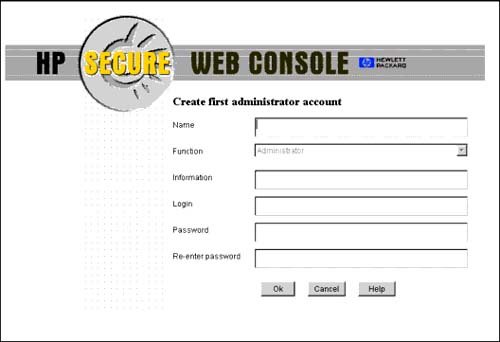
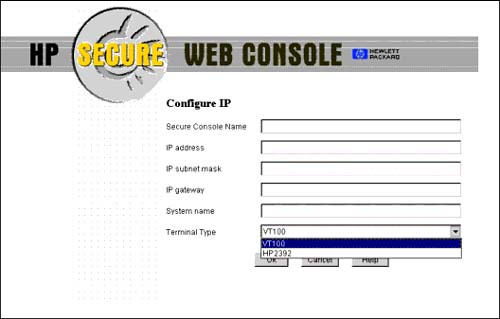
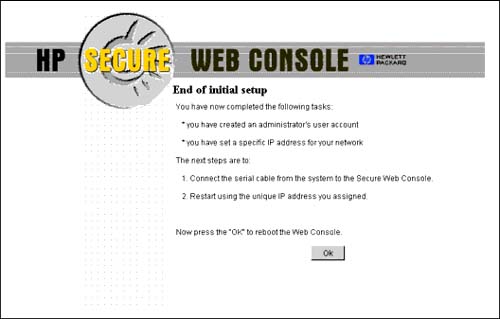
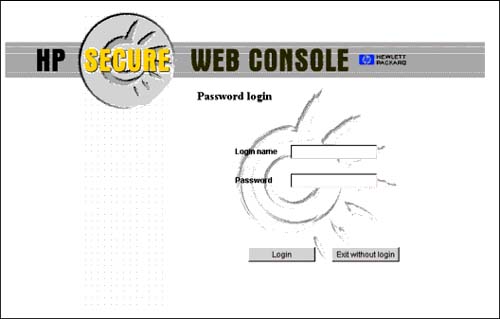
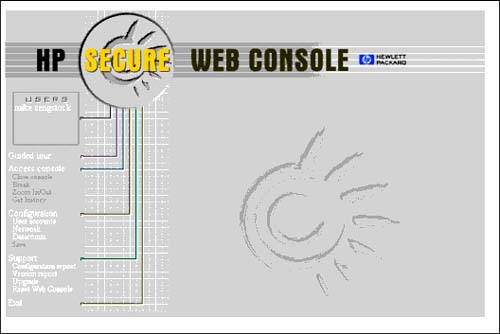
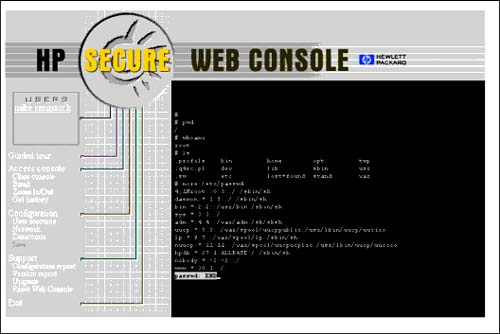
With a connection having been established and the browser properly configured on my computer (the proxy server was earlier disabled), I can use the browser to connect to the Web server on the Secure Web Console. You must be on the same subnet for this to work in most situations. Figure 1-3 is a screen shot showing that I specified the pre-configured IP address of the Secure Web Console with http://192.0.0.192: Figure 1-3. Initial Secure Web Console Screen The "Welcome" screen confirms that we performed the necessary configuration to make our initial connection to the Secure Web Console. After you select "OK" on this screen, you can proceed with the configuration of the Secure Web Console. The next screen in Figure 1-4 shows the initial information related to the Secure Web Console for which you will be prompted when you select "OK". This information is for an administrator of the Secure Web Console, not for the HP system. In the upcoming examples, I zoom in so that you can see the Secure Web Console information more clearly. The browser information is not shown in the figures, but it is insignificant as far as the Secure Web Console configuration is concerned from this point foward. Figure 1-4. Secure Web Console Screen for First Administrator Account After adding all of this information, you have configured the initial administrator account. As we'll see later, you can add subsequent administrator and operator accounts to the Secure Web Console. The next screen, in Figure 1-5, shows the network-related configuration we'll make to the Secure Web Console. Since it came with a pre-configured IP address, we'll now assign the dedicated IP address for the device. Figure 1-5. Secure Web Console Screen to Configure Final IP Address In Figure 1-5 I show the two types of terminals that you can select. In this "Configure IP" screen, you'll enter both a name for the Secure Web Console and the computer to which it is connected. All of the IP-related information is entered in this screen as well. The Secure Web Console requires a dedicated IP address because you connect directly to it to make a console connection to the HP system. When all of the information has been added, we select "OK" on this screen and are shown the following message in Figure 1-6: Figure 1-6. Initial Secure Web Console Setup Complete After we select "OK" in Figure 1-6, we can reconnect to the Secure Web Console using the IP address we assigned to it during the configuration. In our case, we would use http://15.88.85.14 to reconnect, as shown in Figure 1-7: Figure 1-7. Secure Web Console Login Screen We log in with the name and password we earlier defined for the Secure Web Console administrator and are then connected as shown in Figure 1-8: Figure 1-8. Secure Web Console Menu At this point, you can select from a number of Secure Web Console-related functions to perform, such as configuring additional users, or you can access the console on your HP system, which is the purpose of connecting the device. The Access console selection gives us the console of the HP system as shown in Figure 1-9: Figure 1-9. Initial Secure Web Console Screen Notice that we are logged in as root when we select Access console . You could use the Secure Web Console menu to configure additional administrators and operators (we configured only one administrator in our example and no operators) to give multiple users access to your HP system through the Secure Web Console. _________________________________ The Secure Web Console can be a good alternative to using a dedicated console on each HP-UX system. I wanted to provide you with the basic information for configuring the Secure Web Console so that you know how this device works. | ||||||||||||||||||||||||||||||||||||
EAN: 2147483647
Pages: 301
- Chapter X Converting Browsers to Buyers: Key Considerations in Designing Business-to-Consumer Web Sites
- Chapter XI User Satisfaction with Web Portals: An Empirical Study
- Chapter XIV Product Catalog and Shopping Cart Effective Design
- Chapter XV Customer Trust in Online Commerce
- Chapter XVIII Web Systems Design, Litigation, and Online Consumer Behavior