smb.conf Setup
| < Day Day Up > |
| Because Samba is supplied on the Red Hat Linux CD-ROM, we'll walk through a simple Samba setup using Red Hat Linux. When installing Red Hat Linux, you can select the software packages you want to load, as you can on most all UNIX variants. If you did not load Samba at the time you originally loaded the operating system, you can use a graphical RPM tool or rpm from the command line to load Samba or any other software. These tools were briefly discussed in the Chapter 10 covering System Administration. The configuration file for Samba is /etc/samba/smb.conf. The smb.conf file has all Samba-related setup information in it. For our simple Samba setup in this chapter we need to have only a few lines in the file setup. You need to have a few Global Settings and Share Definitions in order to achieve file system sharing between Windows and Linux systems. The following are three select sections from smb.conf that were modified for the example in this section: # workgroup = NT-Domain-Name or Workgroup-Name workgroup = DEVENV encrypt passwords = yes smb passwd file = /etc/samba/smbpasswd [homes] comment = Home Directories browseable = yes writable = yes valid users = %S create mode = 0664 directory mode = 0775
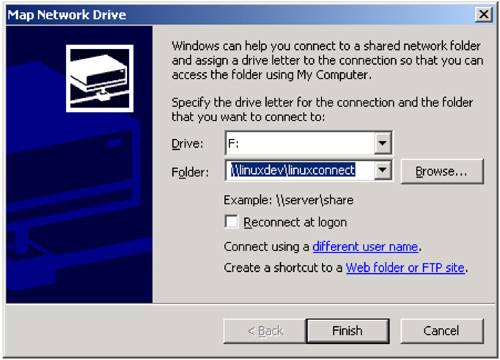
You made only these three modifications to the smb.conf file; how-ever, next you'll run a Samba utility called testparm. This utility checks your /etc/smb.conf file for errors. This utility produces a long output that I won't include here, but you'll want to run this and check for any warnings or errors it produces: # testparm smb.conf Load smb config files from smb.conf Processing section "[homes]" Processing section "[printers]" Loaded services file OK. Press enter to see a dump of your service definitions # Global parameters [global] coding system = client code page = 850 code page directory = /usr/share/samba/codepages workgroup = DEVENV netbios name = netbios aliases = netbios scope = server string = Samba Server interfaces = bind interfaces only = No security = USER encrypt passwords = Yes update encrypted = No allow trusted domains = Yes hosts equiv = min passwd length = 5 map to guest = Never null passwords = No obey pam restrictions = Yes password server = smb passwd file = /etc/samba/smbpasswd . . . There were no warnings or errors produced from having run testparm, so proceed to the next step. User SetupYou now need to create a user on both the Linux and Windows systems that can be used for our Samba-related work. It may already be that you have suitable users on your system. For the purposes of this demonstration, you'll create a user on both systems. On the Linux system, you can use the useradd program from the command line or User Manager graphical program (Programs-System-User Manager) to add the user. The user appears in the /etc/passwd file after he or she has been added. Then, issue the following command to add the encrypted user passwd to the /etc/samba/smbpasswd file: # smbpasswd -a linuxconnect linuxconnect is the name of the user you created for this example. You can view the smbpasswd file to see the entry for your user. This same user was created on the Windows system. The menu pick Start-Programs-Administrative Tools-Computer Management (Local Users and Groups-Users) was used to create linuxconnect. Samba StartupYou can start Samba daemons every time the system boots or start them at the command line. The following commands show starting the daemons at the command line and then viewing them: # /sbin/service smb start Starting SMB services: [ OK ] Starting NMB services: [ OK ] # ps -ef | grep mbd root 10828 1 0 16:59 ? 00:00:00 smbd -D root 10833 1 0 16:59 ? 00:00:00 nmbd -D # You started the daemons with /sbin/service smb start and check to see the two daemons running with ps. Should you make a change to your Samba setup and want to restart the daemons, you could use /sbin/service smb restart. The smbd server daemon provides the file and print services to SMB clients, such as Windows systems. SMB stands for "Server Message Block" and is defined as a network protocol for sharing files, printers, serial ports, and communications abstractions such as named pipes and mail slots between computers. The nmbd server daemon allows for NetBIOS over IP name service requests over a network, like those produced by SMB/CIFS clients such as Windows systems. We have now performed all of the basic setup required to proceed with mounting disks. Mapping a Windows Drive to a Linux DirectoryNow we can both browse the Linux system from Windows as well as mount a specific drive directory of the Linux system on our Windows system. Figure 11-1 shows the window in which we specify the Linux system and directory we will mount as F: on the Windows system. Figure 11-1. Mapping Linux Drive to F: on Windows
We specified the path of \\linuxdev\linuxconnect to mount on the Windows system drive F:. This is the hostname (linuxdev) and the user name (linuxconnect). The system knows automatically to go to the home directory for linuxconnect and mounts that directory as F: for us on the Windows system as shown in the Figure 11-2. Figure 11-2. Viewing Linux Root Filesystem as F: on Windows The /home/linuxconnect directory on our Linux system is now fully accessible on the Windows system. You can browse, edit, copy, and perform other tasks on these shared files. You can use net view on your Windows system to see the shared resource of the Linux directory, as shown in the following listing: c: net view \\linuxdev Shared resources at \\linuxdev Samba Server Share name Type Used as Comment ------------------------------------------------------ homes Disk Home Directories linuxconnect Disk F: Home Directories The command completed successfully. This listing shows that F: has your Linux directory mapped to it. You may have mapped the drive using an IP address in which case you would specify the path using the IP address. The following example shows viewing the Integrity Advanced Server system with net view and the IP address: c: net view \\15.32.162.129 Shared resources at \\15.32.162.129 Samba Server Share name Type Used as Comment ------------------------------------------------------------------ homes Disk Home Directories linuxconnect Disk F: Home Directories The command completed successfull This example shows the mapping of F: to /home/linuxconnect on the Integrity server. Now, get the overall status of the Samba setup with the smbclient utility on our Linux system, as shown in the following listing: # su - linuxconnect $ smbclient -L linuxdev added interface ip=192.168.1.102 bcast=192.168.1.255 nmask=255.255.255.0 Domain=[DEVENV] OS=[Unix] Server=[Samba 2.2.3a] Sharename Type Comment --------- ---- ------- homes Disk Home Directories IPC$ IPC IPC Service (Samba Server) ADMIN$ Disk IPC Service (Samba Server) linuxconnect Disk Home Directories Server Comment --------- ------- LINUXDEV Samba Server Workgroup Master --------- ------- ATLANTA2 F4457MXP DEVENV LINUXDEV Before issuing the smbclient command, you changed user to linuxconnect and then issued the command. This utility produces a useful summary of the Samba setup, including the share linuxconnect you set up, the Samba server for our example, and other useful information.
Keep in mind that Linux, including the Red Hat 8.x distribution used in this example, has a high level of security by default upon installation. The firewall setting on the system in the example was set too high for this drive to be mounted in the example. You first had to lower the security level of the firewall setting. Using the /usr/sbin/setup program and selecting Firewall Configuration, you lowered the Security Level to No Firewall, as shown in Figure 11-3. Figure 11-3. setup Program Used to Eliminate Firewall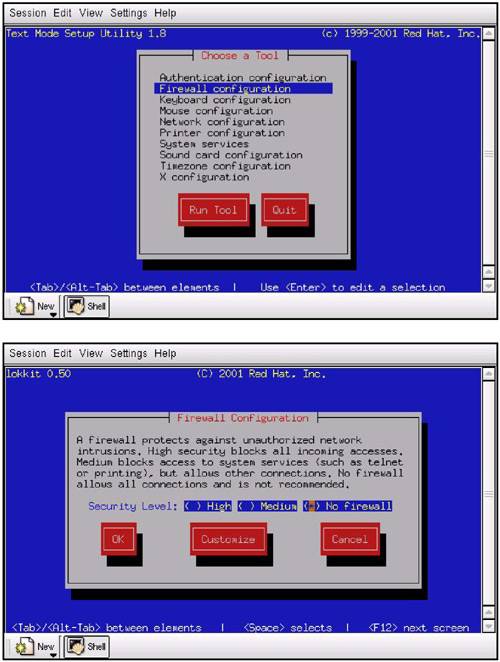 You used setup to eliminate the firewall in this example. This greatly reduces the overall security of the Linux system, so you have to consider this before making the change. As a result of this selection, files on the system were updated to permit more open access to the system, which gave you the ability to map a network drive to your Linux system, but it also reduced the overall level of security on the system. This did not have to be done on the Integrity server because at the time you installed Advanced Server in Chapter 2, you specified this low level of security. Mounting a Windows Drive on a Linux SystemThe previous example demonstrated mapping a Linux file system to a Windows drive. This is commonly done because Linux file systems often act as file servers in a Windows environment. You can also get access to a Windows drive on the Linux system for file sharing purposes or to back up a Windows drive to a Linux system. The following commands show mounting the C: drive on the Windows system as the directory /home/linuxconnect/ pcdev on your Linux system: # smbmount //F4457MXP/c /home/linuxconnect/pcdev -o username=linuxconnect Password: # # # cd /home/linuxconnect/pcdev # ls 6.1_for_2002_Setup.exe HP phone ~adpttmp I386 PMig01.Log aim95.exe INFONET PMig02.Log AUTOEXEC.BAT IO.SYS PMig03.Log BDE kmd.exe PMig0.Log BOOT.BAK lj527en.exe PMig.Log boot.ini Morpheus-b3d-v2.exe Program Files BOOTLOG.TXT MSDOS.SYS Recycled cmdcons My Music RECYCLER cmldr My Photos RunDelay COMMAND.COM NETPRINTER sdc_install.log comreads.dbg netzero.exe sdc.ok comused.dbg NI setupmpe.exe CONFIG.SYS notworm Support data NTDETECT.COM System Volume Information DMI ntldr temp Documents and Settings OMNIBOOK temp.ps drivers OMNILIB TOUR ENV openmail.log unzipped FDWINW pagefile.sys VERSION.INF hiberfil.sys Perl WINNT # In the smbmount command, you specified the name of the Windows system and the path (/F4457MXP/c) we wanted to mount on the Linux system. You could have specified any drive or a directory of any drive but you specified the full C: directory. You then specified the mount point on the Linux system of /home/linuxconnect/pcdev and the username of linuxconnect. You were then prompted for the password for this user and given access to the drive. The listing shows the entire C: drive has been mounted. You could also have substituted an IP address for the PC hostname of F4457MXP. The following example shows having issued df and then ls to see the C: mounted on the Integrity server: # df Filesystem 1k-blocks Used Available Use% Mounted on /dev/sda3 68450624 3572680 61400812 6% / /dev/sda1 104184 6118 98066 6% /boot/efi none 1024576 0 1024576 0% /dev/shm //15.244.168.25/c 11770880 8733440 3037440 75% /home/linuxconnect/pcdev # ls /home/linuxconnect/pcdev/ 6.1_for_2002_Setup.exe DMI _NavCClt.Log sdc_install.log ~adpttmp Documents and Settings NETPRINTER sdc.ok aim95.exe drivers netzero.exe setupmpe.exe AUTOEXEC.BAT ENV NI Support BDE FDWINW notworm System Volume Information BOOT.BAK hiberfil.sys NTDETECT.COM temp boot.ini HP ntldr temp.ps BOOTLOG.TXT I386 OMNIBOOK TOUR ciretool INFONET OMNILIB UNWISE.EXE cmdcons INSTALL.LOG openmail.log UNWISE.INI cmldr IO.SYS pagefile.sys unzipped COMMAND.COM kmd.exe Perl VERSION.INF comreads.dbg lj527en.exe phone WINNT comused.dbg Morpheus-b3d-v2.exe Program Files WINS_updater CONFIG.SYS MSDOS.SYS Recycled cygwin My Music RECYCLER data My Photos RunDelay # Now that the entire C: drive is accessible on the Linux system, you can perform any tasks on these files, such as perform a backup of the entire drive or selected files to the Linux system. Figure 11-4 shows a Linux file manager window (Konqueror) open showing C: from the Windows system. Figure 11-4. Konqueror Viewing C: on Linux System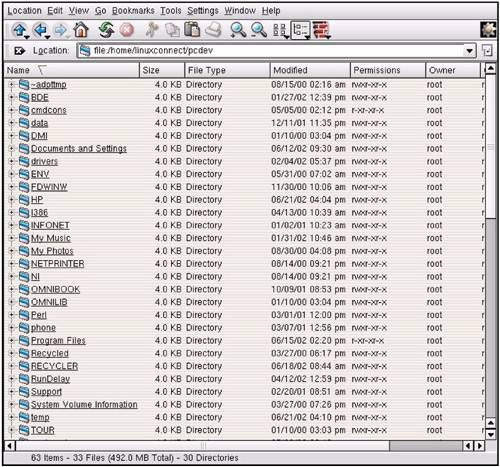 Figure 11-4 shows folders on the C: drive of our Windows system displayed in one of the file manager windows on our Linux system. You can traverse this hierarchy freely to view, copy, and work with these files in other ways. You have demonstrated mounts working in both directions. C: on the Windows system was mounted as /home/linuxconnect/pcdev on the Linux system. /home/linuxconnect was mapped to F: on the Windows system. Additional Samba functionality exists, such as print serving, that were not shown in this example. Log FilesLike most UNIX applications, Samba provides extensive logging. The smb.conf file contains a section that allows you to specify the level of Samba logging you want to take place. The short section below shows that you can have separate log files for each Windows machine that connects, and you can specify the maximum size of the log file: # this tells Samba to use a separate log file for each machine # that connects log file = /var/log/samba/log.%m # Put a capping on the size of the log files (in Kb). max log size = 50 The directory /var/log/samba contains a variety of Samba log files, including the log file for the Windows system used in the examples in this chapter, called f4457mxp, as shown in the following listing: # ls -l /var/log/samba total 27 -rw-r--r-- 1 root root 0 Jun 15 11:15 f4412bfg.log -rw-r--r-- 1 root root 0 Jun 23 04:03 f4457mxp.log -rw-r--r-- 1 root root 664 Jun 23 04:03 f4457mxp.log.1 -rw-r--r-- 1 root root 0 Jun 21 12:22 linuxdev.log -rw-r--r-- 1 root root 8993 Jun 29 05:01 log.nmbd -rw-r--r-- 1 root root 1918 Jun 29 04:56 log.smbd -rw-r--r-- 1 root root 405 Jun 29 04:56 nmbd.log -rw-r--r-- 1 root root 65 Jun 24 04:03 smbd.log -rw-r--r-- 1 root root 65 Jun 24 04:03 smbd.log.1 -rw-r--r-- 1 root root 3271 Jun 29 05:00 smbmount.log -rw-r--r-- 1 root root 7431 Jun 23 04:03 smbmount.log.1 |
| < Day Day Up > |
EAN: 2147483647
Pages: 100