EFI and POSSE
| < Day Day Up > |
| EFI is an interface between your operating systems and platform firmware. POSSE is the HP implementation of EFI that contains additional commands beyond the ones available through EFI alone. You'll use the EFI acronym in this chapter, but you should be aware that some HP documentation may use POSSE. EFI is a component that is independent of the operating system and provides a shell for interfacing to multiple operating systems The interface consists of data tables that contain platform-related information along with boot and runtime service calls that are available to the operating system and its loader. These components work together to provide a standard environment for booting multiple operating systems. If you are interested in finding out more about EFI than what's documented here, take a look at Intel EFI Web site. At the time of this writing, EFI information can be found at http://www.intel.com/technology/efi. As you can see in Figure 1-1, EFI on HP Integrity servers contains several layers. The hardware layer contains disk with an EFI partition, which in turn has in it an operating system loader. This layer also contains one or more operating system partitions. Figure 1-1. EFI on HP Integrity Servers In addition, the EFI system partition itself consists of several different components as shown in Figure 1-2. Figure 1-2. EFI System Partition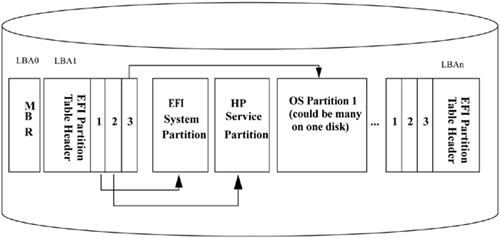 The Logical Block Addresses (LBAs) are shown across the top of the diagram. The Master Boot Record (MBR) is the first LBA. There is then a partition table. Three partitions are shown on this disk. Note that multiple operating system partitions can be loaded on the same disk. At the time of this writing, Windows Server 2003 and Linux can be loaded on the same disk. The EFI partition table on the right is a backup partition table. Booting an operating system with EFI on an Integrity servers involves several steps. Figure 1-3 depicts the high-level steps. Figure 1-3. Load and Run an Operating System
The first step is to initialize the hardware. This takes place at the lowest level (BIOS) before EFI or the operating systems play any part in the process. Next, the EFI and boot loader are loaded and run. After an operating system is chosen, the operating system loader is loaded and run for the specific operating system being booted. Finally, the operating system itself is loaded and run. There are no specific operating systems cited in Figure 1-3 because the process is the same regardless of the operating system being loaded. In the examples in this book, Linux, HP-UX, and Windows are used and all these operating systems would load in the same manner. Working with EFITraversing the EFI menu structure and issuing commands is straight forward. You make your desired selections and then traverse a menu hierarchy. To start EFI, when the system self test is complete, hit any key to break the normal boot process. The main EFI screen appears. Figure 1-4 shows the EFI Boot Administration main screen from which you can make various boot-related selections. Figure 1-4. EFI Boot Administration Main Screen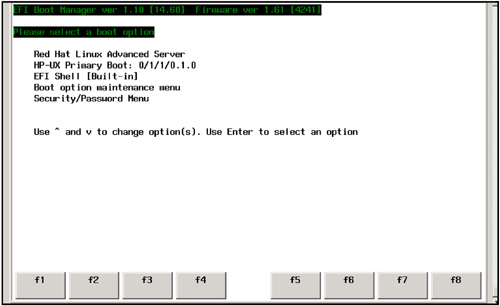 Figure 1-4 shows that there are two operating systems installed on this Integrity server an HP-UX Primary Boot and a Red Hat Linux Advanced Server. Either of these can be booted. From the main screen, you can also choose either EFI Shell [Built-in], Boot option maintenance menu, or Security/Password menu. The first item shown in the EFI main screen is the default. Use the arrow keys to scroll and highlight a selection. After the item you need is highlighted, press Enter to select it. For example, if you were to select Boot option maintenance menu, you would see a screen resembling the one shown in Figure 1-5. Figure 1-5. EFI Boot Maintenance Manager Main Menu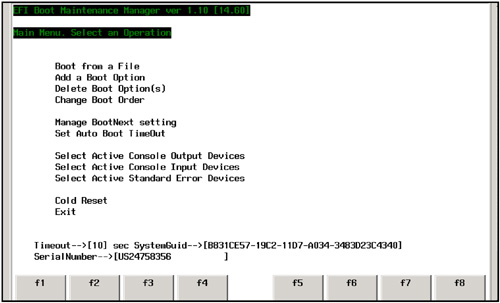 Figures 1-4 and 1-5 give you a feeling for the menu-driven nature of EFI and EFI selections. One of the important things a system administrator might need to know is a given system's device mappings. To view mappings using EFI, you need to get to a console-like EFI Shell> prompt. To do so, you must select EFI Shell in Figure 1-4. Once at the prompt, there are a variety of commands that you can run including map. map is the EFI command that shows device mapping on the Integrity server. This listing shows the output from the map command: Shell> map fs0 : Acpi(HWP0002,100)/Pci(1|0)/Scsi(Pun0,Lun0)/HD(Part1,Sig8E89981A-0B97-11D7-9C4C - AF87605217DA) fs1 : Acpi(HWP0002,100)/Pci(1|0)/Scsi(Pun1,Lun0)/HD(Part1,Sig7C0F0000) blk0: Acpi(HWP0002,0)/Pci(2|0)/Ata(Primary,Master) blk1: Acpi(HWP0002,100)/Pci(1|0)/Scsi(Pun0,Lun0) blk2: Acpi(HWP0002,100)/Pci(1|0)/Scsi(Pun0,Lun0)/HD(Part1,Sig8E89981A-0B97-11D7-9C4C - AF87605217DA) blk3 : Acpi(HWP0002,100)/Pci(1|0)/Scsi(Pun0,Lun0)/HD(Part2,SigC9D59DF0-0BA7-11D7-9B31 - FBA1AECDAF7E) blk4 : Acpi(HWP0002,100)/Pci(1|0)/Scsi(Pun0,Lun0)/HD(Part3,SigC9D7945C-0BA7-11D7-9B31 - FBA1AECDAF7E) blk5 : Acpi(HWP0002,100)/Pci(1|0)/Scsi(Pun1,Lun0) blk6 : Acpi(HWP0002,100)/Pci(1|0)/Scsi(Pun1,Lun0)/HD(Part1,Sig7C0F0000) blk7 : Acpi(HWP0002,100)/Pci(1|0)/Scsi(Pun1,Lun0)/HD(Part2,Sig7C0F0000) The device mappings can be difficult to read. Much of the information is intended for programmers and technicians. As a system administrator, however, you need to know which entries correspond to which devices and which entries are for your partitions and file systems. To determine that, let's take a look at each entry. As you probably guessed, file systems begin with fs and block devices begin with blk in this listing. To understand these entries however, let's look at them individually. To make their meaning clearer, I've grouped the entries differently than they originally appeared in the EFI listing previously shown. Red Hat Advanced Server disk and related entries: blk1 physical disk blk2 is first partition on blk1 blk3 is second partition on blk1 blk4 is third partition on blk1 fs0 is first file system on blk1 HP-UX 11i disk and related entries: blk5 physical disk blk6 is first partition on blk5 blk7 is second partition on blk5 fs1 is first file system on blk5 Let's analyze one of the block (blk) entries: blk1 : Acpi(HWP0002,100)/Pci(1|0)/Scsi(Pun0,Lun0) blk is the label assigned to the physical drive and the 1 is the number of the physical drive (blk can also be a partition on a physical drive as we'll see shortly). Acpi(HWP0002,100) first shows a device type of HWP0002 with a PCI host number of 100. This PCI host number is often called the ROPE. The ROPE is the circuitry that handles I/O for the PCI interface. Although this information is most often used by programmers, it is sometimes handy to know the ROPE since it also defines the I/O card slot. The following types of devices are the most common: HWP0001: Single I/O Controller Single Block Address w/o I/O Controller in the namespace. HWP0002: Logical Block Address (LBA) device. HWP0003: AGP LBA device. After the ROPE we find a Pci entry. This entry indicates that the device/slot number is 1 and the function number is 0. The Scsi Pun (physical unit) will be either 0 or 1 depending on which is the SCSI address of the disk. The Lun (logical unit) will always be 0 in this case because you're not assigning any Logical Units on the disks. Now, let's look at the blk2 entry: blk2 : Acpi(HWP0002,100)/Pci(1|0)/Scsi(Pun0,Lun0)/ HD(Part1,Sig8E89981A-0B97-11D7-9C4C-AF87605217DA) The blk2 entry is a partition on the blk1 device. All of the information is the same for the two entries except for the additional partition-related information beginning with Part1. Part1 indicates this is the first partition on physical device blk1 with an EFI signature beginning with Sig. blk3 and blk4 are additional partitions that we created when we loaded Advanced Server on this disk and created three partitions. The first group ends with the fs0 entry: fs0 : Acpi(HWP0002,100)/Pci(1|0)/Scsi(Pun0,Lun0)/ HD(Part1,Sig8E89981A-0B97-11D7-9C4C-AF87605217DA) Notice that the fs0 line also matches blk1 and blk2 from a path perspective. This is a file system readable by EFI; hence, it begins with fs. To summarize, what we see is a physical device blk1 that has on it an EFI partition blk2 and a file system fs0. All three of these are listed as separate entries in EFI. In addition, blk3 and blk4 are partitions on the same physical device blk1. The same applies to physical unit 1, which is Pun1. This is blk5. It too has two partitions at blk6 and blk7. fs1 is the file system that is on disk. This is the HP-UX disk in our configuration: blk0 : Acpi(HWP0002,0)/Pci(2|0)/Ata(Primary,Master) The blk0 device in the list is the DVD-ROM. The Ata (Advanced Technology Attachment) is the official name that American National Standards Institute group X3T10 uses for what the computer industry calls Integrated Drive Electronics (IDE) in this case, a DVD-ROM. Table 1-1 summarizes the fields that we analyzed for all the entries.
Keep in mind that some of this information, such as the Acpi data, is most often necessary to help analyze the system in the event of a problem. Keep in mind that the file system numbers may change when you remap devices or when components are added or removed, such as a DVD device. There are many more EFI commands that you may want to use in addition to map. Table 1-2 summarizes many of the most used EFI commands. We'll take a look at some of them in the next section.
Using EFI, you can control the boot-related setup on your Integrity server. Because of the number of operating systems you can run on Integrity servers, you'll use this interface often to coordinate and manage them. EFI Command ExamplesAs previously mentioned, traversing the EFI menu structure and issuing commands is straightforward. When the system boots, you are given the option to interrupt the autoboot. (If you don't interrupt it, the autoboot will load the first operating system listed which, in our case, is Red Hat Advanced Server.) At system startup, the EFI Boot Manager presents the boot option menu (as shown in the following output). Here, you have five seconds to enter a selection before Red Hat Linux Advanced Server is started: EFI Boot Manager ver 1.10 [14.60] Firmware ver 1.61 [4241] Please select a boot option Red Hat Linux Advanced Server HP-UX Primary Boot: 0/1/1/0.1.0 EFI Shell [Built-in] Boot option maintenance menu Security/Password Menu Use ^ and v to change option(s). Use Enter to select an option Default boot selection will be booted in 5 seconds You can use the arrow, or the u and d keys, to move up and down respectively. We used the Shell> help List of classes of commands: boot -- Booting options and disk-related commands configuration -- Changing and retrieving system information device -- Getting device, driver and handle information memory -- Memory related commands shell -- Basic shell navigation and customization scripts -- EFI shell-script commands Use 'help <class>' for a list of commands in that class Use 'help <command>' for full documentation of a command Use 'help -a' to display list of all commands When using Linux from a network connection from another system you may have to use the ^ and v to move up and down the menu structure respectively. You can also issue help requests for any EFI commands at any level. For example, if you want to know more about your current cpu configuration, you would start with help configuration to determine the help command for cpu configuration, and then help cpuconfig: Shell> help configuration Configuration commands: cpuconfig -- Deconfigure or reconfigure cpus date -- Displays the current date or sets the date in the system err -- Displays or changes the error level esiproc -- Make an ESI call errdump -- View/Clear logs info -- Display hardware information monarch -- View or set the monarch processor palproc -- Make a PAL call. salproc -- Make a SAL call time -- Displays the current time or sets the time of the system ver -- Displays the version information Use 'help <command>' for full documentation of a command Use 'help -a' to display list of all commands Shell> help cpuconfig cpu Specifies which cpu to configure CPUCONFIG [cpu] [on|off] on|off Specifies to configure or deconfigure a cpu Note: 1. Cpu status will not change until next boot. 2. Specifying a cpu number without a state will display configuration status. Examples: * To deconfigure CPU 0 fs0:\> cpuconfig 0 off Cpu will be deconfigured on the next boot. * To display configuration status of cpus fs0:\> cpuconfig PROCESSOR INFORMATION Proc Arch Processor CPU Speed Rev Model Family Rev State --- ---------- ---- ----- ------ ---- ------------- 0 560 MHz B1 0 31 0 Sched Deconf 1 560 MHz B1 0 31 0 Active Shell> As a result of having issued this help cpuconfig, we now know how to manipulate the CPUs in our system. The following output shows what happens when you issue the cpuconfig command with a few options: Shell> cpuconfig PROCESSOR INFORMATION Proc Arch Processor CPU Speed Rev Model Family Rev State --- ---------- ---- ----- ------ ---- ------------- 0 1000 MHz B3 0 31 0 Active 1 1000 MHz B3 0 31 0 Active Shell> cpuconfig 1 off CPU will be deconfigured on next boot. Shell> cpuconfig PROCESSOR INFORMATION Proc Arch Processor CPU Speed Rev Model Family Rev State --- ---------- ---- ----- ------ ---- ------------- 0 1000 MHz B3 0 31 0 Active 1 1000 MHz B3 0 31 0 Sched Deconf Shell> cpuconfig 1 on CPU will be configured on next boot. Shell> cpuconfig PROCESSOR INFORMATION Proc Arch Processor CPU Speed Rev Model Family Rev State --- ---------- ---- ----- ------ ---- ------------- 0 1000 MHz B3 0 31 0 Active 1 1000 MHz B3 0 31 0 Active Shell> You used cpuconfig to view the current CPU configuration showing that both processors are Active. Then you turned off processor 1 (cpuconfig 1 off). You then viewed the CPU configuration again to confirm that processor 1 had been turned off as indicated by the Sched Deconf (cpuconfig). After that, we turned processor 1 on again (cpuconfig 1 on). Finally, we confirmed that both processors are again Active (cpuconfig). As you can see, a lot of useful configuration information about your system is available using EFI. In addition to cpuconfig, you can also use info to get important system information. The following listing first shows the results of the info command. info, with no argument, lists all the differing information options available (such as all, boot, cache, and so on). After you see all the info options, you use info all to get a complete rundown on your system: Shell> info Usage: INFO [-b] [target] target : all, boot, cache, chiprev, cpu, fw, io, mem, sys, warning Shell> info all SYSTEM INFORMATION Product Name: server rx2600 Serial Number: US24758356 UUID: B831CE57-19C2-11D7-A034-3483D23C4340 PROCESSOR INFORMATION Proc Arch Processor CPU Speed Rev Model Family Rev State --- ---------- ---- ----- ------ ---- ------------- 0 1000 MHz B3 0 31 0 Active 1 1000 MHz B3 0 31 0 Active CACHE INFORMATON Instruction Data Unified CPU L1 L1 L2 L3 --- -------- -------- -------- -------- 0 16 KB 16 KB 256 KB 3072 KB 1 16 KB 16 KB 256 KB 3072 KB MEMORY INFORMATION ---- DIMM A ----- ---- DIMM B ----- DIMM Current DIMM Current --- ------ ---------- ------ ---------- 0 256MB Active 256MB Active 1 256MB Active 256MB Active 2 256MB Active 256MB Active 3 256MB Active 256MB Active 4 ---- ---- 5 ---- ---- Active Memory : 2048 MB Installed Memory : 2048 MB I/O INFORMATION BOOTABLE DEVICES Order Media Type Path ----- ---------- --------------------------------------- 1 HARDDRIVE Acpi(HWP0002,100)/Pci(1|0)/Scsi(Pun0,Lun0)/ HD(Part1,Sig8E89981A-0B97-11D7-9C4C-AF87605217DA) 2 HARDDRIVE Acpi(HWP0002,100)/Pci(1|0)/Scsi(Pun1,Lun0)/HD(Part1,Sig7C0F0000) Seg Bus Dev Fnc Vendor Device Slot # # # # ID ID # Path --- --- --- --- ------ ------ --- ----------- 00 00 01 00 0x1033 0x0035 XX Acpi(HWP0002,0)/Pci(1|0) 00 00 01 01 0x1033 0x0035 XX Acpi(HWP0002,0)/Pci(1|1) 00 00 01 02 0x1033 0x00E0 XX Acpi(HWP0002,0)/Pci(1|2) 00 00 02 00 0x1095 0x0649 XX Acpi(HWP0002,0)/Pci(2|0) 00 00 03 00 0x8086 0x1229 XX Acpi(HWP0002,0)/Pci(3|0) 00 20 01 00 0x1000 0x0030 XX Acpi(HWP0002,100)/Pci(1|0) 00 20 01 01 0x1000 0x0030 XX Acpi(HWP0002,100)/Pci(1|1) 00 20 02 00 0x14E4 0x1645 XX Acpi(HWP0002,100)/Pci(2|0) 00 40 01 00 0x1011 0x0019 03 Acpi(HWP0002,200)/Pci(1|0) 00 80 01 00 0x1011 0x0019 01 Acpi(HWP0002,400)/Pci(1|0) 00 E0 01 00 0x103C 0x1290 XX Acpi(HWP0002,700)/Pci(1|0) 00 E0 01 01 0x103C 0x1048 XX Acpi(HWP0002,700)/Pci(1|1) 00 E0 02 00 0x1002 0x5159 XX Acpi(HWP0002,700)/Pci(2|0) BOOT INFORMATION Monarch CPU: Current Preferred Monarch Monarch Possible Warnings ------- --------- ----------------- 0 0 AutoBoot: ON - Timeout is : 10 sec Boottest: BOOTTEST Settings Default Variable OS is not speedy boot aware. Selftest Setting --------- -------------- early_cpu Skip this test late_cpu Skip this test platform Skip this test chipset Skip this test io_hw Skip this test mem_init Skip this test mem_test Skip this test LAN Address Information: LAN Address Path ----------------- ---------------------------------------- Mac(00306E39B724) Acpi(HWP0002,0)/Pci(3|0)/Mac(00306E39B724)) *Mac(00306E3927B0) Acpi(HWP0002,100)/Pci(2|0)/Mac(00306E3927B0)) FIRMWARE INFORMATION Firmware Revision: 1.61 [4241] PAL A Revision: 7.31 PAL B Revision: 7.36 SAL Spec Revision: 0.20 SAL A Revision: 2.00 SAL B Revision: 1.60 EFI Spec Revision: 1.10 EFI Intel Drop Revision: 14.60 EFI Build Revision: 1.22 POSSE Revision: 0.10 ACPI Revision: 7.00 BMC Revision 1.30 IPMI Revision: 1.00 SMBIOS Revision: 2.3.2a Management Processor Revision: E.02.07 WARNING AND STOP BOOT INFORMATION CHIP REVISION INFORMATION Chip Logical Device Chip Type ID ID Revision ------------------- ------- ------ -------- Memory Controller 0 122b 0022 Root Bridge 0 1229 0022 Host Bridge 0000 122e 0032 Host Bridge 0001 122e 0032 Host Bridge 0002 122e 0032 Host Bridge 0003 122e 0032 Host Bridge 0004 122e 0032 Host Bridge 0006 122e 0032 Host Bridge 0007 122e 0032 Other Bridge 0 0 0002 Other Bridge 0 0 0007 Baseboard MC 0 0 0130 Shell> As you can see, info all produces a great overview of the system configuration. Note that two bootable devices are listed in the order in which they appear in the main EFI screen (see the "EFI Boot Administration Main Screen" on page 5). In addition to selecting the EFI Shell, which we have been doing in our examples to this point, we also have other options. Selecting Boot option maintenance menu produces the selections shown here: EFI Boot Maintenance Manager ver 1.10 [14.60] Manage BootNext setting. Select an Operation Red Hat Linux Advanced Server HP-UX Primary Boot: 0/1/1/0.1.0 EFI Shell [Built-in] Reset BootNext Setting Save Settings to NVRAM Help Exit You have some of the same selections that you had at the main menu level, including the two installed operating systems and the EFI shell, but you also have some new selections. If you were to select Reset BootNext Setting, the following selections would be produced: EFI Boot Maintenance Manager ver 1.10 [14.60] Main Menu. Select an Operation Boot from a File Add a Boot Option Delete Boot Option(s) Change Boot Order Manage BootNext setting Set Auto Boot TimeOut Select Active Console Output Devices Select Active Console Input Devices Select Active Standard Error Devices Cold Reset Exit At this point, you could perform a variety of functions. On your system, for instance, we could use Change Boot Order to make the HP-UX partition the default boot selection instead of the Linux Advanced Server. Although you are going to perform a console-only installation of Red Hat Advanced Server in Chapter 2, the rx2600 we're working on does indeed have a built-in VGA port and graphics display attached. If you wanted to enable the graphics display, we would select Select Active Console Output Devices from the menu above. The Select the Console Output Device(s) menu appears listing all possible console devices. The first device with an * is the serial port that was selected by default. To enable the graphics as well, you must select the last console device. You know that this is the graphics device port because it does not contain Uart as part of the selection. Note that Uart devices are always serial devices. Also note that in the following example, the graphical device port is already selected (indicated by an * in front of it). We then select Save Settings to NVRAM, which saves the console device settings, and then exit: EFI Boot Maintenance Manager ver 1.10 [14.60] Select the Console Output Device(s) Acpi(PNP0501,0)/Uart(9600 N81)/VenMsg(PcAnsi) Acpi(PNP0501,0)/Uart(9600 N81)/VenMsg(Vt100) Acpi(PNP0501,0)/Uart(9600 N81)/VenMsg(Vt100+) Acpi(PNP0501,0)/Uart(9600 N81)/VenMsg(VtUtf8) Acpi(HWP0002,700)/Pci(1|1)/Uart(9600 N81)/VenMsg(PcAnsi) Acpi(HWP0002,700)/Pci(1|1)/Uart(9600 N81)/VenMsg(Vt100) * Acpi(HWP0002,700)/Pci(1|1)/Uart(9600 N81)/VenMsg(Vt100+) Acpi(HWP0002,700)/Pci(1|1)/Uart(9600 N81)/VenMsg(VtUtf8) * Acpi(HWP0002,700)/Pci(2|0) Save Settings to NVRAM Exit This setting enables both the serial and graphics consoles. The early boot messages will go to the serial console. After the graphics server is started, the Advanced Server-related boot messages will display graphically. After the installation is complete, this would be true during the load of Advanced Server as well. The early selections would take place on the console and then the majority of the load selections would display graphically. The first four entries with PNP0501 in them are on the nine pin serial port. The next four entries with HWP0002 in them are on the three cable device that fits into the 25 pin connector. Be sure to enable a serial console on only one of the two devices since the Linux kernel expects only one serial console to be enabled. As you have seen, EFI is a useful and relatively easy to use tool. Of course, no one expects you to remember all you have seen here. If you need help, refer to "Commonly Used EFI Commands" on page 9 in Table 1-2. You can also type help at the Shell> prompt, or take a look at the tables summarizing EFI at the end of this chapter. Between them all, you'll be able to perform many useful functions using the EFI interface. | ||||||||||||||||||||||||||||||||||||||||||||||||||||||||||||||||||||||||||||||||||

 key (down arrow) to select
 | < Day Day Up > |
EAN: 2147483647
Pages: 100