| The manual processes noted in the previous section showed what is involved in manually enabling security in a Windows and Exchange environment. Beyond the complexity of users having to perform critical system tasks to enable and access secured information, the security provided by these manual methods is not even that good. A simple compromise of a shared key can invalidate the security of files, access systems, and secured communications. The better method is to use a certificate-based security system using encryption to provide a significantly higher level of security. Additionally, by automating the process, users do not have to be involved in the encryption, transport, or communications between their laptop or desktop, and the network. This section covers the creation of a certificate of authority server system that issues certificates and the process known as autoenrollment of certificates that automatically issues certificates to users and computers in a Windows 2003 Active Directory environment. Note This section assumes that you have a Windows 2003 server that has been fully patched with the latest Windows 2003 service pack and updates and that the server is connected to a Windows 2003 Active Directory network. If you are creating this system in a limited lab environment, the certificate server can be added on the same server system as the global catalog server so that a single domain controller and certificate server can be used.
Adding the Certificate Service to a Server The Certificate Service is the Windows service that allocates certificates to be issued to users and computers. It is nothing more than a service added to an existing Windows 2003 server system. To install the Certificate Service to a system, do the following: 1. | On the server that will become your certificate server, click on Start | Settings | Control Panel.
| 2. | Double-click on Add or Remove Programs, and then click on Add/Remove Windows Components.
| 3. | Select the check box for Certificate Services. The warning note that pops up will inform you that once you install Certificate Services on this system, you cannot change the server name or domain membership. Assuming you are okay with this, click Yes to continue.
| 4. | If you have not installed IIS Web Services on this system yet, in the Windows Components screen, highlight Application Server and click on Details.
| 5. | Select the Internet Information Services (IIS) check box, and then click OK. Then click Next to begin the installation of the Certificate Services and IIS components.
| 6. | Assuming this is the first certificate server in your environment, choose Enterprise Root CA for the type of certificate of authority server, and then click Next.
| | | 7. | For the common name for this CA, enter a name. Typically, the name of the server is selected; however, a distinguishable name such as xyzCertServer (where xyz is a short name of the company) can help identify the certificate server in the future.
| 8. | Leave the Distinguished Name Suffix and the Validity Period as is. The CA Identifying Information page should look similar to what is shown in Figure 8. Then click Next.
Figure 8. Certificate identifying information settings. 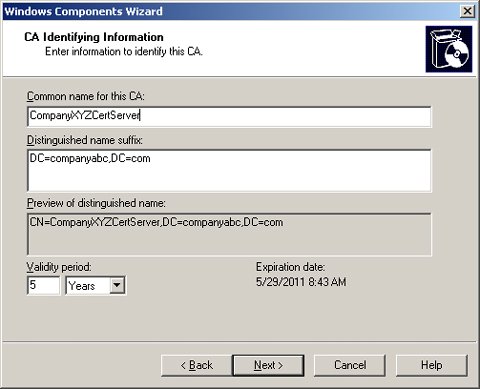
| 9. | Click Next through the defaults of the Certificate Database Settings page (click Yes through the warning that IIS must be temporarily stopped). Click Finish after the installation of the component files has been completed.
|
Configuring Autoenrollment of Certificates After the certificate service has been installed on the system, the administrator of the network can issue certificates to users and computers. However, rather than manually generating and issuing certificates, the best practice is to have the certificate server automatically issue certificates to users and computers in Active Directory. This is known as autoenrollment of certificates. Autoenrollment of certificates requires the following: 1. | A certificate template needs to be created.
| 2. | The template needs to be added to the Certificate of Authority server.
| 3. | A group policy needs to be created to automatically deploy the certificate to the user or computer.
|
With autoenrollment of certificates, rules are created that define which certificates should be issued to a user or computer. For example, a rule can be created for the autoenrollment of a certificate, allowing a user to have her certificates automatically created for the encryption of data files. With autoenrollment of encrypted files, the user can simply save files to a shared location, and the files stored in that location will be encrypted. To have certificates automatically installed for the users in Active Directory, do the following: 1. | On the certificate server you just created, launch the Certificate Template Microsoft Management Console (MMC) by clicking Start | Run and typing mmc.exe; then click OK.
| 2. | Click File | Add/Remove Snap-in, and then click Add.
| 3. | Select Certificate Templates, and then click Add.
| 4. | Click Close, and then click OK.
| 5. | Click on the Certificate Templates folder.
| 6. | Right-click on the User Template and select Duplicate Template.
| 7. | For the Template Display Name, enter AutoEnroll User.
| | | 8. | Make sure the Publish Certificate in Active Directory and the Do Not Automatically Reenroll If a Duplicate Certificate Exists in Active Directory options are both checked. The screen should look similar to Figure 9.
Figure 9. Creating the AutoEnroll user template. 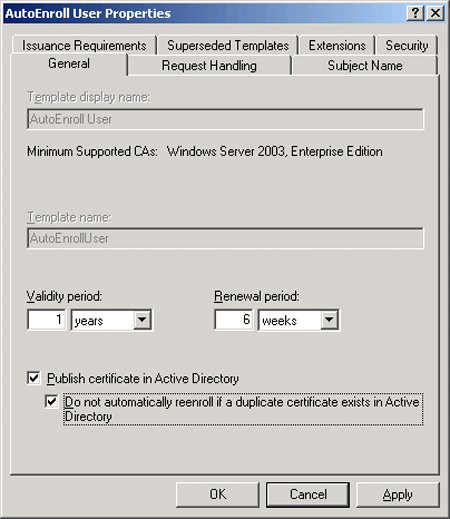
| 9. | Click on the Security tab.
| 10. | Highlight the Authenticated Users Name and select the check boxes to Allow for Enroll and Autoenroll for the Authenticated Users. The result will have the Read, Enroll and the Autoenroll checkboxes selected.
| 11. | Click OK.
|
Adding the Template to the Certificate Server Once the AutoEnroll user template has been created, the template needs to be added to the certificate server and distributed to users. This is done by the following: 1. | Launch the Certification Authority Microsoft Management Console (MMC) by clicking Start | Run and typing mmc.exe; then click OK.
| 2. | Click File | Add/Remove Snap-in, and then click Add.
| 3. | Select the Certification Authority snap-in and then click Add. Assuming you are on the certificate server, select Local Computer, and then click Finish.
| 4. | Click Close, and then click OK.
| 5. | Expand the Certification Authority folder.
| 6. | Expand the folder for your Certificate Server.
| | | 7. | Right-click on the Certificate Templates folder and select New | Certificate Template to Issue.
| 8. | Highlight the AutoEnroll user template, and then click OK.
|
Note This step of adding the AutoEnroll user template you created earlier adds this new template to the certificate server. The AutoEnroll user template allows user certificates to be issued automatically through Group Policy.
Creating a Group Policy to Distribute User Certificates The next step for autoenrollment is to create a group policy that can then distribute user certificates to the users' laptops and desktops automatically. This is done by creating a group policy and having the group policy distribute the certificates created in the previous step. To create this group policy, do the following: 1. | Launch the Active Directory Users and Computers tool by selecting Start | Programs | Administrative Tools and choosing Active Directory Users and Computers.
| 2. | Right-click on the forest name of the network (such as companyabc.com) and choose Properties.
| 3. | Click on the Group Policy tab.
| 4. | Highlight the Default Domain Policy and click Edit.
| 5. | Under the User Configuration container, expand the Windows Settings folder.
| 6. | Expand the Security Settings folder and then click to select the Public Key Policies folder. You will see an object type named Autoenrollment Settings, as shown in Figure 10.
| 7. | Right-click the Autoenrollment Settings object and select Properties.
| | | 8. | Check the Renew Expired Certificates, Update Pending Certificates, and Remove Revoked Certificates options as well as the Update Certificates That Use Certificate Templates option. Then click OK.
Figure 10. Expanding folders to access the Autoenrollment Settings object. 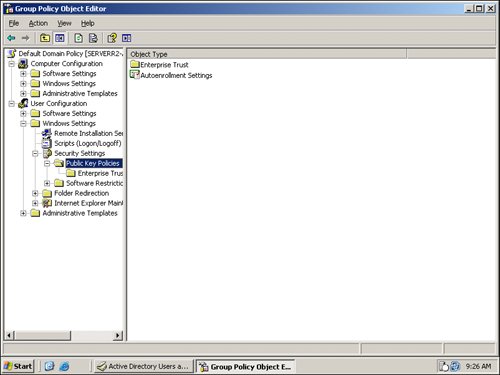
|
Validating That Certificates Are Working Properly The autoenrollment of user certificates has now been configured for all users that log on to the domain. To validate that certificates are working properly, do the following: 1. | From a Windows XP workstation, log on to the domain.
| 2. | Launch the Certificates Microsoft Management Console (MMC) by clicking Start | Run and typing mmc.exe; then click OK.
| 3. | Click File | Add/Remove Snap-in, and then click Add.
| 4. | Select Certificates Snap-in and then click Add. Assuming you logged in as the user and you want to verify that certificates are working, choose My User Account, and then click Finish.
| 5. | Click Close, and then click OK.
| 6. | Expand the Certificates Current User folder.
| 7. | Expand the Personal folder and click to highlight the Certificates folder.
| | | 8. | You should have a Client Authentication certificate created by the AutoEnroll User certificate template, as shown in Figure 11.
Figure 11. Certificate automatically added to the user's Certificates folder. 
|
The autoenrollment of certificate process will be covered in each of the following sections for the autoenrollment and distribution of certificates for file encryption, transport encryption, wireless encryption, and email encryption. |