5.11. Themes If you ask Apple, the most important new feature in iMovie 6 may be the introduction of themes : predesigned, animated opening, closing and credits sequences (complete with text and graphics) that you can use to punctuate the sections of a movie. They're ready to use; all you have to do is drag some of your own photos or movie clips into designated "holes" in the themes' graphic design, thus tailoring them to your particular movie. For example, the Road Trip opening begins with a closeup of a couple of travel photos lying on a cluttered desk. (These are photos that you've suppliedin fact, they can be videos if you prefer.) The camera swoops across the desk to a closed scrapbook, which magically opens by itself to reveal more of your photos. The camera now pans across to the facing page to a final photo, and zooms into it until the "photo" fills the screen and begins to play, as a video. Your iMovie has begun. To check out the available themes, click the Themes button (Figure 5-14). At the top of the pane, a pop-up menu lists all five of the standard iMovie 6 themes: Travel, Road Trip, Pass Through, ReflectionWhite, and ReflectionBlack.
Tip: iMovie's themes match five of the latest themes in iDVD. The idea, of course, is that you can now make your movie's intro, chapter, and credits sequences match the main menus of the finished DVD.
Figure 5-14. What you can't see in this picture is that the "camera" is actually moving. It's panning across the map and the photos. Backed up by some choice funky guitar music, you've got yourself a killer opening sequence.
Of course, those empty gray rectangles will look a lot more interesting when filled with your own pictures or videos. 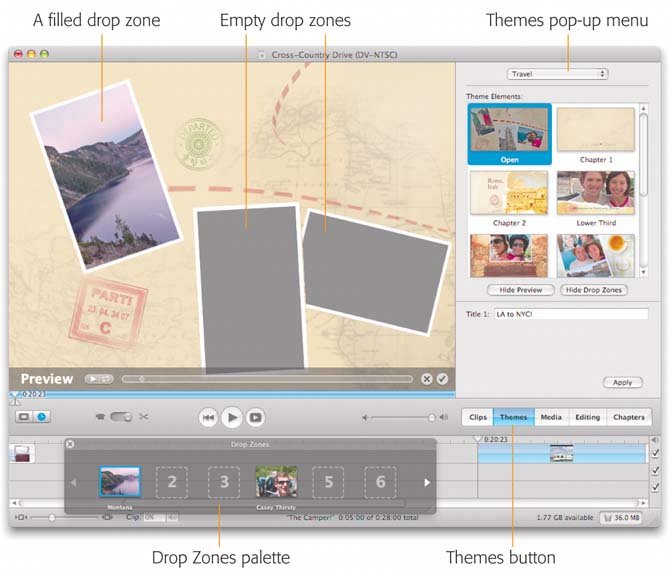
When you make a selection from this pop-up menu, a handful of thumbnail images appear in the Themes pane. They represent the various related animations that you can use at various spots in your movie. For example, among them, you'll find these categories: -
Open . "Open" is short for "Opening," as in opening title sequence. In most Open animations, the camera flies across some photos or videos that represent important moments in the movie that's to come, and finally comes to rest on a "card" that identifies the name of the movie. -
Chapter . Use these short, snappy animations to introduce new sections of your moviethe various cities you visited on a trip, for example. If your movie's ultimate destination is a DVD, you can set them up so that they correspond to the DVD "chapters" (scene markers) of your movie. -
Lower Third . "Lower Third" is TV jargon for an identifying credit that appears on the lower third of the screen, beneath the subject's face. On the evening news, it might say "Casey T. McGillicuddy, CEO." In your iMovie, it could serve to introduce a new character, place, or event. -
Bumper . In TV-land, a bumper is the last thing you see before the commercial. You know: "Coming up: A rose ceremony like you've never seen before!"accompanied by a tiny, titillating piece of sneak -preview footage. It's not especially likely that your home movies will have commercials, of course. But Apple gave you a few bumper templates just in case. -
Credits . You can use iMovie's Titles feature (Chapter 7) to create opening or closing credits, no problem. But these templates add something a little extra: the ability to see a photo (or memorable scene) of the characters as their names appear, to help jog the audience's memory. Each Credits theme has room for only two movie stars at most, though. You'll have to string several together if you want to exhibit more than the two biggest stars. Here's how you use themes. -
Click the Themes button. From the pop-up menu at the top of the Themes pane, choose a theme style . For example, choose Road Trip. (Behind the scenes, iMovie stores two different versions of each theme: one for widescreen productions , and another for standard-TV shape projects. It chooses the appropriately shaped theme automatically.) -
Click a thumbnail to get a feel for the style and duration of the animation . In the Monitor window, you see a full-scale preview of the effect. You can control its looping, start and stop its playback, and otherwise take command of this preview exactly as described in Section 6.3. You can't help noticing, however, the big gray rectangles that seem to occupy most of the screen (Figure 5-14). These are drop zones placeholders for photos and videos you're supposed to supply. (If you're familiar with iDVD, you already know about drop zones; they're a big part of that program, too.) As you can see in Figure 5-14, a floating palette also appears when you click a thumbnail. It's called the Drop Zones window, and its little rectangular "wells" are stand-ins for the various big gray rectangles that are now flying by in the animation. Your job is to fill up each of these wells, thereby filling in the gray rectangles with your own pictures and video. -
Drag photos or videos into the Drop Zones window wells . To populate a well with a still photo, click the Media button, then the Photos button, and proceed as shown in Figure 5-15.
Tip: If the picture you want isn't in iPhoto, you can also switch to the Finder, locate a graphics file, and drag it directly into the iMovie window, right into a Drop Zone window well.
Figure 5-15. Here's your iPhoto collection. Use the Search box, album list, and other tools of this mini-iPhoto to locate the photo you want. Then drag its thumbnail directly onto one of the wells in the Drop Zone window. If the well was empty, it's now occupied by the picture; if the well already had something in it, the picture now replaces that something. 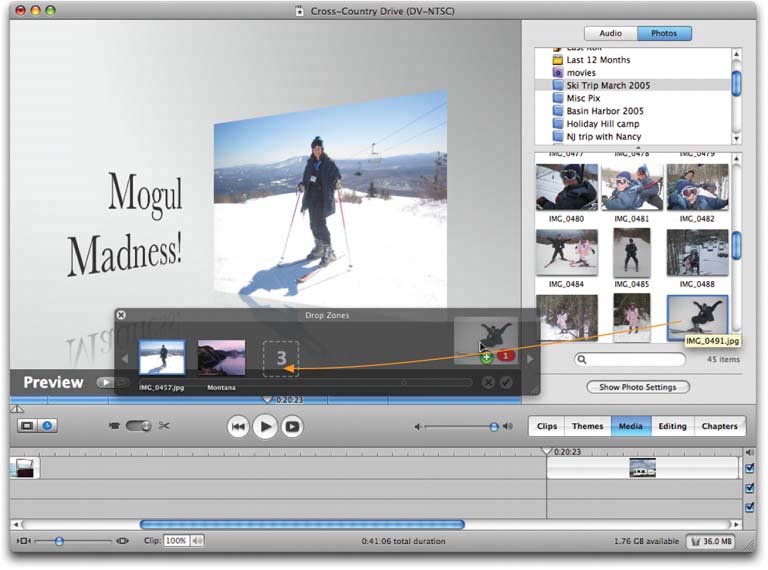 If you'd rather fill a drop zone with actual moving video, click the Clips button, find the clip, and drag it onto a Drop Zone window well. In fact, you can drag a movie's icon from anywhere fine video clips are found: the Movie Track, the Finder, or even another iMovie project that you open at this point. (The Drop Zone window helpfully remains open on the screen, even when you're in a different project.) If you change your mind about something you've dropped into a Drop Zone, you can remove it by clicking its well in the Drop Zone window and then pressing the Delete key (or just dragging the thumbnail out of the well). Or you can drag a new photo or video clip right on top of it, thereby replacing the one you don't want. -
Type new text into the Title boxes, if any . Some of the theme elementsOpenings, Lower Thirds, and Credits, for exampleinclude text boxes that you can fill in with names or titles. (You can't control the type size or font selections; that's all part of the theme design.) In the Pass Through theme, this step is particularly important. Whatever you type into the Title 1 box will become the theme: these words will slide across the screen at gigantic size, big and bold, as cutouts through which the audience can see your photo or video. -
When everything looks good, drag the theme element's thumbnail (the icon called Open, Chapter 1, Bumper, or whatever) directly down into place on the Movie Track . iMovie renders the animation, incorporating your photos and video clips into the existing theme template. After a minute or so, the finished video clip appears. (Instead of dragging the thumbnail, you can also click Applybut that puts the finished clip at the end of the movie, and requires that you drag it back into its rightful position in the Movie Track.) At this point, your theme acts like any other video clip. You can chop off the beginning or the end (by dragging its end points inward in the Timeline Viewer), speed it up or slow it down (by using the Fast/Slow/Reverse effect described in Section 6.7.7), superimpose more text onto it (using titlessee Chapter 7), tint or distort it (Section 6.7.16), delete it (highlight it and press the Delete key), and so on. For best visual results, use theme elements from just one family in each movie. For example, use only the Road Trip elements, or only the Reflection elements. You'll also find that themes are the most effective when you add the same piece of music to each one, giving them both visual and sonic unity.  |