4.9. Magic iMovie Nobody disputes that music, titles, and crossfades make movies look a heck of a lot better. But let's face it: Millions of people wind up taking camcorder movies, and then never looking at them again. Editing and spicing up those movies is great, but it's work . And it takes a lot of time. In an effort to solve that problem, iMovie HD offers something called the Magic iMoviea completely automated movie-assembly feature. You literally connect the camcorder, choose File  Make a Magic iMovie, choose the music and options you want, and then walk away. Without any further attention from you, the program rewinds the tape, creates an opening title, imports all the footage, adds transitions between shots, backs it all up with music that you choose (at a volume level you specify), and, if you like, hands off the result to iDVD for quick burning to disc, complete with scene-selection buttons for easy navigation. Make a Magic iMovie, choose the music and options you want, and then walk away. Without any further attention from you, the program rewinds the tape, creates an opening title, imports all the footage, adds transitions between shots, backs it all up with music that you choose (at a volume level you specify), and, if you like, hands off the result to iDVD for quick burning to disc, complete with scene-selection buttons for easy navigation. Magic iMovie is ideal, in other words, in situations like these: -
The alternative is leaving the video untouched on the original tape. The simple grace notes added by Magic iMovieeven adding an opening title to identify the footagemake the movie much more watchable than the unedited original. -
You've just captured footage of somethinga wedding , a graduation, a school danceand you want to put something together quickly that you can play at the reception immediately afterward. -
You realize that Magic iMovie can serve as a starting point, with a lot of the grunt work done for you. Afterward, you can pick through the scenes, deleting the ones you don't need, changing or removing the transitions that don't seem right, and adjusting music volume levels, without having to do the whole thing from scratch. -
You feel that a DVD is a much better long- term storage depository than a tape, and you'd like Magic iMovie to automate the transfer for you. Magic iMovie is, however, a fairly limited tool. It was designed to automate things for you, which means that it doesn't give you a lot of options. Here are some things you should be aware of: -
Magic iMovie creates a transitionfor example, a crossfadeout of every single camcorder shot, even if there are several shots in a row of the same subject. (Of course, it's easy enough to delete these transitions later. Or just turn off the Transition checkbox if you don't want them.) -
You have little control over the specifics of the things the Magic iMovie feature adds, like the length of the transitions, the font of the title, and so on. Here again, of course, you can always adjust these manually after the deed is done. -
Left to its own devices, Magic iMovie always imports the entire contents of the cassette; it rewinds the tape before it begins. (There is a workaround, though, as you'll read in a moment.) Now that you understand what to expect from Magic iMovie, here's how it works: -
Choose File Make a Magic iMovie . From the top of the iMovie window, the options box shown in Figure 4-11 appears. (Alternatively, you can close all iMovie windows and then click the Make a Magic iMovie button on the Create Project dialog box.) -
Type a name for the movie . Whatever you type into the "Movie title" box is what will appear on the opening credit, as white text against a black background. -
Specify start and end points . If the tape is already cued up to the right starting point, do nothing. But if you like, you can turn on "Rewind the tape" to make iMovie rewind the camcorder before importing the video. Figure 4-11. Magic iMovie will do your bidding, but first you have to spell out what, exactly, your bidding is.  You can also tell iMovie how many minutes' worth of video you want it to import by turning on the "Stop capturing after __ minutes" checkbox. (Both of these options are new in iMovie 6, and a big improvement; the previous version insisted on importing the entire cassette every time.) -
Choose a transition style, if you like . If you like the idea of smooth crossfades between the shots of your video, make sure the "Use ____ transitions" checkbox is turned on, and then choose the transition style you want from the pop-up menu. Your options are Circle Opening, Circle Closing, Cross Dissolve, Overlap, Push, Radial, Scale Down, and Random. (You can read much more about transitions, including descriptions of these effects, in Chapter 6.) -
Specify what music you want to play as the soundtrack, if you want one . If you'd just like to use the audio captured by the camcorder, turn off the "Play a music soundtrack" checkbox. But if you want to try some background music (you can always remove or adjust it later), click Choose Music. Now the dialog box shown in Figure 4-12 appears, revealing the contents of your entire iTunes music library. Use the pop-up menu at the top to choose a playlist, if you like, from which to choose the songs you want. Figure 4-12. Drag songs from the left-side list (your iTunes collection) to the rightside list (your Magic iMovie soundtrack). Drag them up or down to rearrange them in the right-side list. The volume slider beneath the list lets you control the volume of the music relative to the camcorder audio. At the far-right setting, you hear only the music, which can give your movie a sweet, emotional overtone. 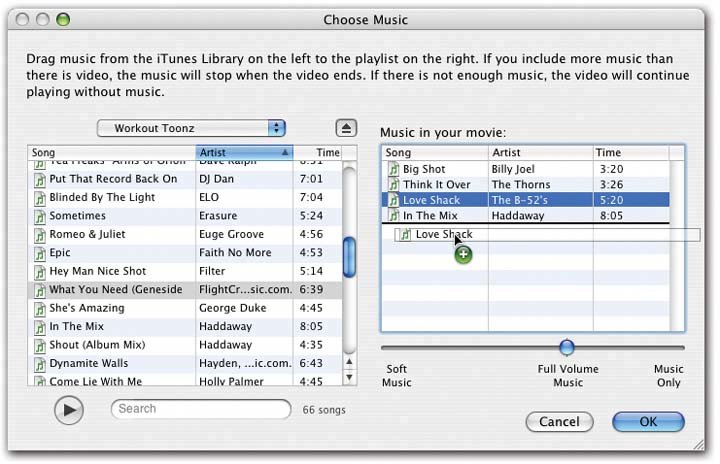 In any case, Figure 4-12 shows you how to take it from here. Just remember that if you don't choose enough music to "cover" all the video, the music will just stop short in the middle. (If you choose too much music, the music will end with the video.) Click OK when you're finished setting up the music. -
Indicate whether you want iMovie to send the completed movie to iDVD in readiness for burning to disc . At that point, you'll still have to choose a DVD-menu design theme, preview the result, insert a blank DVD, and so on (see Chapter 15). But the work of adding chapter markers and opening a DVD itselfusually a minute-long waitwill at least be handled for you. And if you don't want iMovie to hand off the result to iDVD, turn off the "Send to iDVD" checkbox. -
Click Create . iMovie whirls into action.
Tip: You can stop the importing process before Magic iMovie reaches the end of the designated period (or the end of the tape) by turning off the camcorder at that spot.
Each individual step of this process takes just as long as if you did it manually. iMovie must still import the video in real time, render (process) every transition, and so on. Figure 4-13. The new Time Lapse feature is great for capturing nature's most dazzlingbut most boring-to-watchdisplays, like clouds passing, flowers blooming, or Microsoft coming out with a new version of Windows.
When you turn on the feature (lower left), you're offered the opportunity to specify how much time compression you want (top).
Note that iMovie does not, in fact, record audio in time-lapse mode if you're recording live from an iSight camera or a high-def. You do get sped-up audio if you're importing from a DV tape.
Bottom: When you're recording into an iSight-formatted project, you can opt to have a date and time stamp embedded into the captured videoa great technique for security videos , science experiments, and other informational projects.
The box on the next page has details. 
The beauty of this method, though, is that you don't have to be there. You can be working in another program, or even another part of the house, as iMovie chugs away unattended. (Then again, if you're a first-time iMovie maker, sticking around to watch the process may help to give you an idea of how the general iMovie workflow goes.) POWER USERS' CLINIC
The Time-Lapse Date Stamp | | If you really think about it, the new Time Lapse option was born for the iSight camera. Here, after all, is a video camera with no tape to run out, and no battery to run dry ( assuming your Mac is plugged in). You could use this setup to capture days' worth of footage, for scientific, documentary , security, or fun purposes. That's why, if you're recording from an iSight camera, you get some additional options in the Time Lapse sheet, as shown here. (Actually, just recording from an iSight camera doesn't do the trick; you have to be recording into an iSight-formatted project . That is, when creating the project, you have to choose iSight as the video format as described in Section 4.3.4.) For starters, iMovie offers to stamp the time and date onto the video, as shown in Figure 4-13. The pop-up menus let you choose the size of type and where it should appear on the video (which corner of the frame). If you want to change how the time and date stamps appearU.S. vs. European style, , for examplechoose  System Preferences, click International click Formats, click Customize, and adjust the Short date and time versions. System Preferences, click International click Formats, click Customize, and adjust the Short date and time versions. Now, a warning: this time stamp becomes a permanent part of the footage. It's not like an iMovie title, whose font, color , and position you can adjust later. But what if you want to fiddle with the font, color, and other parameters? If you're technically brave and promise not to blame Apple if something goes wrong, here's how. First, duplicate the iMovie program in your Applications folder. Call the second one iMovie Doctored, or something. Control-click (or right-click) the iMovie Doctored icon. From the shortcut menu, choose Show Package Contents. Open the Contents Resources English.lproj folder. Using a program like TextEdit, open the file called Localizable.strings. Search for the text Timelapse-font about half way down the file. By carefully editing the 12 entries there, you can customize the font, color, and size of the time stamp. You'll see the effect after you save your changes and open the hacked iMovie. (If anything goes wrong, you still have the original version.) All rightso you've read this box and you really wish you could have a timestamp from your camcorder , not just iSight. There is a waybut it's technical, undocumented, and definitely not endorsed by Apple. Open Terminal (in your Applications Utilities folder). Type exactly this command defaults write com.apple.iMovie allowDVwithSG -bool yes and press Enter. Now a standard DV camcorder will show up even in iSightformat projects, so that you can use the time-stamp options. You'll encounter glitchesyour camcorder may be listed twice, and some frames may be droppedbut at least you'll get the time stamp! To turn off this feature, return to Terminal and type the same command, but make the last word no instead of yes . Then press the Enter key. 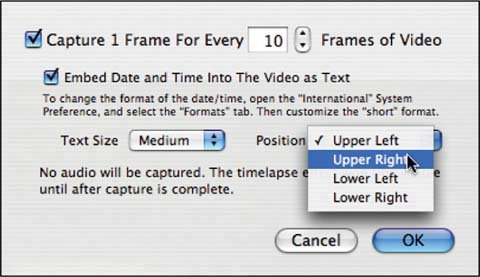 |
The important thing to remember is that the resulting iMovie project is fully editable; there's nothing holy about any of the creative decisions that iMovie makes. You can still chop out clips you don't want, remove or edit some transitions, add or remove chapter markers, and so on.  |